Not The Same Anon, But Hyacinths Please
Not the same Anon, but hyacinths please
Hi friend, thank you so much for your interest! I’m going to go over how I draw these flowers, but I realized midway that I’m actually very terrible at drawing these in particular, haha. There’s a reason I’ve lowkey avoided doing them so far, and I think it enabled me to highlight a bit more, the way I choose my arts.
It’s quite hard to teach just “how to draw a specific flower” mostly because I myself don’t know - the most important thing I can emphasize is using references!

I personally dislike drawing these flowers in my art, and I couldn’t figure out why until I started this tutorial.
One thing I tend to notice when I look at reference pictures is how flowers move as a ‘whole’ and their relative ‘flexibility’. I pay attention to that because the way I do art, I choose the flower in part based on appearance and how natural they will look in a specific composition.

I tend to like flowers that sprout outwards and have a kind of ‘loose’ appearance. The red lines here show the ‘direction’ I want the flowers to go in.

This is where these flowers pose a bit of a problem. Because arranged in clumps, they are very stiff. It’s not a bad thing if that’s what you’re looking for, but it’s not what I wanted, exactly, for this image.

They just stick straight up, because they have very stiff leaves and a tight packed pattern. (They sometimes tilt though, mine always did). At this point, I could decide the form isn’t right, and this isn’t the flower I want. But there’s also another thing I could do, which is altering it’s appearance when I draw it, slightly.

Left is a simplified version of the shape, while the middle is a more detailed image. The furthest to the right is a close-up of a single flower. Depending on what you want to portray, you can choose to alter what you want your flowers to look like.

As you can see, when drawn closer up, the flower has a lot more flexibility!

So with this, I ended up drawing the batch of flowers a lot larger than how it would be normally, while still retaining the recognizable flower and leaf shape.
So what I’m trying to convey is that sometimes you have to study references, but then know you can pick and choose what aspects to highlight in your art. That’s I think, how you can get your flowers to look extra ‘dynamic’ in your work - by accentuating their specific shapes to work to your advantage! And also playing with their colors and such! But hyacinths come in so many colors that any would work!
I hope this is helpful to you, anon!
More Posts from Nastysynth and Others
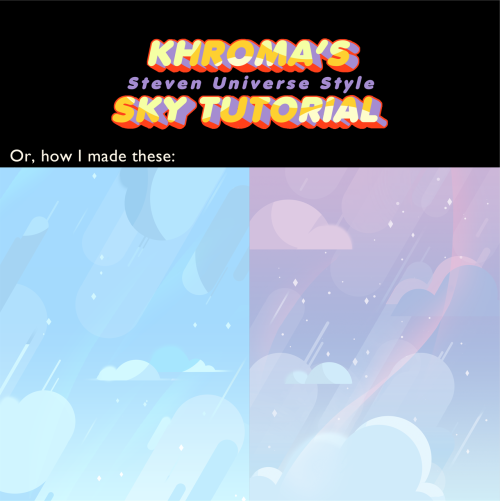
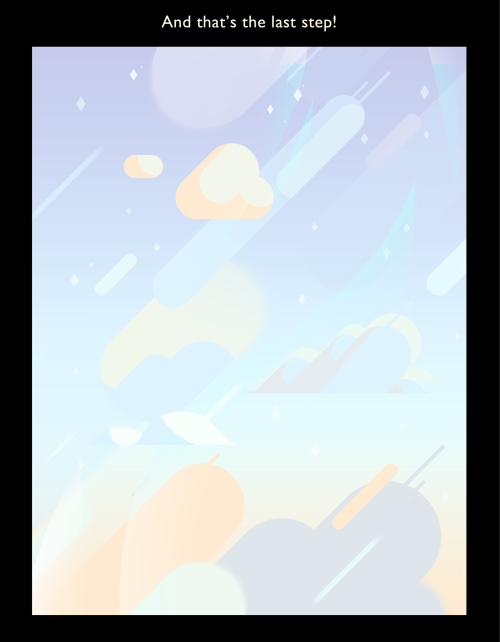
In conclusion, obrounds.
Sorry for the long post (I think it’s most legible in this format but yikes it’s long)


It has been literal years since I've done a tutorial.
Nobody actually asked for this, but for the first picture I did with this type of lighting I actually went and looked up some tutorials online... and couldn't really find any. So a lot of what I did in the first picture I used this type of light was me just throwing spaghetti at the wall.
I figured it out a little more in the second picture, and then I thought: y'know i would've liked to have a tutorial like this in the first place to get a good starting point for myself. So I made one. it is yours now. do what you want with it.


Pearl is one of my favorite characters from cartoons.

If everything is prioritized, nothing is prioritized.
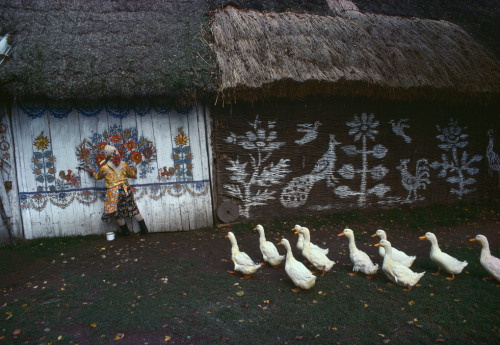
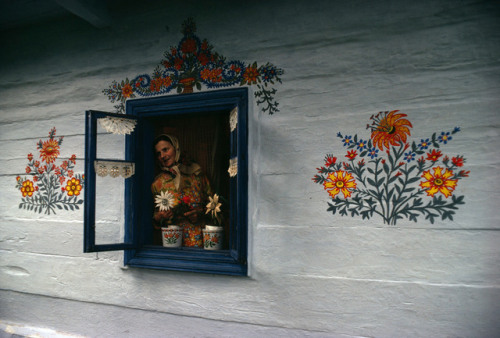
Zalipie, the “painted village” near Ternow. Houses are completely painted on the inside and outside by their owners. 1976.
Location: Zalipie, Poland
Photographer: Bruno Barbey

i am SO sorry for the super long response, but i thought this might make a nice little tutorial opportunity, since soft body physics can be… frustrating, to say the least. i’ve noticed that it tends to respond better to spherical meshes than most others, so getting it to work with something with a lot of hard edges and flat planes can be a little tricky (at least in my experience).
so! to get started, here’s my basic setup

the only thing i’ve done so far is place my object in the scene, along with a plane to act as the ground and a camera to record everything.
next you want to select your object, and in the properties menu on the right, select the physics tab (should be the very last one, the icon looks like a bouncing ball)

and for your object, you want to apply a collision and a soft body modifier (some people use rigid body instead of collision, so if you have issues with one there’s a chance the other might work out better. as for me, i usually stick to collision)

then select your plane and apply the collision modifier only.
now when you hit the play button at the bottom of the screen, this happens

it’ll just kinda float in place.
so to fix that, you select the object, go back into the physics menu, and look at its soft body settings

now uncheck the box that says “Soft Body Goal” (this’ll let gravity do its thing)

now when you press play after that

poor dude just kinda dies.
so there are a couple things i like to do to help it not… do… whatever that is.
go back into your object’s soft body menu and click on the tab that says “Soft Body Edges”

now underneath where it says “Collision:” you want to make sure that you have either “Edge” or “Face” (or both, why not live a little) applied to the object (this can help prevent clipping!)

we’re trying to make it wiggle n’ jiggle while still maintaining its shape, so what usually works for me is to crank up the “Bending” spring as high as it’ll go (which is 10) and enabling “Stiff Quads”

and we’re left with this!

and that’s how i do it! there are probably more efficient ways to get this effect, but for me

i literally love how your color and shade if it’s ok do you have any tips on digital coloring? you don’t have to answer this if you don’t feel like it :) thanks!!
hello friend!! i have a tutorial i made on twitter a while ago which is more or less how i make my colours more interesting. i still use the technique and in general it’s just a lot of colour adjustment nothing too special LOL here!!


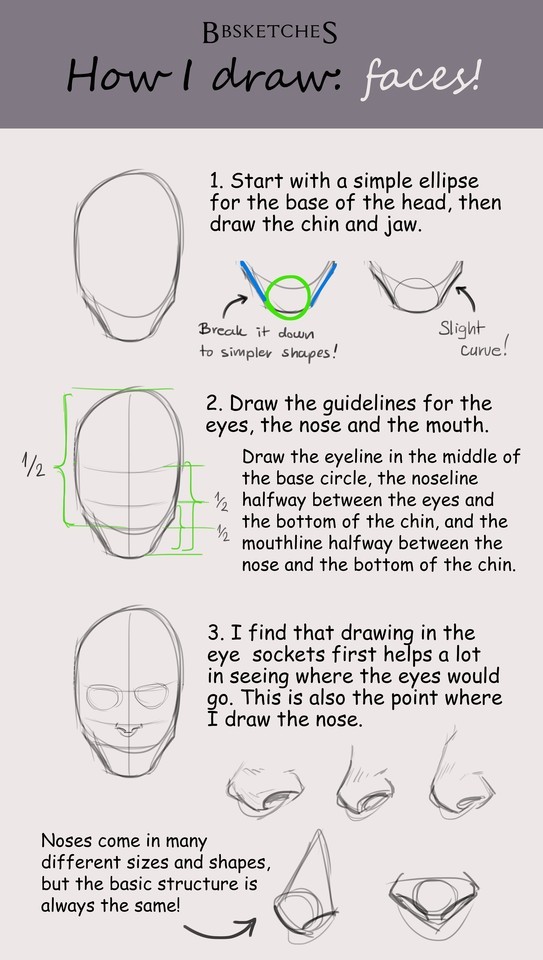

Face tutorial for Anon!
I wasn’t sure whether you meant heads or facial expressions, so here’s a very basic head tutorial! Of course not all faces are the same so proportions and the size of ears/eyes/noses etc. can vary! Feel free to explore and play with them to create unique and interesting characters! I hope this is somewhat helpful, and let me know if you’d like a tutorial on expressions as well!


Really crappy/quick tutorial on how I draw muscles?
I tend to draw muscles very simply, and there are tons of other tutorials that are waaaaayyyy better! But I hope you enjoy yungterra!
Quick art tip - child proportions
Ok this is a real quick one but let me show you how to get more-or-less accurate sizes for child characters. Kids are tricky to draw, they are - from toddler up to about teens people change radically almost every year so pinpointing character’s size during those years is pure hell.
What you need to do to make everything super easy for yourself is to check their Head Proportion. What makes kids look like - well, kids, is that their heads are proportionally large in comparison to their body.
Average adult is about 7,5 heads tall in comparison to their own body, however with children under 10 that number is just under 6 heads with about 1 head shorter the younger you go down to 3 heads as an infant.
Easiest way to figure the so-so head-height of a certain age is to find images of said age group and do a quick count on them

at which after you can replicate it in your own works - don’t mind if it’s not 1:1 with reference, finding images that are actually of the age you need is tricky and kids in general vary a lot so someone might be a lot taller than others. You have a bout 0,5 -1 heads of wiggle room before it starts to look way older.


Proportions are super important in art and i lovingly recommend everyone to figure out basics of them - it’s the easiest way to get notifically better with art. I could go on about proportions but let’s wrap this up. Need to note however that head proportion is not same as character height - a character can be 15 feet tall but still have head-height of 6, HH is simply a way to scale out the body.
-
 psychedelic138 liked this · 1 year ago
 -
 crunchyspositivybubble liked this · 1 year ago
 -
 billiethereaper liked this · 1 year ago
 -
 helpfulthingzzz reblogged this · 2 years ago
 -
 sissy-raee liked this · 2 years ago
 -
 some-masked-guy liked this · 2 years ago
 -
 sweetlambkin liked this · 2 years ago
 -
 cuatrocientos-trece reblogged this · 2 years ago
 -
cuatrocientos-trece liked this · 2 years ago
-
 deadblogdeadblog liked this · 3 years ago
 -
 m0n5t345 liked this · 3 years ago
 -
 acroakingbird liked this · 3 years ago
 -
 floramaisel liked this · 3 years ago
 -
 art-tip-tapdance reblogged this · 3 years ago
 -
 noonblight liked this · 3 years ago
 -
 moojolras liked this · 3 years ago
 -
 skylar56raven liked this · 3 years ago
 -
magicarpetfromunderzasea liked this · 4 years ago
-
 dannyzigzag liked this · 4 years ago
 -
 deactivatedaccount-2001 liked this · 4 years ago
 -
 field-of-cosmos liked this · 4 years ago
 -
 rachel78-99 liked this · 4 years ago
 -
 revengeful-bitch liked this · 4 years ago
 -
 complementaryxcolors liked this · 4 years ago
 -
 luminouscandoodle liked this · 4 years ago
 -
 starpopsoda liked this · 4 years ago
 -
 nervousmugllamafish liked this · 4 years ago
 -
 speedycopoperavoid liked this · 4 years ago
 -
 vemoon liked this · 4 years ago
 -
 baekags liked this · 4 years ago
 -
 aevierre liked this · 4 years ago
 -
 k0fi liked this · 4 years ago
 -
 chuubunnie liked this · 4 years ago
 -
 kitdat reblogged this · 4 years ago
 -
 thefangirlhasarrive reblogged this · 4 years ago
 -
thefangirlhasarrive reblogged this · 4 years ago
-
thefangirlhasarrive liked this · 4 years ago
-
 gelatopistacchioecioccolato liked this · 4 years ago
 -
 lanzo-of-lance reblogged this · 4 years ago
 -
lanzo-of-lance liked this · 4 years ago
-
 ashten009 liked this · 4 years ago
 -
 jikooksubunit liked this · 4 years ago
 -
 killmepieceofshit liked this · 4 years ago
 -
 alien-angelworlds liked this · 4 years ago

Sylwester | i will mostly post sketches, because i'm too lazy to end them
196 posts