If Everything Is Prioritized, Nothing Is Prioritized.

If everything is prioritized, nothing is prioritized.
More Posts from Nastysynth and Others

Wake up while we still have a chance.


leggie tutorial!!!
Not the same Anon, but hyacinths please
Hi friend, thank you so much for your interest! I’m going to go over how I draw these flowers, but I realized midway that I’m actually very terrible at drawing these in particular, haha. There’s a reason I’ve lowkey avoided doing them so far, and I think it enabled me to highlight a bit more, the way I choose my arts.
It’s quite hard to teach just “how to draw a specific flower” mostly because I myself don’t know - the most important thing I can emphasize is using references!

I personally dislike drawing these flowers in my art, and I couldn’t figure out why until I started this tutorial.
One thing I tend to notice when I look at reference pictures is how flowers move as a ‘whole’ and their relative ‘flexibility’. I pay attention to that because the way I do art, I choose the flower in part based on appearance and how natural they will look in a specific composition.

I tend to like flowers that sprout outwards and have a kind of ‘loose’ appearance. The red lines here show the ‘direction’ I want the flowers to go in.

This is where these flowers pose a bit of a problem. Because arranged in clumps, they are very stiff. It’s not a bad thing if that’s what you’re looking for, but it’s not what I wanted, exactly, for this image.

They just stick straight up, because they have very stiff leaves and a tight packed pattern. (They sometimes tilt though, mine always did). At this point, I could decide the form isn’t right, and this isn’t the flower I want. But there’s also another thing I could do, which is altering it’s appearance when I draw it, slightly.

Left is a simplified version of the shape, while the middle is a more detailed image. The furthest to the right is a close-up of a single flower. Depending on what you want to portray, you can choose to alter what you want your flowers to look like.

As you can see, when drawn closer up, the flower has a lot more flexibility!

So with this, I ended up drawing the batch of flowers a lot larger than how it would be normally, while still retaining the recognizable flower and leaf shape.
So what I’m trying to convey is that sometimes you have to study references, but then know you can pick and choose what aspects to highlight in your art. That’s I think, how you can get your flowers to look extra ‘dynamic’ in your work - by accentuating their specific shapes to work to your advantage! And also playing with their colors and such! But hyacinths come in so many colors that any would work!
I hope this is helpful to you, anon!


Since I have a long-form comic taking place in a sorcerer’s tower, I did a little study to level myself up on the subject of stonework walls. These are my notes on what I want.
Especially focusing on an effective way to render the background walls without drawing every single stone because aaaaa

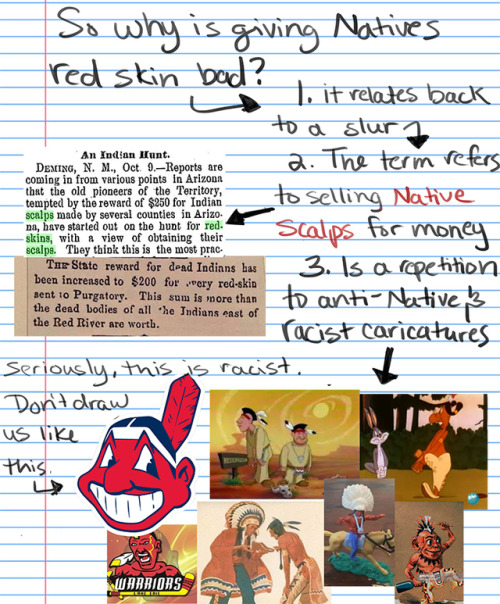
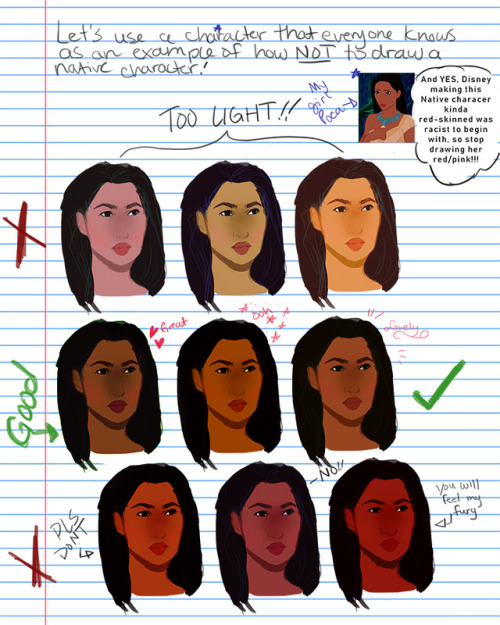
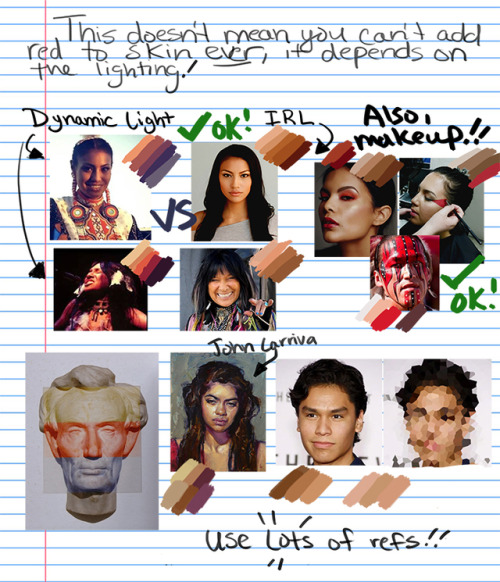
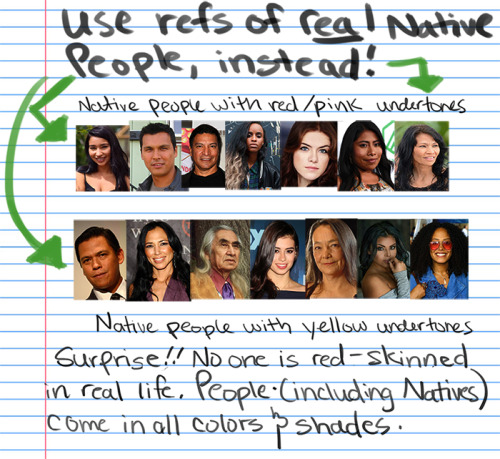
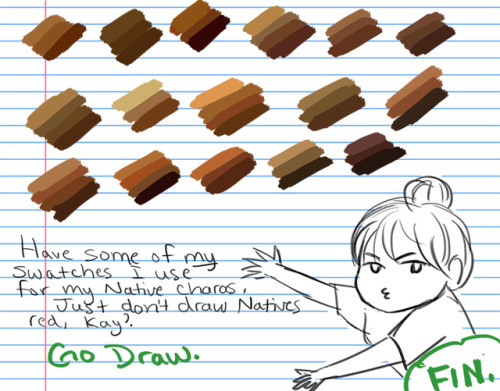
How I draw skin Part 2: DON”T DRAW NATIVE PEOPLE WITH RED SKIN!!!! A tutorial
For the first tutorial on how I draw skin, see the post here.
But seriously, I’ve seen too many drawings of Native characters with literal red/pink skin to count so just in case some of you are having troubles with drawing Native people, I’ve provided a guide for you. Please take my swatches if it helps!! and no more red skinned people, please <0<
Disclaimer: this tutorial is mainly about the artistic depictions of Indigenous Peoples in North America, where the slur and redskin caricature originated, but it would still be racist to draw other non-North/Central/South American Indigenous groups like this so…..don’t.
Custom brush tutorial kinda??
Heres how you can make pixel brushes in Clip Studio Paint
first make a little pixel pattern and made sure that the background layer is transparent.

then you want to select edit -> register material -> image. this i remember from trying it before

next name it and choose a place for it to go among the others. doesnt matter where really. also check the texture box.

next to make the brush choose whatever brush that youd like to give it that has the properties you want and copy it. i just chose the standard oil brush. go to the copied brushes settings and click texture

click where it says none and find the brush that you made. after you click it change the setting to this

for me the texture works for subtract, multiply and compare. dont really know the differences between them all or form the others but for what i wanted those three seemed to work.
i did this for a bunch of different pixel patterns and brushes and got some cool effects! check it out!

i appreciate all the help and suggestions yall gave me!

maybe once i figure them out some more i could offer stylized commissions with them :V
art resource masterpost! (2019)
A list of links to all the art resources I’ve compiled since I was thirteen, from Tumblr/Twitter/googling around. They’re not all specifically drawing-related but I’ve personally found them helpful to my art + actively used or learned from each of them. Links marked with a star (★) are ones I use often, or find the most helpful!
compare heights of human figures
textures
hairstyle photos, search by colour/style/etc.
★ pinterest of tons of character design & anatomy ref boards
models.com: just modelling news/photography but nice for portrait reference + diverse faces
★ tons of tips on drawing: @grizandnorm and also @etheringtonbrothers (also on twitter and instagram)
tips for drawing backgrounds (layout & perspective) - thomas romain
selective colour tool in photoshop (helps balance out colours) - @genicecream
going from B&W to colour using photoshop curves - @genicecream
quickposes: pose library for figure & gesture drawing practice, timed drawing
wetcanvas: forum for object/still life photo references
tons of varied human poses, can sort by pose type/age/body type/etc. (warning for nudity)
★ lookbook.nu: fashion lookbook, can sort outfits by style, occasion, etc.
timed and randomized photo references for figure drawing (warning: nudity)
easy lineart in photoshop - @okolnir
guide for facial expressions - @lackadaisy
tons of pose photography, categorized by pose - senshistock (deviantart)
more timed photo references: figure drawing, animal drawing, hands and feet, faces
★ PDF of the animator’s survival kit by richard williams: comprehensive book on animation fundamentals
adobe kuler: adjustable colour wheel, creates cohesive 5-colour palettes
★ perspective grid in photoshop - @chuwenjie
interactive 3d models: human models & wooden figurine
youtube playlist of various art tutorials/speedpaints/etc. - @erinye
integrating lineart into flat colours - @dinduarte
twitter thread of general art resources (technical/fundamental skills) - @jovaline
tips on drawing backgrounds - @jovaline
simple nighttime lighting - @japhers
tips for drawing kissing - @mud-muffin
★ mapcrunch: randomized (or editable) google street view, great for environment photo reference
catalogue of theater costumes sorted by clothing item/time period, great for historical clothing reference
google’s we wear culture: information about & catalogue of fashion/design/art collections
one perfect shot database: film screencaps, can organize by shot
typefilmgrab: more movie shots
stretches to stop artist back pain (more important than half this list)
dynamic clouds - @amiamihan
avoiding empty/“dead” spaces in comic panels - @hammpix
tips on simplifying drawings for clarity - @hammpix
guide on making webcomics - @velinxi
twitter thread of storyboard/comic art resources - @nilaffle
creating depth and distance in backgrounds - @mathiaszamecki
★ croquiscafe: youtube channel that simulates figure drawing sessions (warning: nudity)
★ large PDF of storyboarding tips - @jimmortensen
another colour picker for harmonious colours
★ google drive folder of art book PDFs (anatomy & figure drawing) - @jijidraws
designdoll (free program for download): adjustable 3d human figures, better quality than online sites
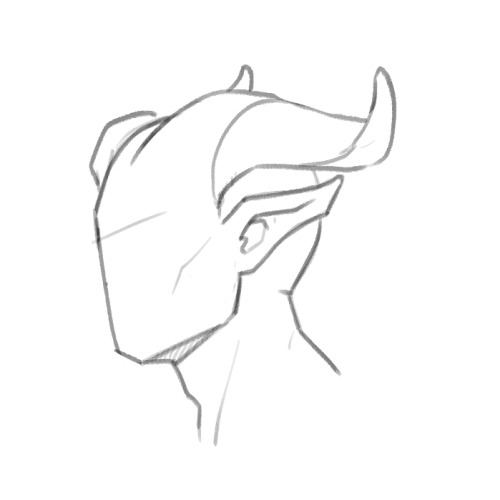
Do you happen to have any tips for drawing horns?
Hi, Anon! I’ll definitely try my best. Horns are a little tricky since they’re so subjective and the styles/textures vary so drastically.
Mostly I’m going to be talking about texture here and I’ll try to keep it simple since they’re time consuming to draw.
Smooth horns are great and easy, can come in any and all shapes, but if you want to add more interest and character to the horns, it all comes down to how you texture them. Here’s a simple smooth horn. It’s okay, it’s basic, but it works and will especially work better once it’s colored if it has a sheen or a matte look.

You can add simple lines to it to give it a bit more interest, but you can take it farther than just the cylinder look like drawn here. The lines give it the easy, quick illusion of being more dimensional, but it’s not the most interesting or dynamic.

You can play with the lines however you like to give the horns more uniqueness, such as a line down the center to sort of pinch it inwards. Still more dynamic than the smooth horn, but more interesting than the rounded one.

You can leave the lines as they are for an easier horn, or take it a step farther and use them as guides to texture them. This is where it gets fun, but time consuming. Definitely look up references of what you want to go for if you’re not sure. I highly recommend Ram, Ibex or Antelope references, Antelope being my favorite. They have so much texture to them in the forum of smaller and larger ridges, so here’s a horn based loosely (artistic liberties taken) off a mix of Ram and Antelope.

Getting into plates which are my favorite, there’s little to reference off of. Here’s a more dynamic, spiky look with plates using the guide lines as a base to get an ideal direction you want the horn to shape into.

Just take your guide lines and then extend outward. Add as little or as much wear, tear and damage as you want. Horns can get dry and crack, they can take a hit and break, age can cause grooves, your imagination’s the limit.

Outside of plates, you can look up any horned animal to get ideas for texture, anything from steer to deer and elk (if you want to get more into the antlered look), or mix and match textures from a few horn styles you like. Hope this helps! Sorry I can’t go more in depth, but I tried to explain it as best as I know how. Good luck with your horns!

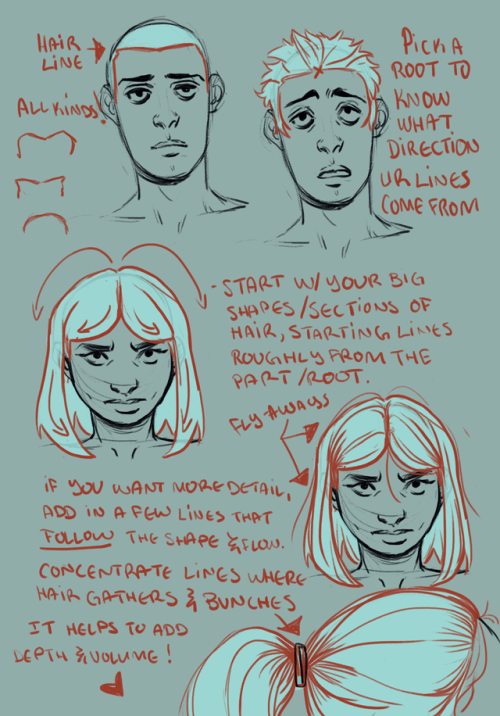
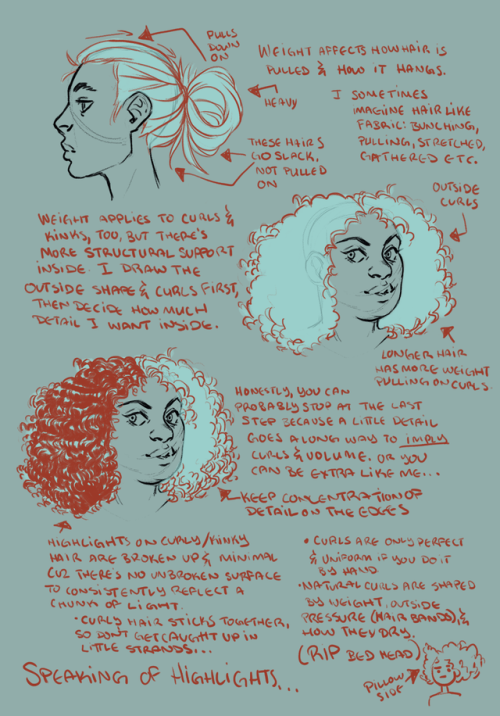
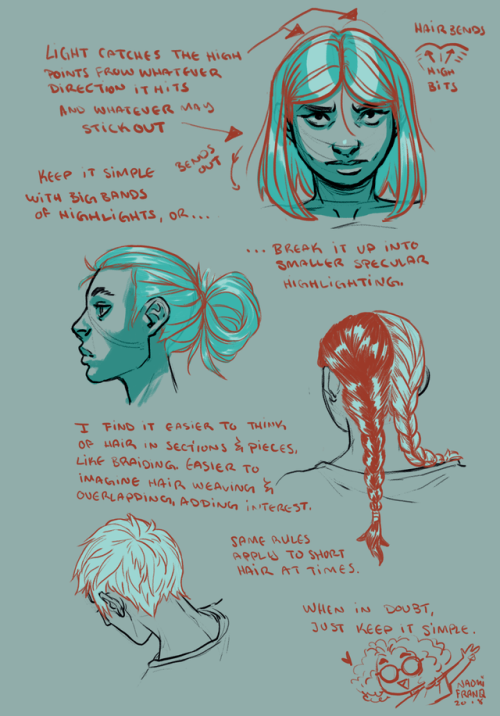
I jotted down for a friend of mine some tips and notes on how I approach drawing hair, and things I keep in mind while doing so, and thought I’d share. There are loads of other ways to do it, and the learning never stops, so I hope this helps!
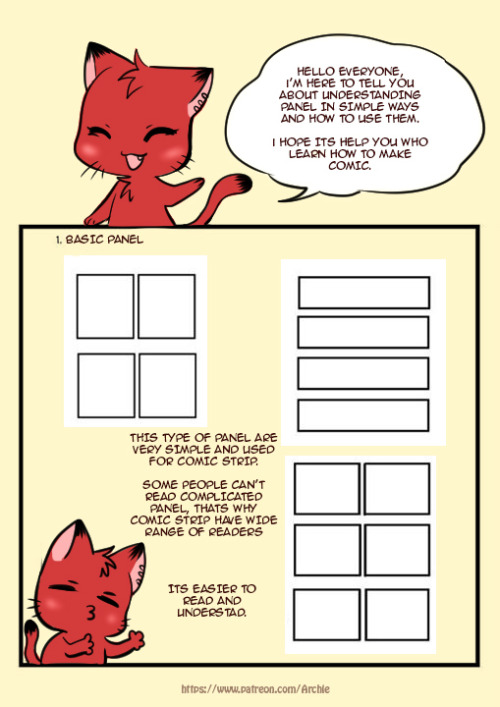
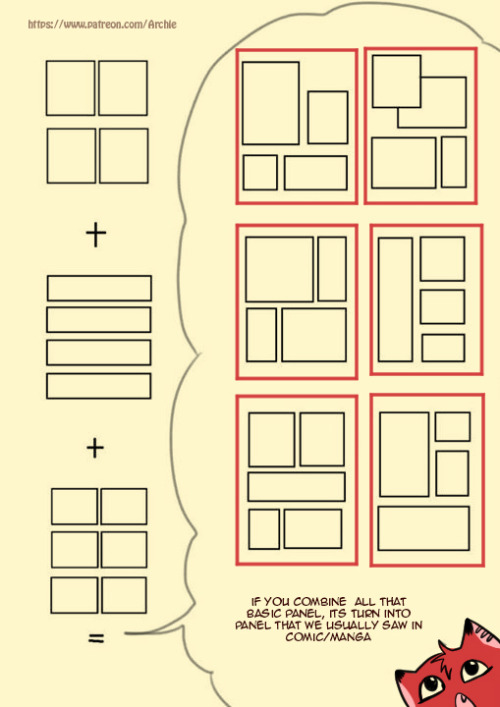
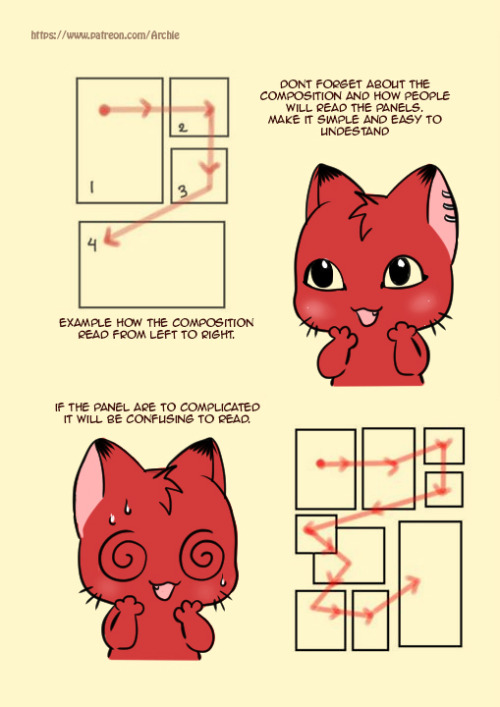

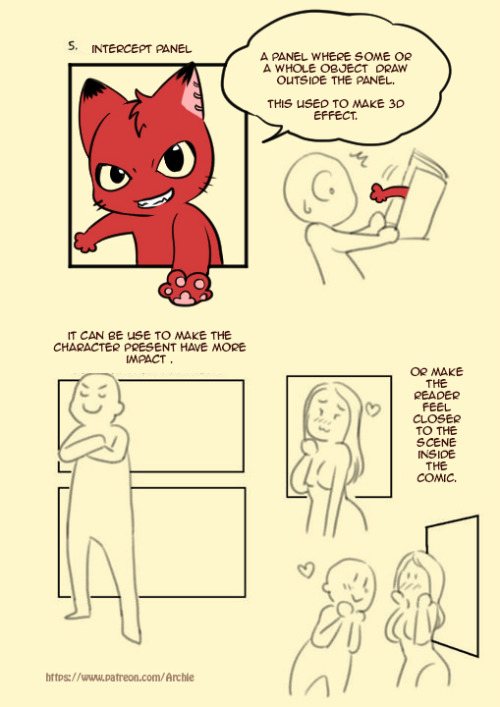
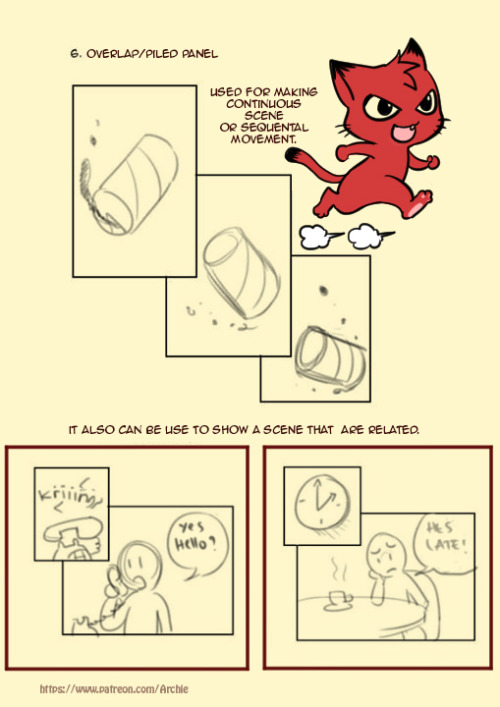
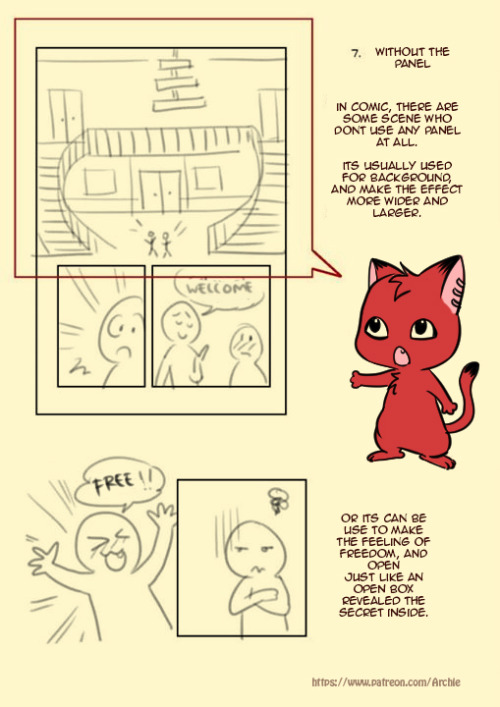
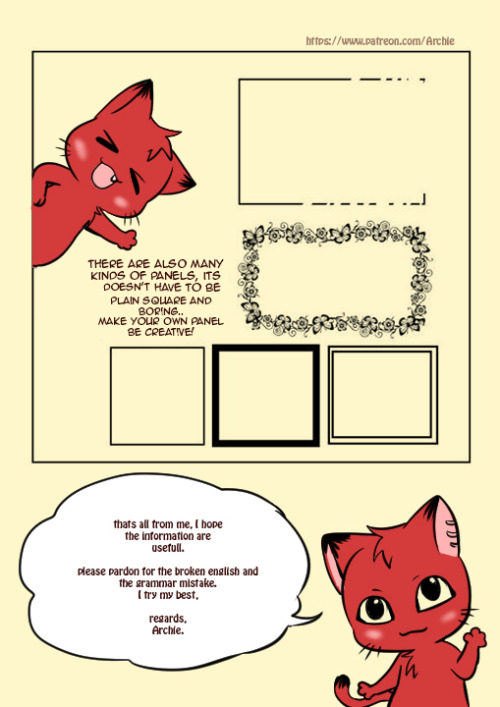
Simple Comic Panel Tutorial
please kindly visit my Gallery
-
 certified-monster-fucker reblogged this · 1 year ago
 -
 sea-rhubarb liked this · 1 year ago
 -
 thisisjustanartrefblog reblogged this · 1 year ago
 -
 thatstrangesheep reblogged this · 2 years ago
 -
thatstrangesheep liked this · 2 years ago
-
 theonionguy liked this · 2 years ago
 -
 mycatateit liked this · 2 years ago
 -
 virtualdonkeysportspanda liked this · 2 years ago
 -
 reference-mothh reblogged this · 3 years ago
 -
 futuristicwizardtimemachine liked this · 3 years ago
 -
 smallestchurch liked this · 3 years ago
 -
 womanenjoyer liked this · 3 years ago
 -
 narke reblogged this · 3 years ago
 -
 mulk-milk liked this · 3 years ago
 -
 serialkitsch liked this · 3 years ago
 -
 ooooarthell reblogged this · 3 years ago
 -
 salthat liked this · 3 years ago
 -
 ihavenoobjectpermanence reblogged this · 3 years ago
 -
 energon-with-a-curly-straw liked this · 3 years ago
 -
 personal-writing-tips-and-tricks reblogged this · 3 years ago
 -
 trainsreblogblog reblogged this · 3 years ago
 -
trainsreblogblog reblogged this · 3 years ago
-
 1iliketrains1 liked this · 3 years ago
 -
tutoriarts reblogged this · 3 years ago
-
 oldaccounticanrgetridpf liked this · 3 years ago
 -
 eggplantable liked this · 3 years ago
 -
 stormspecter liked this · 3 years ago
 -
 nose-just-vibing liked this · 3 years ago
 -
 neonbracelets liked this · 3 years ago
 -
 aco-mist reblogged this · 3 years ago
 -
aco-mist liked this · 3 years ago
-
 queerio-nimbus liked this · 3 years ago
 -
 iconicname liked this · 3 years ago
 -
 noxsonus liked this · 3 years ago
 -
 sagaschan liked this · 4 years ago
 -
 caivo liked this · 4 years ago
 -
 skullb0nes liked this · 4 years ago
 -
 annnmke liked this · 4 years ago
 -
 ren-tenn liked this · 4 years ago
 -
 arttipstolookbackat reblogged this · 4 years ago
 -
 eldritchghost2 liked this · 4 years ago
 -
 clearjellyfishwhispers liked this · 4 years ago
 -
 copedthatpizza liked this · 4 years ago
 -
 veeslug liked this · 4 years ago
 -
 maebees-stuff liked this · 4 years ago
 -
 scinttillas reblogged this · 4 years ago
 -
 letters2eternity liked this · 4 years ago

Sylwester | i will mostly post sketches, because i'm too lazy to end them
196 posts