In Conclusion, Obrounds.
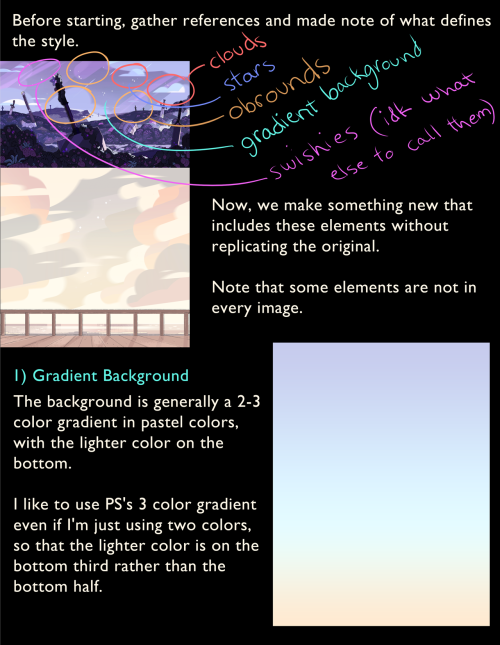
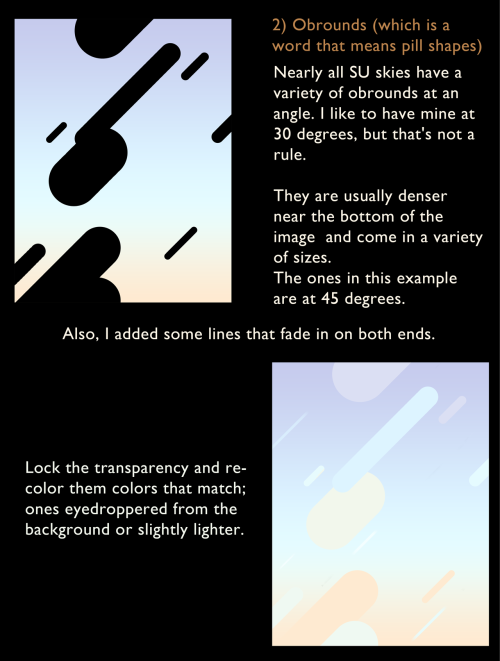
In conclusion, obrounds.
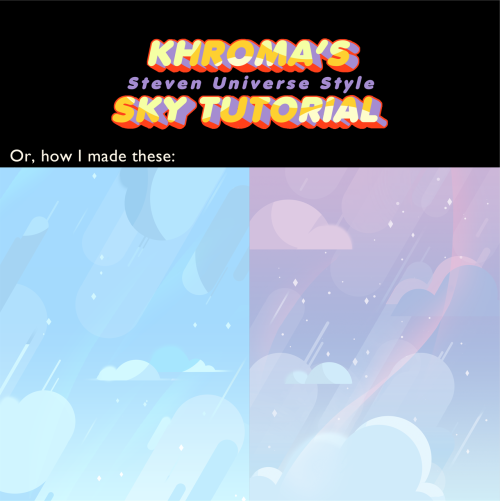
Sorry for the long post (I think it’s most legible in this format but yikes it’s long)
More Posts from Nastysynth and Others
Not the same Anon, but hyacinths please
Hi friend, thank you so much for your interest! I’m going to go over how I draw these flowers, but I realized midway that I’m actually very terrible at drawing these in particular, haha. There’s a reason I’ve lowkey avoided doing them so far, and I think it enabled me to highlight a bit more, the way I choose my arts.
It’s quite hard to teach just “how to draw a specific flower” mostly because I myself don’t know - the most important thing I can emphasize is using references!

I personally dislike drawing these flowers in my art, and I couldn’t figure out why until I started this tutorial.
One thing I tend to notice when I look at reference pictures is how flowers move as a ‘whole’ and their relative ‘flexibility’. I pay attention to that because the way I do art, I choose the flower in part based on appearance and how natural they will look in a specific composition.

I tend to like flowers that sprout outwards and have a kind of ‘loose’ appearance. The red lines here show the ‘direction’ I want the flowers to go in.

This is where these flowers pose a bit of a problem. Because arranged in clumps, they are very stiff. It’s not a bad thing if that’s what you’re looking for, but it’s not what I wanted, exactly, for this image.

They just stick straight up, because they have very stiff leaves and a tight packed pattern. (They sometimes tilt though, mine always did). At this point, I could decide the form isn’t right, and this isn’t the flower I want. But there’s also another thing I could do, which is altering it’s appearance when I draw it, slightly.

Left is a simplified version of the shape, while the middle is a more detailed image. The furthest to the right is a close-up of a single flower. Depending on what you want to portray, you can choose to alter what you want your flowers to look like.

As you can see, when drawn closer up, the flower has a lot more flexibility!

So with this, I ended up drawing the batch of flowers a lot larger than how it would be normally, while still retaining the recognizable flower and leaf shape.
So what I’m trying to convey is that sometimes you have to study references, but then know you can pick and choose what aspects to highlight in your art. That’s I think, how you can get your flowers to look extra ‘dynamic’ in your work - by accentuating their specific shapes to work to your advantage! And also playing with their colors and such! But hyacinths come in so many colors that any would work!
I hope this is helpful to you, anon!

Do you happen to have any tips for drawing horns?
Hi, Anon! I’ll definitely try my best. Horns are a little tricky since they’re so subjective and the styles/textures vary so drastically.
Mostly I’m going to be talking about texture here and I’ll try to keep it simple since they’re time consuming to draw.
Smooth horns are great and easy, can come in any and all shapes, but if you want to add more interest and character to the horns, it all comes down to how you texture them. Here’s a simple smooth horn. It’s okay, it’s basic, but it works and will especially work better once it’s colored if it has a sheen or a matte look.

You can add simple lines to it to give it a bit more interest, but you can take it farther than just the cylinder look like drawn here. The lines give it the easy, quick illusion of being more dimensional, but it’s not the most interesting or dynamic.

You can play with the lines however you like to give the horns more uniqueness, such as a line down the center to sort of pinch it inwards. Still more dynamic than the smooth horn, but more interesting than the rounded one.

You can leave the lines as they are for an easier horn, or take it a step farther and use them as guides to texture them. This is where it gets fun, but time consuming. Definitely look up references of what you want to go for if you’re not sure. I highly recommend Ram, Ibex or Antelope references, Antelope being my favorite. They have so much texture to them in the forum of smaller and larger ridges, so here’s a horn based loosely (artistic liberties taken) off a mix of Ram and Antelope.
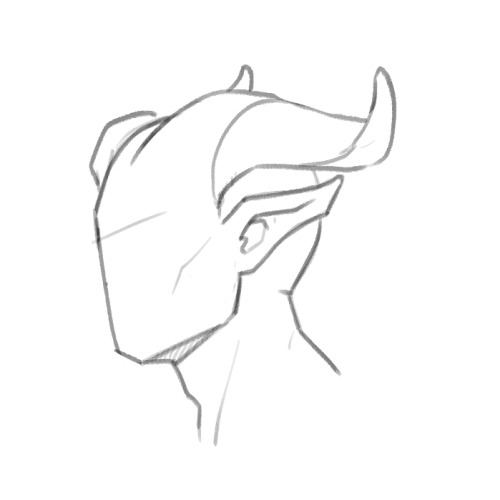

Getting into plates which are my favorite, there’s little to reference off of. Here’s a more dynamic, spiky look with plates using the guide lines as a base to get an ideal direction you want the horn to shape into.

Just take your guide lines and then extend outward. Add as little or as much wear, tear and damage as you want. Horns can get dry and crack, they can take a hit and break, age can cause grooves, your imagination’s the limit.

Outside of plates, you can look up any horned animal to get ideas for texture, anything from steer to deer and elk (if you want to get more into the antlered look), or mix and match textures from a few horn styles you like. Hope this helps! Sorry I can’t go more in depth, but I tried to explain it as best as I know how. Good luck with your horns!


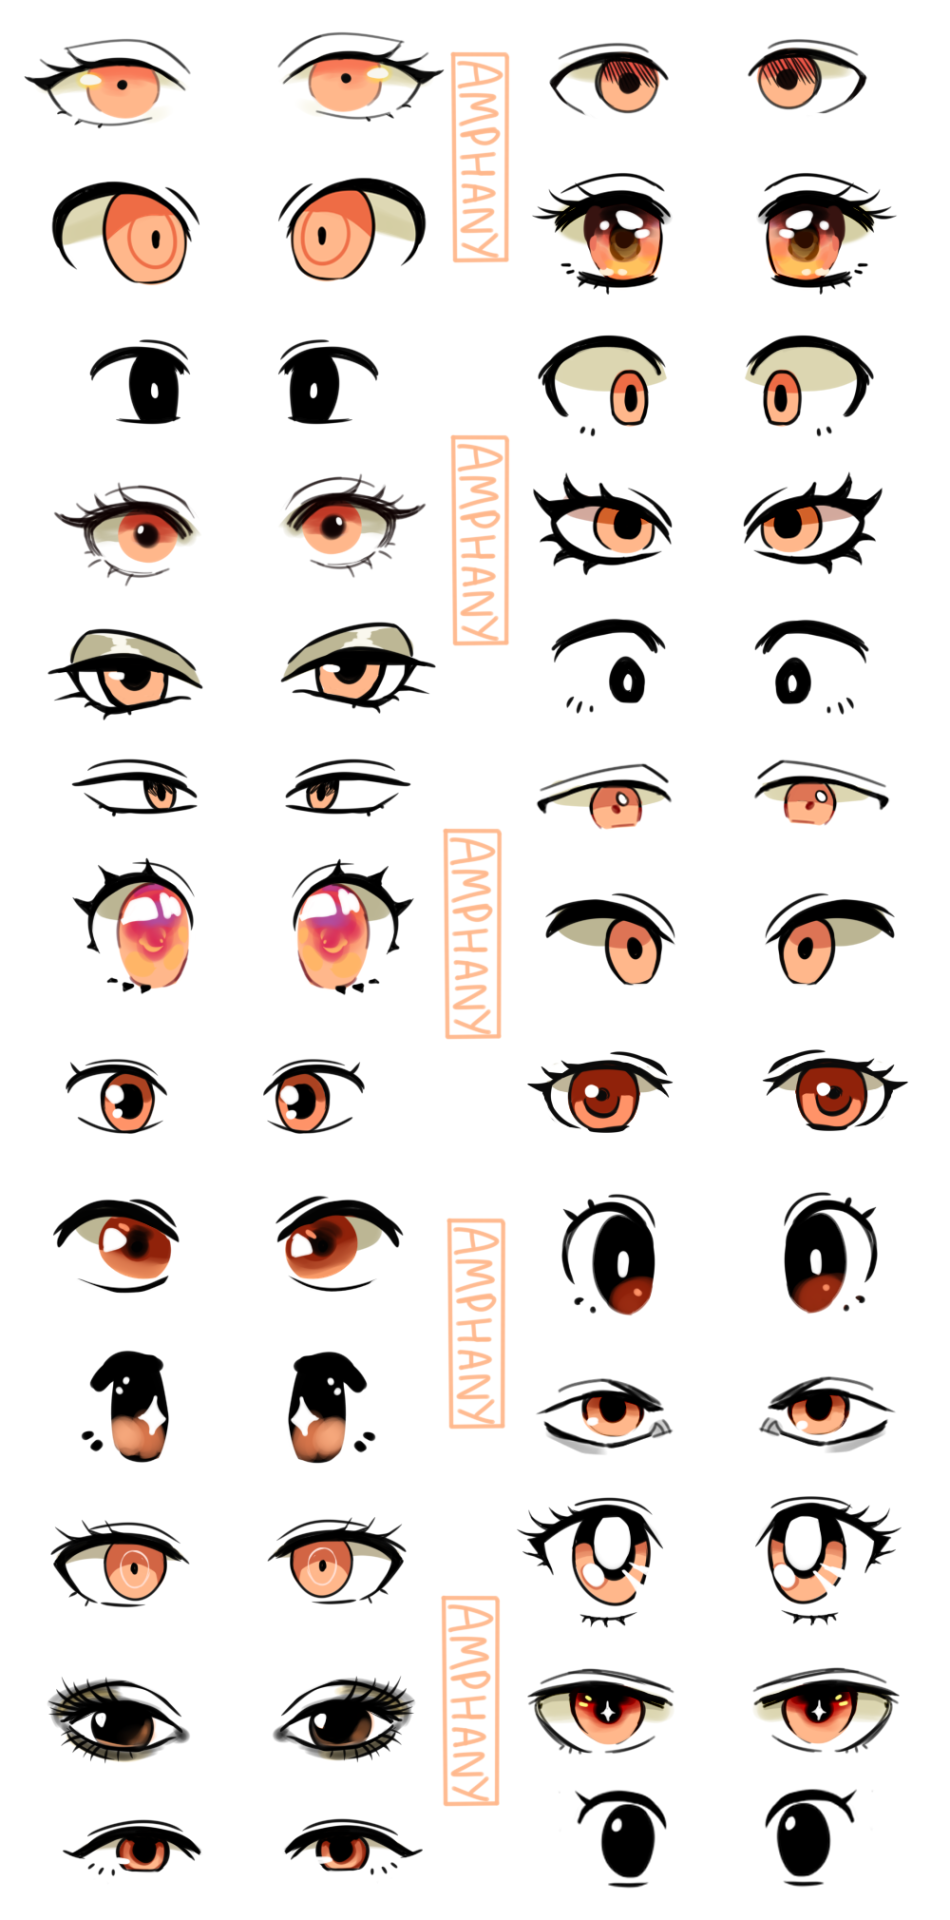
I made a tutorial! I hope it is helpful. Some of the styles of eyes are from Studio Ghibli,Sailor Moon, Pokemon, Dangan Ronpa, Fire Emblem, Ace Attorney.
Please ask me if you have any questions! <3
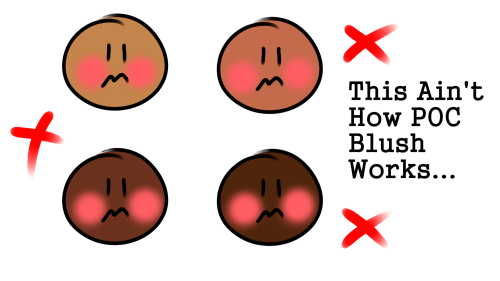
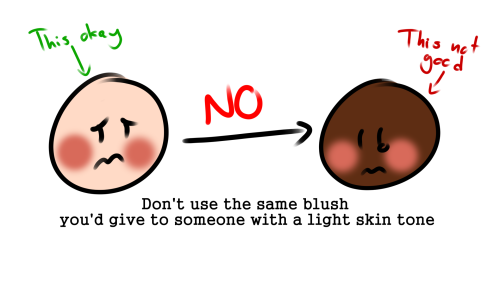
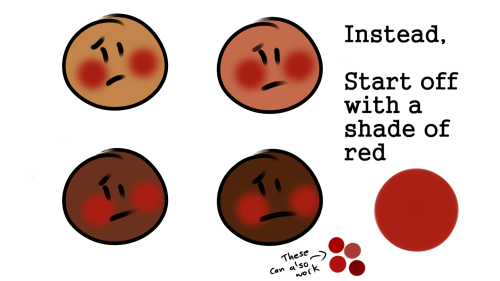

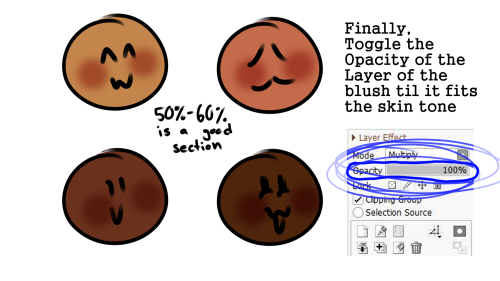
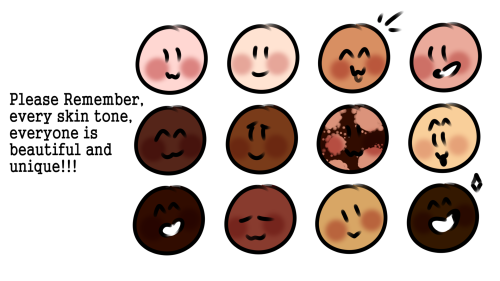
POC blush tutorial
Feel free to repost, but please credit me

Just random and for like cartoons not real life
can you do a tutorial on how you color your artwork? it's so pretty!! 😍🤩
this is not the best and only way to color but personally i think it’s easy and quite effective for beginner artists who are practicing setting the mood for an artwork or laying out ground work for more detailed illustrations
I’m using Clip Studio Paint for this drawing.
Step 1: The base color

Use magic wand and bucket tool to lay out the base color, you can use different layers for each colors to be more precise, and it’s easier to change the colors later on. I use mainly warm tones for my base color because i prefer the look of it. Step 2: Coloring the lineart

Use a clipping layer above the lineart layer to do this step (there are other ways of course, you can search for them online) Color the lines that isn’t intersected with the background, the inner lines. Especially the skin part to reduce stiffness of the lineart, also help adding shadows.


I usually draw the darkest shadow areas with my lineart so i can color them at the same time.
Step 3: Adding shadow
Group the lineart + base color into 1 big group. Add a clipping layer above that group. Switch the layer mode to “Multiply”. Add the shadow area using a desaturated/grayish hue of your choice to set the mood for the drawing.
Example:
If the mood you want is more broody, use more cool tones (blue, purple,..)


If the mood is more festive or happy, use more warm tones


A drawing should consists both cool AND warm tones, other wise it would look dull. The second example has too much warm tones because the base color is already warm.
Step 4: Add filter layers/adjustment layers
This is where the magic happens. Enhance your art work by adding more Multiply and Overlay layers, set the mood as you like it to look, balancing the tones, play around. I wanted this particular drawing to have an overall cold feeling to it, so I added a blue multiply layer

Adding light with a beige overlay layer, using the airbrush with low opacity. This also help creating contrast between the shadow and light areas

But wait,,, it looks,,,,,, it looks too sad!! they are comforting each other after a terrible situation! Adam is not dead! I need another warm multiply layer!

There, it’s now finished. Quick tip: If your colors are looking off/doesn’t go well with each other, group everything and add a beige multiply layer on top! It would look better instantly! Learning color theory, color harmony also helps A LOT!! find tutorials and study from the masters! Good luck with your art, Anon!


My friend @nuclear333 asked me how I shaded hair and I promised her a hair shading tutorial, which of course became a hair…everything…tutorial.
Lots of great tutorials have already been been made on the subject so here’s me throwing in my own two cents. The usual disclaimers apply: this is how I think of hair when I draw it, and is by absolutely no means the only way, or even necessarily a correct way, to do it. I’m always happy to hear about how others approach the same subject!

i am SO sorry for the super long response, but i thought this might make a nice little tutorial opportunity, since soft body physics can be… frustrating, to say the least. i’ve noticed that it tends to respond better to spherical meshes than most others, so getting it to work with something with a lot of hard edges and flat planes can be a little tricky (at least in my experience).
so! to get started, here’s my basic setup

the only thing i’ve done so far is place my object in the scene, along with a plane to act as the ground and a camera to record everything.
next you want to select your object, and in the properties menu on the right, select the physics tab (should be the very last one, the icon looks like a bouncing ball)

and for your object, you want to apply a collision and a soft body modifier (some people use rigid body instead of collision, so if you have issues with one there’s a chance the other might work out better. as for me, i usually stick to collision)

then select your plane and apply the collision modifier only.
now when you hit the play button at the bottom of the screen, this happens

it’ll just kinda float in place.
so to fix that, you select the object, go back into the physics menu, and look at its soft body settings

now uncheck the box that says “Soft Body Goal” (this’ll let gravity do its thing)

now when you press play after that

poor dude just kinda dies.
so there are a couple things i like to do to help it not… do… whatever that is.
go back into your object’s soft body menu and click on the tab that says “Soft Body Edges”

now underneath where it says “Collision:” you want to make sure that you have either “Edge” or “Face” (or both, why not live a little) applied to the object (this can help prevent clipping!)

we’re trying to make it wiggle n’ jiggle while still maintaining its shape, so what usually works for me is to crank up the “Bending” spring as high as it’ll go (which is 10) and enabling “Stiff Quads”

and we’re left with this!

and that’s how i do it! there are probably more efficient ways to get this effect, but for me


Anatomy Tips by zephy.fr
Support the artist and follow them on Instagram!
-
 the-pillow-knight liked this · 1 month ago
 -
 alanxkjciwkwn liked this · 2 months ago
 -
 thewanderingshadow1-1 reblogged this · 2 months ago
 -
thewanderingshadow1-1 liked this · 2 months ago
-
 madariaga1194 liked this · 2 months ago
 -
 silvershadow1711 liked this · 2 months ago
 -
 cocokappy reblogged this · 2 months ago
 -
cocokappy liked this · 2 months ago
-
 mayybuggg reblogged this · 3 months ago
 -
mayybuggg liked this · 3 months ago
-
 dodobro reblogged this · 3 months ago
 -
 acidicleafbat liked this · 3 months ago
 -
 luckyteacat liked this · 4 months ago
 -
 craftytrashnightmare liked this · 4 months ago
 -
 felipe5horas liked this · 7 months ago
 -
 krowspiracyanon reblogged this · 7 months ago
 -
 aw-snap-chrome-crashed reblogged this · 8 months ago
 -
aw-snap-chrome-crashed liked this · 8 months ago
-
 muted-honey reblogged this · 8 months ago
 -
muted-honey liked this · 8 months ago
-
 dinofur liked this · 9 months ago
 -
 rijjiruru reblogged this · 9 months ago
 -
 regina-aimable liked this · 9 months ago
 -
 strawberryicecreamin reblogged this · 9 months ago
 -
 chandellite reblogged this · 10 months ago
 -
 kupidachillea liked this · 10 months ago
 -
 seriousbusiness4130 liked this · 11 months ago
 -
 rosie-autz reblogged this · 11 months ago
 -
 blacksweettea liked this · 1 year ago
 -
 lifeofanotheruniverse liked this · 1 year ago
 -
 d3adly-d4rl1ng reblogged this · 1 year ago
 -
 kate808 reblogged this · 1 year ago
 -
 griffin-the-enderman liked this · 1 year ago
 -
 mx-seraph reblogged this · 1 year ago
 -
 brighterbug liked this · 1 year ago
 -
 bohebabbitt reblogged this · 1 year ago
 -
 babe-of-rage liked this · 1 year ago
 -
 shaf-tutorials reblogged this · 1 year ago
 -
 shafau reblogged this · 1 year ago
 -
shafau liked this · 1 year ago
-
 djur reblogged this · 1 year ago
 -
mx-seraph liked this · 1 year ago
-
 electronic-old-men reblogged this · 1 year ago
 -
 micamone reblogged this · 1 year ago
 -
micamone liked this · 1 year ago
-
 fishingforcrows reblogged this · 1 year ago

Sylwester | i will mostly post sketches, because i'm too lazy to end them
196 posts