Quick Art Tip - Child Proportions
Quick art tip - child proportions
Ok this is a real quick one but let me show you how to get more-or-less accurate sizes for child characters. Kids are tricky to draw, they are - from toddler up to about teens people change radically almost every year so pinpointing character’s size during those years is pure hell.
What you need to do to make everything super easy for yourself is to check their Head Proportion. What makes kids look like - well, kids, is that their heads are proportionally large in comparison to their body.
Average adult is about 7,5 heads tall in comparison to their own body, however with children under 10 that number is just under 6 heads with about 1 head shorter the younger you go down to 3 heads as an infant.
Easiest way to figure the so-so head-height of a certain age is to find images of said age group and do a quick count on them

at which after you can replicate it in your own works - don’t mind if it’s not 1:1 with reference, finding images that are actually of the age you need is tricky and kids in general vary a lot so someone might be a lot taller than others. You have a bout 0,5 -1 heads of wiggle room before it starts to look way older.


Proportions are super important in art and i lovingly recommend everyone to figure out basics of them - it’s the easiest way to get notifically better with art. I could go on about proportions but let’s wrap this up. Need to note however that head proportion is not same as character height - a character can be 15 feet tall but still have head-height of 6, HH is simply a way to scale out the body.
More Posts from Nastysynth and Others
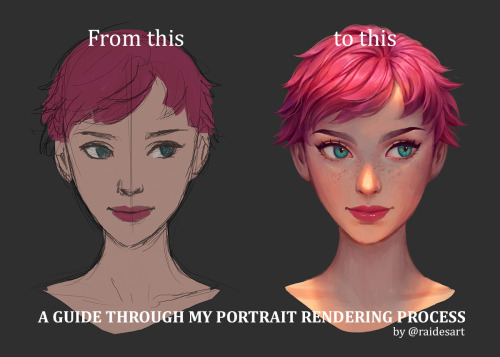
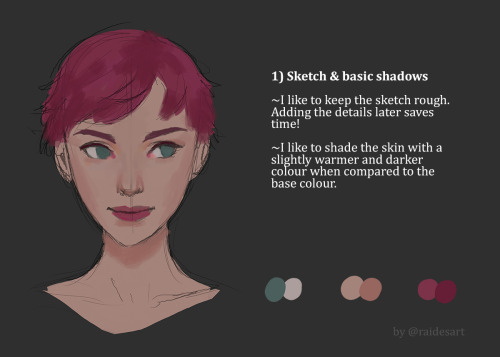
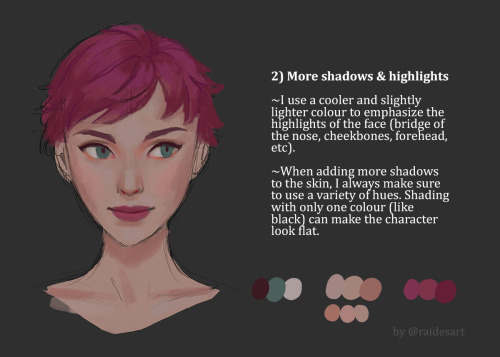
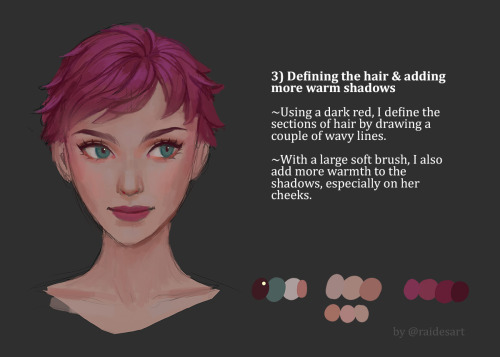
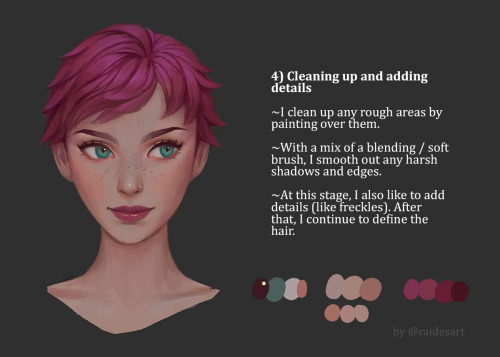
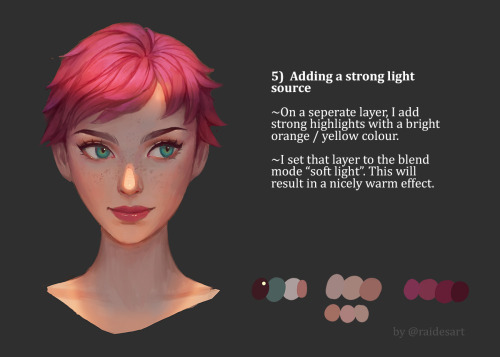
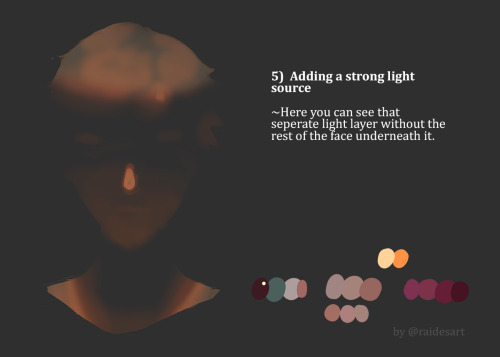
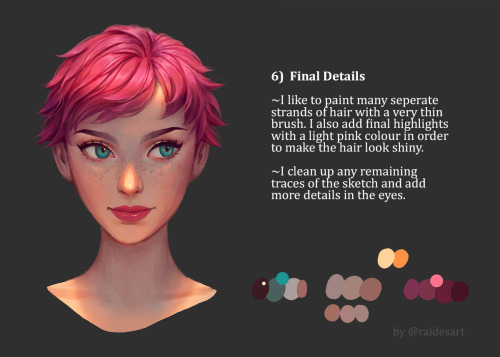
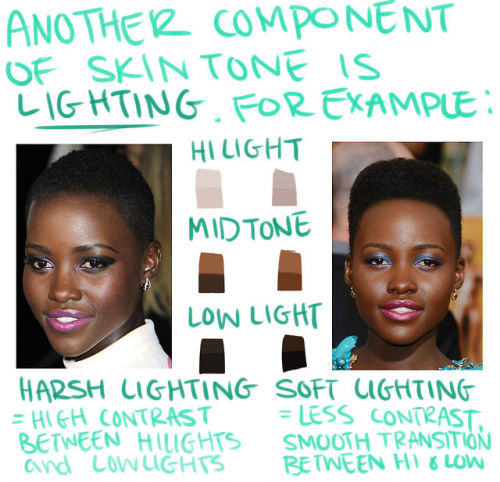
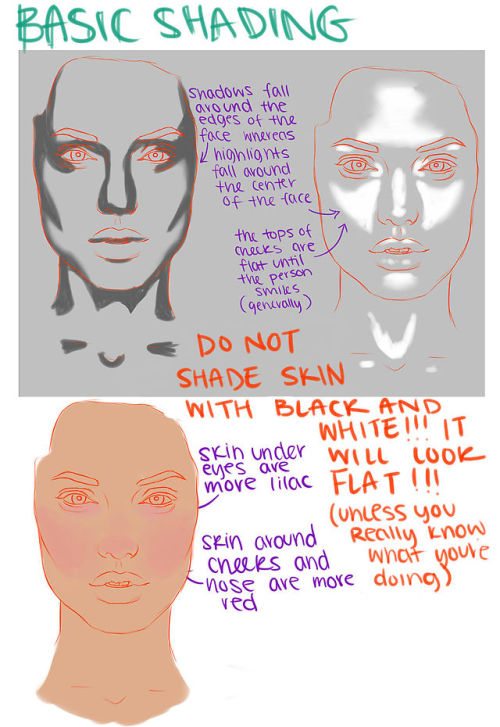
So many of you asked for a tutorial on how I paint faces/ add a light source, so here you go! 😍 Let me know if you guys have any feedback or if you want to try it yourself! 💜


Pearl is one of my favorite characters from cartoons.
Static Texture Tutorial (Blender 2.7)
So it’s been a hot minute since i’ve posted any tutorials on here, and one of my gifs featuring a static texture recently got a nice amount of attention on twitter, so i thought i’d post a tutorial on how to make an effect like this


in blender (blender 2.7 to be exact, i haven’t updated yet because i’m an old senior citizen set in their ways). This one’s super simple, it literally takes about 5 seconds, so let’s get started.
Czytaj dalej

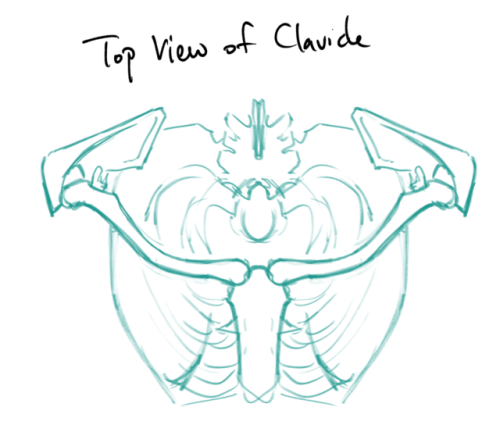
Back muscles!
SKELETAL LANDMARKS

shoulder blades: most of the upper back muscles attach to them directly, placement is affected by the arms. They can get obscured on very muscular backs, but most people these are the most dominant features!
7th cervical vertebra: neck bone that sticks out in most people, it sits in the center of that diamond shaped tendon in the middle of the trapezius
Also, obviously always keep the general shape of the ribcage and spine in mind, it was too much of a pain to draw them all in lol.
BACK MUSCLES

Erector Spinae: make the column-like structures around the spine, they extend all the way up to the neck, but you really only see the bottom part.
Latissimus Dorsi: are very thin, so most of the time you only see the structures underneath (such as the erector spinae). But when flexed, (for example, when climbing), you can see here on Jimmy Webb’s back that swooping curve it makes under the armpits.

The lats are also responsible for most of a person’s upper body strength and are the “V” shaped part of the back. For example, it’s how Bruce Lee was so strong despite being a small guy. Just look at those wings, man.


Infraspinatus, Teres Minor, and Teres Major: sit on the shoulder blade itself, and connects it to the top of the arm bone. These are responsible for a lot of the crazy shapes you see in bodybuilders’ backs.
Underneath them is the serratus anterior, which technically isn’t a back muscle but sits on the side of the ribs. These form that zig-zag pattern on the ribs that makes people look super ripped when visible with the external obliques, both wrapping around the sides of the torso. They’re not technically back muscles but fill out the silhouette, so it’s good to keep them in mind.
the glutes/butt muscles… they go farther up the back than one might assume and they, along with the pelvis, do affect the surface appearance of the lower back.

Rhomboid: simple shape, attaches from the inner edge of the shoulder blades to the middle of the spine at the 7th cervical vetebra to about the 4th or 5th thoracic vetebra. It does not overlap with the latissimus dorsi

Trapezius: divided roughly in the top, middle, and bottom sections. The top is quite thick and cylindrical and makes the sloping shape from the neck to the shoulders.
The bottom part is very thin; like the latissimus dorsi, the forms underneath it are visible when relaxed, making the rhomboid visible if it is flexed and the traps are not. Also not where the bottom part’s tendons attach to the shoulder blades; it outlines the curve of the shoulder blades even in people who are covered in brains muscles.
When fully flexed, it doesn’t taper into a point, but makes a small “w” shape at the bottom.
The 7th cervical vertebra sits at the center of the diamond-shaped tendons between the first and second sections of the trapezius. This part appears recessed in very muscular people.

Deltoid: not really a back muscle, but they overlap with the Infraspinatus and insert into the upper ridge of the shoulder blades, so it’s good to see how they interact with the others.

Ah, now for an example, featuring Thor himself. Note the curve where the traps meet the shoulder blades, the diamond-shaped tendon, and the rough “w” shaped contour of the lower back. Also note the two dimples, which is formed by the pelvis bones. They tend to be more prominent in women, although they are found in both men and women.
Try to find the back muscles on other people yourself, and then GET DRAWING

(PS, Generally it’s best to be able to simplify the forms instead of trying to render straight away - that’s how you know you really internalized the anatomy! I… honestly still don’t understand the back enough to do that yet, hence the lack of examples, unlike with the forearms post. But nonetheless, I hope that this is still useful as a general reference. I know it’s helped me at least remember what the different parts are, even if I don’t yet have a grasp of how they interact in motion!)
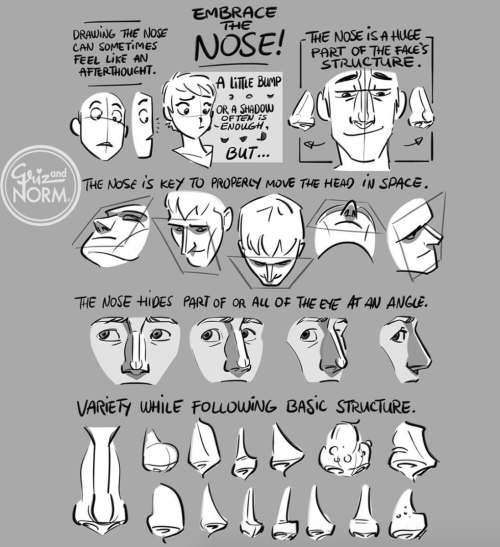
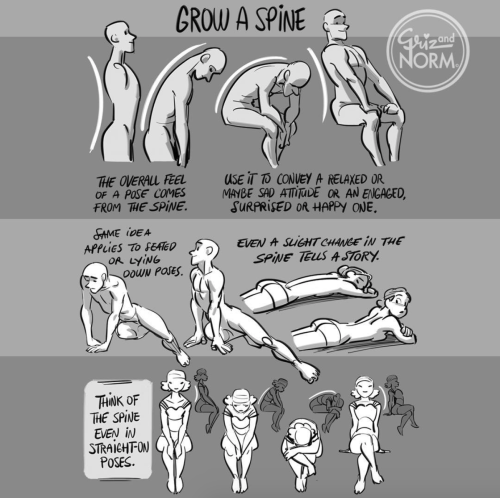
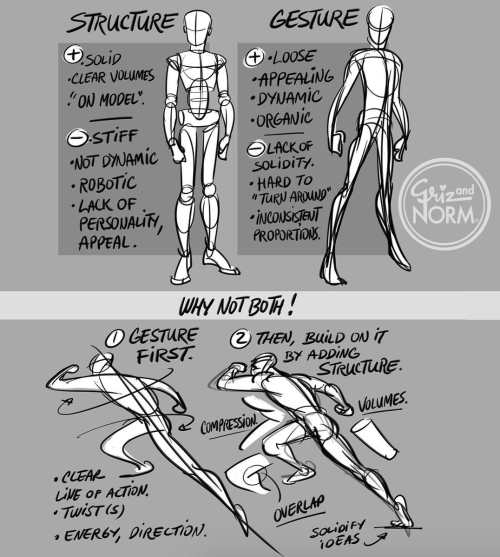
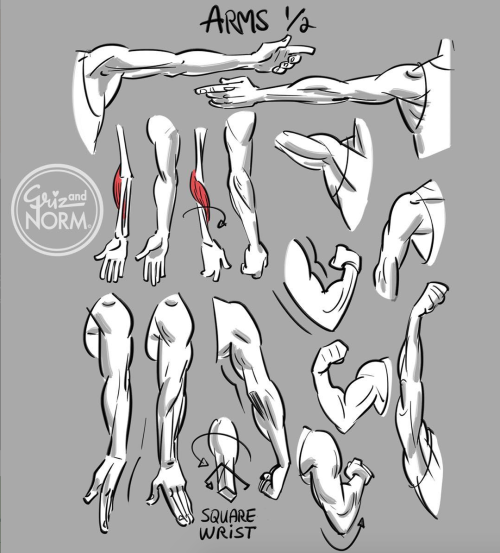
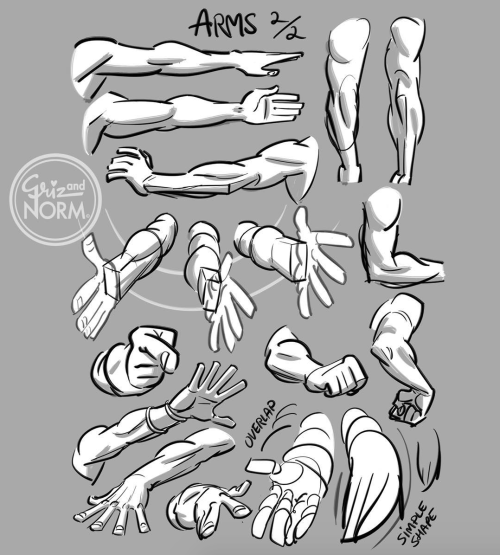
Art tutorials by Disney artists Griz and Norm Lemay
Quick art tip - child proportions
Ok this is a real quick one but let me show you how to get more-or-less accurate sizes for child characters. Kids are tricky to draw, they are - from toddler up to about teens people change radically almost every year so pinpointing character’s size during those years is pure hell.
What you need to do to make everything super easy for yourself is to check their Head Proportion. What makes kids look like - well, kids, is that their heads are proportionally large in comparison to their body.
Average adult is about 7,5 heads tall in comparison to their own body, however with children under 10 that number is just under 6 heads with about 1 head shorter the younger you go down to 3 heads as an infant.
Easiest way to figure the so-so head-height of a certain age is to find images of said age group and do a quick count on them
at which after you can replicate it in your own works - don’t mind if it’s not 1:1 with reference, finding images that are actually of the age you need is tricky and kids in general vary a lot so someone might be a lot taller than others. You have a bout 0,5 -1 heads of wiggle room before it starts to look way older.
Proportions are super important in art and i lovingly recommend everyone to figure out basics of them - it’s the easiest way to get notifically better with art. I could go on about proportions but let’s wrap this up. Need to note however that head proportion is not same as character height - a character can be 15 feet tall but still have head-height of 6, HH is simply a way to scale out the body.


It was about time I shared my art tutorials from Patreon.


Let me know if you have questions!!!
Free to use textures, credit optional.


some puppies studies ( ͡° ͜ʖ ͡°) 🐶 | Instagram
(Edited) + more studies lkdafña
-
 actuallyart3mis reblogged this · 1 month ago
 -
actuallyart3mis liked this · 1 month ago
-
 bamboozled-bumblefuck liked this · 1 month ago
 -
 finalpan liked this · 1 month ago
 -
 liliastriangle liked this · 1 month ago
 -
 brobeckology reblogged this · 1 month ago
 -
 bythestedeside reblogged this · 1 month ago
 -
bythestedeside liked this · 1 month ago
-
 newyorksjojos reblogged this · 1 month ago
 -
 mushroomgnome006 liked this · 1 month ago
 -
 grandmasickomode reblogged this · 2 months ago
 -
grandmasickomode liked this · 2 months ago
-
 itarasi reblogged this · 2 months ago
 -
 argentumartworks reblogged this · 2 months ago
 -
argentumartworks liked this · 2 months ago
-
 bectara-art-and-writing liked this · 2 months ago
 -
 fruitloopsfactory liked this · 2 months ago
 -
 wolf-a-kins liked this · 2 months ago
 -
itarasi reblogged this · 2 months ago
-
 uwutastic liked this · 3 months ago
 -
 sidezclaw-attack reblogged this · 3 months ago
 -
sidezclaw-attack liked this · 3 months ago
-
 amalgamatus liked this · 4 months ago
 -
 opalthewyvern liked this · 6 months ago
 -
 byzarrrr reblogged this · 6 months ago
 -
 rebirthresource reblogged this · 6 months ago
 -
 tfcoorock reblogged this · 7 months ago
 -
 dadjokesbutgay liked this · 7 months ago
 -
dadjokesbutgay reblogged this · 7 months ago
-
tfcoorock liked this · 7 months ago
-
 daemon-404 reblogged this · 7 months ago
 -
daemon-404 liked this · 7 months ago
-
 multidimensionalfang1rl liked this · 7 months ago
 -
 animeschibia reblogged this · 7 months ago
 -
 keikoayano liked this · 8 months ago
 -
 eeveechuandsticks reblogged this · 8 months ago
 -
eeveechuandsticks liked this · 8 months ago
-
 waywardshuck liked this · 8 months ago
 -
 iishifishii liked this · 8 months ago
 -
 myuuuteo liked this · 8 months ago
 -
 the-goose-ferret liked this · 9 months ago
 -
 mysteriouscalligraphy reblogged this · 9 months ago
 -
 twadi-gurl reblogged this · 9 months ago
 -
 limbs-are-optional liked this · 11 months ago
 -
 aviatorofaces liked this · 11 months ago

Sylwester | i will mostly post sketches, because i'm too lazy to end them
196 posts