Back Muscles!
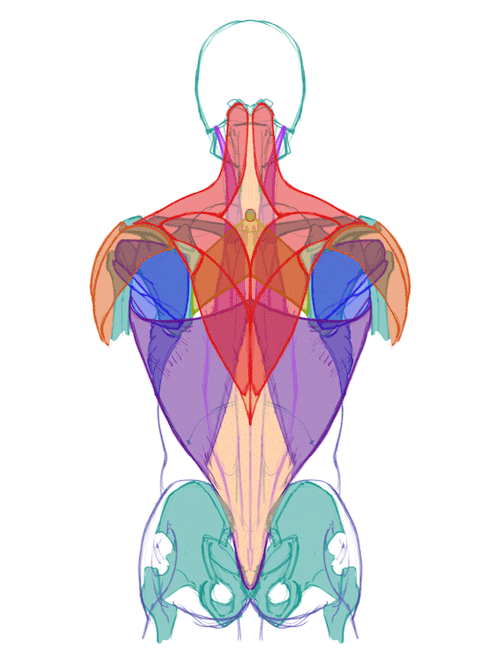

Back muscles!
SKELETAL LANDMARKS

shoulder blades: most of the upper back muscles attach to them directly, placement is affected by the arms. They can get obscured on very muscular backs, but most people these are the most dominant features!
7th cervical vertebra: neck bone that sticks out in most people, it sits in the center of that diamond shaped tendon in the middle of the trapezius
Also, obviously always keep the general shape of the ribcage and spine in mind, it was too much of a pain to draw them all in lol.
BACK MUSCLES

Erector Spinae: make the column-like structures around the spine, they extend all the way up to the neck, but you really only see the bottom part.
Latissimus Dorsi: are very thin, so most of the time you only see the structures underneath (such as the erector spinae). But when flexed, (for example, when climbing), you can see here on Jimmy Webb’s back that swooping curve it makes under the armpits.

The lats are also responsible for most of a person’s upper body strength and are the “V” shaped part of the back. For example, it’s how Bruce Lee was so strong despite being a small guy. Just look at those wings, man.


Infraspinatus, Teres Minor, and Teres Major: sit on the shoulder blade itself, and connects it to the top of the arm bone. These are responsible for a lot of the crazy shapes you see in bodybuilders’ backs.
Underneath them is the serratus anterior, which technically isn’t a back muscle but sits on the side of the ribs. These form that zig-zag pattern on the ribs that makes people look super ripped when visible with the external obliques, both wrapping around the sides of the torso. They’re not technically back muscles but fill out the silhouette, so it’s good to keep them in mind.
the glutes/butt muscles… they go farther up the back than one might assume and they, along with the pelvis, do affect the surface appearance of the lower back.

Rhomboid: simple shape, attaches from the inner edge of the shoulder blades to the middle of the spine at the 7th cervical vetebra to about the 4th or 5th thoracic vetebra. It does not overlap with the latissimus dorsi

Trapezius: divided roughly in the top, middle, and bottom sections. The top is quite thick and cylindrical and makes the sloping shape from the neck to the shoulders.
The bottom part is very thin; like the latissimus dorsi, the forms underneath it are visible when relaxed, making the rhomboid visible if it is flexed and the traps are not. Also not where the bottom part’s tendons attach to the shoulder blades; it outlines the curve of the shoulder blades even in people who are covered in brains muscles.
When fully flexed, it doesn’t taper into a point, but makes a small “w” shape at the bottom.
The 7th cervical vertebra sits at the center of the diamond-shaped tendons between the first and second sections of the trapezius. This part appears recessed in very muscular people.

Deltoid: not really a back muscle, but they overlap with the Infraspinatus and insert into the upper ridge of the shoulder blades, so it’s good to see how they interact with the others.

Ah, now for an example, featuring Thor himself. Note the curve where the traps meet the shoulder blades, the diamond-shaped tendon, and the rough “w” shaped contour of the lower back. Also note the two dimples, which is formed by the pelvis bones. They tend to be more prominent in women, although they are found in both men and women.
Try to find the back muscles on other people yourself, and then GET DRAWING

(PS, Generally it’s best to be able to simplify the forms instead of trying to render straight away - that’s how you know you really internalized the anatomy! I… honestly still don’t understand the back enough to do that yet, hence the lack of examples, unlike with the forearms post. But nonetheless, I hope that this is still useful as a general reference. I know it’s helped me at least remember what the different parts are, even if I don’t yet have a grasp of how they interact in motion!)
More Posts from Nastysynth and Others

Some people were curious how I finish my 1H sketches so here’s a little tutorial ✨
Ps: just keep in mind that this is the result of super concentrating for 60min just drawing nothing else.

i am SO sorry for the super long response, but i thought this might make a nice little tutorial opportunity, since soft body physics can be… frustrating, to say the least. i’ve noticed that it tends to respond better to spherical meshes than most others, so getting it to work with something with a lot of hard edges and flat planes can be a little tricky (at least in my experience).
so! to get started, here’s my basic setup

the only thing i’ve done so far is place my object in the scene, along with a plane to act as the ground and a camera to record everything.
next you want to select your object, and in the properties menu on the right, select the physics tab (should be the very last one, the icon looks like a bouncing ball)

and for your object, you want to apply a collision and a soft body modifier (some people use rigid body instead of collision, so if you have issues with one there’s a chance the other might work out better. as for me, i usually stick to collision)

then select your plane and apply the collision modifier only.
now when you hit the play button at the bottom of the screen, this happens

it’ll just kinda float in place.
so to fix that, you select the object, go back into the physics menu, and look at its soft body settings

now uncheck the box that says “Soft Body Goal” (this’ll let gravity do its thing)

now when you press play after that

poor dude just kinda dies.
so there are a couple things i like to do to help it not… do… whatever that is.
go back into your object’s soft body menu and click on the tab that says “Soft Body Edges”

now underneath where it says “Collision:” you want to make sure that you have either “Edge” or “Face” (or both, why not live a little) applied to the object (this can help prevent clipping!)

we’re trying to make it wiggle n’ jiggle while still maintaining its shape, so what usually works for me is to crank up the “Bending” spring as high as it’ll go (which is 10) and enabling “Stiff Quads”

and we’re left with this!

and that’s how i do it! there are probably more efficient ways to get this effect, but for me

do you have any tips for drawing a nose when the face is front facing?
This was really fast but I hope this helps:

Depending on the shape of the nose, the way you chose to render the contour lines will change. I used Rose, Quazky, and Glasner as examples in the lower right corner there. For TH, I generally don’t render the bottom of the nose with a line but with a shadow for simplicity’s sake. I hope that makes sense.
PS - I made a new brush for rendering technical drawings and I love it. *A*
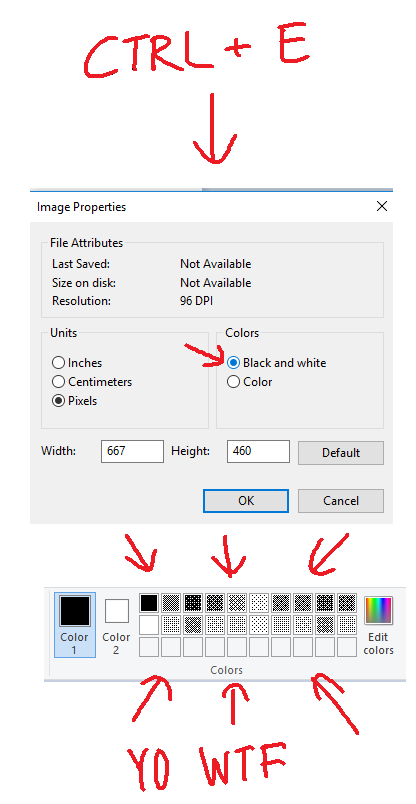
Do you any tips about using ms paint?
I think I have few tips
#1Use 500x500 px or bigger canvas size. Any smaller size will make a brush look messy and shit.Here look:
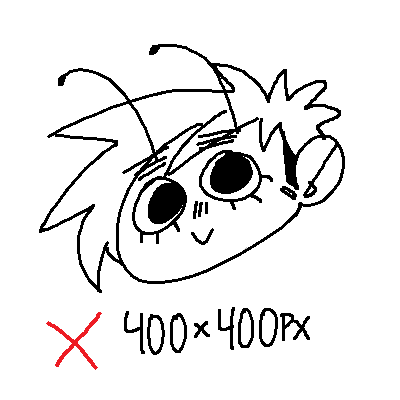

Can you see the difference?? Lineart in 600x600 px is so much smoother
#2

#3

#4 RIGHT MOUSE BUTTON YOU NEED IT

#5

*:・゚✧it’s like manga : *✧・゚
that’s all tbh
i hope this was somewhat helpful


My friend @nuclear333 asked me how I shaded hair and I promised her a hair shading tutorial, which of course became a hair…everything…tutorial.
Lots of great tutorials have already been been made on the subject so here’s me throwing in my own two cents. The usual disclaimers apply: this is how I think of hair when I draw it, and is by absolutely no means the only way, or even necessarily a correct way, to do it. I’m always happy to hear about how others approach the same subject!


Hey got any tips of drawing in the cr style?
Well first off, study the sprite sheets of the characters. They can all be found on the Cookie Run wiki.To draw in a style it helps to study the style too and figure out the elements of how the characters are put together. For Cookie Run it goes hand in hand with my style because a lot of it is very Geometric. Even with cookies who are oddly shaped.

I talked about this with my Discord once about how basic shapes can really go into making the character design solid and this seems to largely be the basis of how CR renders it’s characters.

Even characters build like Purple Yam and Milk Cookie use this more basic geometry when building the foundation of the character. It all comes down to a more simplistic style based on shapes.

That being said, When I build characters I use basic shapes to do it. That’s why a lot of my earlier drawings of the CR OCs look so different compared to now, because back then I was learning it. The easiest way to do it is to try drawing a CR character, build them as you see them, and then adapt that into how you draw.

And obviously cookies aren’t all the same shape! Shapes really can go into how people will interpret your character and their personality! So don’t be afraid to think outside of the box and look at different shapes for different characters!
That’s about as many tips as I have for now, but that’s the fundamentals over how I go about it.

Wake up while we still have a chance.
I have two questions! First: have you ever thought of doing a tarot card suit for your characters? I think it'd work really well for them! And two: help me how do I draw legs
@gravitality
Hi!! I’ve absolutely been thinking about that, yeah, in fact I recently talked about that to my boyfriend just recently. It’ll likely happen after october! And to answer your second question! I made a thing on legs that i hope you’ll find useful!!
So. I’ve already explained basics on legs here, but I don’t think it hurts to go through some extra details to help you understand legs some more.

The very basic thing is to imagine legs as teardrops. Again, this has already been covered in said tutorial above, but I figured it’s still good to mention even the most basic thing that I know of. I still highly recommend you check it out to get in more detail and to see some other examples and practices that you do. But basically, think of legs in the shapes of teardrops, when it comes to shape. If you need a simple stick-figure to connect the legs in the first place, make sure that they bend at the knees a bit so that the legs don’t come off as stiff and unnatural.

As you can see, this method works perfectly for realistic legs as it does for stylistic ones. Remember to use these as a guideline, never to be the exact base of the legs you will be drawing. If you draw traditionally, remember not to draw these guides too hard, or they will be hard to erase/do freestyle!

But how do you actually draw out the legs without drawing them perfectly straight, as shown to the left? The trick is to add volume to them, and how you do that can be winged to your own liking. The idea is to think in curves. As no leg is perfectly straight. You may make these curves minimal if you don’t want them to be curvy, but keep in mind, still, that not even your own bones are perfectly straight, so it is highly recommended that you make them bend, at least a little.

It all depends on how you draw them as well. Say you put your legs together, as shown in this picture, what happens to the fat and muscle? Naturally, they press together, much like how thighs squish on the surface when you sit down (I’m sure most people know what I’m talking about). Make sure this shows in your art! This is very important to keep in mind, because it makes it all look more natural and believable. Try to cross your legs or stand up and sit down again for real-life examples!


The same applies for stretching your legs, more or less, except they appear to become more ‘hollow’ and slimmer. They become less soft to the touch, too, and might show. Try stretching your legs and feel where the muscles tense and where it feels ‘hollow’. This is very helpful with your art.

Many leg tutorials talk about legs without mentioning the behind. It requires a tutorial on it’s own, in all honesty, but this is the most simplest way to draw it connecting to the legs. Remember that it comes in many different shapes, and this is just a super basic guide! Two circles overlapping, while following the line and flow of the legs. Remember the muscle/fat as mentioned above!

Okay, so we got the basics of leg shapes figured out? What if you want o draw them in a certain pose, or with a certain silhouette, but perhaps do not have the reference for it? Or you want to blend your style into it? The key is to not shy away from doodling the form. Make mess, draw lightly and don’t care about the anatomy. That way you’ll get everything down without it appearing stiff. You can clean up the sketch later, always, and if you can, use a reference after you have drawn your pose, to correct your drawing.

Remember that the hips do a lot to the pose of the legs! Make sure they are in flow with your legs, so that it can look more natural. Remembers that hips ‘rotate’ with the spine.

I’ve talked about this method before when it comes to posing, and the same applies for the legs. One way to make legs appear ‘steady’ is to picture them standing in a line, and one of those legs need not to stray from the lines too much, making it steady. If you want a dynamic pose despite the steady pose, you can always have the other leg stray from the line, since it only matters that one leg is steady. This method can create good, casual poses without making them appear boring. (also notice how the teardrop shapes are used here, despite the highly stylized legs)

Do you want a highly dynamic pose, or them to appear unsteady, then skip the line entirely and make both legs aim away from it completely. As you can see, the legs appear more moving, in action, as if they’re fighting, falling, or dancing. As you can imagine, this is not a pose that one could stay steady on, suggesting that it’s taken mid-movement. More about posing and this ‘line’ method is talked about in this tutorial.
Hope this helped you, if you have any questions let me know, and if you’d like to check out all my tutorials they can be found here!


people have asked me how i draw eyes so i made an extremely slap-dash eye tutorial! this is simply about how i draw a simple neutral eye, nothing to do with expressions (that’s a whole other thing).
start with the horizontal guide on the face, to help place the eyes. put circles where the eyes will go!
adjust the circles into diamond shapes– i got this idea from sinix design on youtube, it’s very helpful and easier to see where the lids should end than with a circle.
draw the top lid/lash lines, leaving a bit of space at the top of the diamond. keep each eye in time with each other– drawing one whole eye first makes it harder to match the other one.
then the bottom lids. i usually try to do all the lid shapes with a single curved stroke each. keep it simple pals!
irises & pupils. sometimes i’ll draw filled-in black circles for the irises, to help figure out where to place them naturally!
lid creases, use the leftover diamond at the top as a loose guide for where to place them. remember that the lid curves around the eyeball.
make adjustments! things don’t always come out perfect immediately. i usually have to thicken the lash line (i like mine quite thick), move the bottom lid up or down, and sometimes resize a whole eye (easier on computer than traditional, i know!). if you’re on a computer make sure to flip your canvas often so you can see these little things ❤
and to practice, just doodle a lot of small eyes! keeping them small makes them easier and faster to finish, so you can focus on your strokes and playing around with shapes, tilt, lid space, all that. don’t worry about making the irises perfect circles/ovals or any of that, just try to capture the character. have fun!
-
 mightylaaitie reblogged this · 1 week ago
 -
 lwoorl liked this · 1 week ago
 -
 cenedrariva reblogged this · 1 week ago
 -
 believemeallisbrilliant liked this · 1 week ago
 -
 ricsilvan liked this · 1 week ago
 -
 clowderofcloudies reblogged this · 1 week ago
 -
 seedling-lotus reblogged this · 1 week ago
 -
 happipo liked this · 1 week ago
 -
 lepetiterik reblogged this · 1 week ago
 -
lepetiterik liked this · 1 week ago
-
 dimensionslip liked this · 1 week ago
 -
 virus-weinkeller reblogged this · 1 week ago
 -
 vanishedgaze liked this · 3 weeks ago
 -
 ehay liked this · 2 months ago
 -
 solarbeardragon liked this · 2 months ago
 -
 peacelovingdaffodil reblogged this · 3 months ago
 -
 moonlitkawaiifestival reblogged this · 3 months ago
 -
 rhapsodynjune reblogged this · 3 months ago
 -
 tony-artx liked this · 4 months ago
 -
 colterblues liked this · 4 months ago
 -
 krowspiracyanon liked this · 4 months ago
 -
 alterkrystal reblogged this · 4 months ago
 -
alterkrystal liked this · 4 months ago
-
 missmeiyou liked this · 4 months ago
 -
 lcuzyes liked this · 4 months ago
 -
 superbb liked this · 4 months ago
 -
 trottolinos liked this · 4 months ago
 -
 aegialeus liked this · 4 months ago
 -
 mothzarellaman liked this · 4 months ago
 -
 lotsofdreamb0ats reblogged this · 4 months ago
 -
lotsofdreamb0ats liked this · 4 months ago
-
 coltgold liked this · 4 months ago
 -
 fruitloopsfactory liked this · 4 months ago
 -
 lookey-here reblogged this · 4 months ago
 -
 wind-sama liked this · 4 months ago
 -
 silverwantsfood liked this · 4 months ago
 -
 turtleloser liked this · 4 months ago
 -
 berryblu-arts liked this · 4 months ago
 -
 deliriouslyparanoid liked this · 4 months ago
 -
 somekindofhat reblogged this · 4 months ago
 -
 masoomasstuff-blog reblogged this · 4 months ago
 -
masoomasstuff-blog liked this · 4 months ago
-
 hinataelyontoph liked this · 4 months ago
 -
 memento-mori-twilight reblogged this · 4 months ago
 -
memento-mori-twilight liked this · 4 months ago
-
 squirrelkittys-art-refs reblogged this · 4 months ago
 -
 ekcess reblogged this · 4 months ago
 -
ekcess liked this · 4 months ago

Sylwester | i will mostly post sketches, because i'm too lazy to end them
196 posts