I Have Two Questions! First: Have You Ever Thought Of Doing A Tarot Card Suit For Your Characters? I
I have two questions! First: have you ever thought of doing a tarot card suit for your characters? I think it'd work really well for them! And two: help me how do I draw legs
@gravitality
Hi!! I’ve absolutely been thinking about that, yeah, in fact I recently talked about that to my boyfriend just recently. It’ll likely happen after october! And to answer your second question! I made a thing on legs that i hope you’ll find useful!!
So. I’ve already explained basics on legs here, but I don’t think it hurts to go through some extra details to help you understand legs some more.

The very basic thing is to imagine legs as teardrops. Again, this has already been covered in said tutorial above, but I figured it’s still good to mention even the most basic thing that I know of. I still highly recommend you check it out to get in more detail and to see some other examples and practices that you do. But basically, think of legs in the shapes of teardrops, when it comes to shape. If you need a simple stick-figure to connect the legs in the first place, make sure that they bend at the knees a bit so that the legs don’t come off as stiff and unnatural.

As you can see, this method works perfectly for realistic legs as it does for stylistic ones. Remember to use these as a guideline, never to be the exact base of the legs you will be drawing. If you draw traditionally, remember not to draw these guides too hard, or they will be hard to erase/do freestyle!

But how do you actually draw out the legs without drawing them perfectly straight, as shown to the left? The trick is to add volume to them, and how you do that can be winged to your own liking. The idea is to think in curves. As no leg is perfectly straight. You may make these curves minimal if you don’t want them to be curvy, but keep in mind, still, that not even your own bones are perfectly straight, so it is highly recommended that you make them bend, at least a little.

It all depends on how you draw them as well. Say you put your legs together, as shown in this picture, what happens to the fat and muscle? Naturally, they press together, much like how thighs squish on the surface when you sit down (I’m sure most people know what I’m talking about). Make sure this shows in your art! This is very important to keep in mind, because it makes it all look more natural and believable. Try to cross your legs or stand up and sit down again for real-life examples!


The same applies for stretching your legs, more or less, except they appear to become more ‘hollow’ and slimmer. They become less soft to the touch, too, and might show. Try stretching your legs and feel where the muscles tense and where it feels ‘hollow’. This is very helpful with your art.

Many leg tutorials talk about legs without mentioning the behind. It requires a tutorial on it’s own, in all honesty, but this is the most simplest way to draw it connecting to the legs. Remember that it comes in many different shapes, and this is just a super basic guide! Two circles overlapping, while following the line and flow of the legs. Remember the muscle/fat as mentioned above!

Okay, so we got the basics of leg shapes figured out? What if you want o draw them in a certain pose, or with a certain silhouette, but perhaps do not have the reference for it? Or you want to blend your style into it? The key is to not shy away from doodling the form. Make mess, draw lightly and don’t care about the anatomy. That way you’ll get everything down without it appearing stiff. You can clean up the sketch later, always, and if you can, use a reference after you have drawn your pose, to correct your drawing.

Remember that the hips do a lot to the pose of the legs! Make sure they are in flow with your legs, so that it can look more natural. Remembers that hips ‘rotate’ with the spine.

I’ve talked about this method before when it comes to posing, and the same applies for the legs. One way to make legs appear ‘steady’ is to picture them standing in a line, and one of those legs need not to stray from the lines too much, making it steady. If you want a dynamic pose despite the steady pose, you can always have the other leg stray from the line, since it only matters that one leg is steady. This method can create good, casual poses without making them appear boring. (also notice how the teardrop shapes are used here, despite the highly stylized legs)

Do you want a highly dynamic pose, or them to appear unsteady, then skip the line entirely and make both legs aim away from it completely. As you can see, the legs appear more moving, in action, as if they’re fighting, falling, or dancing. As you can imagine, this is not a pose that one could stay steady on, suggesting that it’s taken mid-movement. More about posing and this ‘line’ method is talked about in this tutorial.
Hope this helped you, if you have any questions let me know, and if you’d like to check out all my tutorials they can be found here!
More Posts from Nastysynth and Others
i literally love how your color and shade if it’s ok do you have any tips on digital coloring? you don’t have to answer this if you don’t feel like it :) thanks!!
hello friend!! i have a tutorial i made on twitter a while ago which is more or less how i make my colours more interesting. i still use the technique and in general it’s just a lot of colour adjustment nothing too special LOL here!!


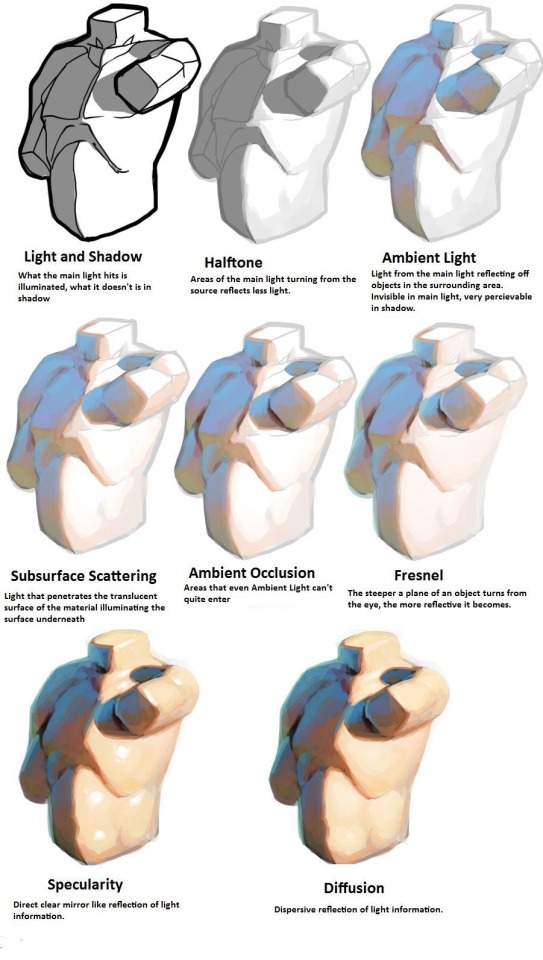

I am so serious when I say if you want to learn about light, you NEED to at least look at modeseven’s tutorials. even if you’re not pursuing a painterly style, this is all essential theory that can be easily adapted to different coloring styles. notice how none of these ever say ‘light with these colors and shade with these colors’? notice how this is teaching how light works on a mechanical level, and reminding the audience to adjust the actual colors they choose by context? THAT is good advice.
(if you’re thinking ‘wow I want to study more of this persons art!’ I encourage you to do so, but proceed with the knowledge that modeseven draws pretty much exclusively weird as hell kink art. sometimes wisdom comes from horny places)


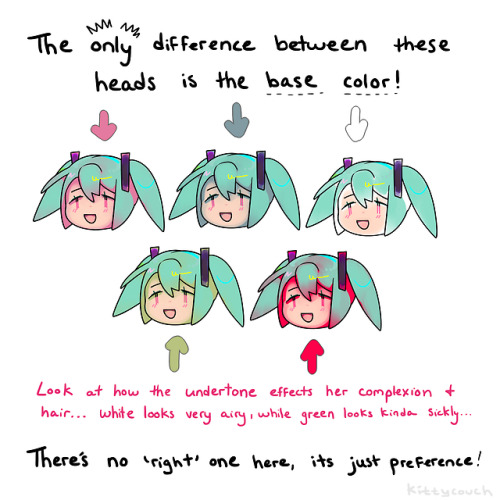

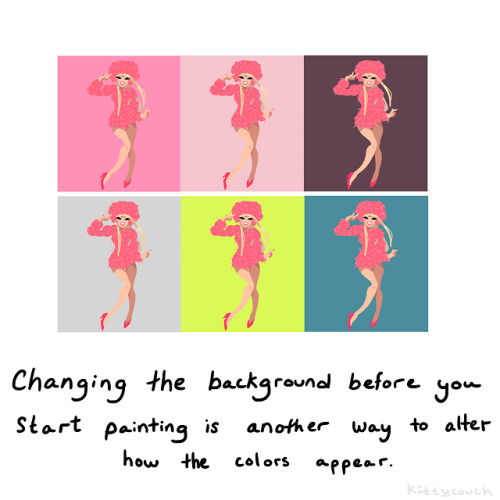
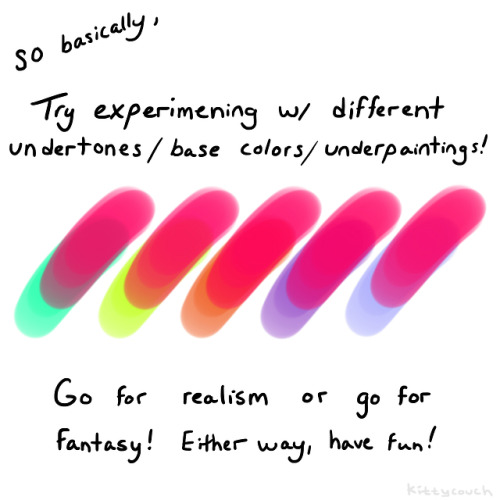
No one asked but here’s a brief tutorial on digital underpainting and how it can add some extra flavor to your art!
(I got asked this a couple times so just to clarify: I used “overlay” in the second slide… but the rest of these examples are JUST painted on, no effects! Try playing with the opacity on your pencil/water/brush tool to allow the base color to show through!)


A basic tutorial on how I do ghoul skin for anon!! I wanted to include how to do fat/veins and stuff underneath the skin, but this tut is already long enough so I just stayed with the basics! Sorry if this is a bit messy, but I hope it helps!


some people expressed that they would like to see my process on painting eyes, so I threw together a quick guide. I’m really bad at explaining things, but maybe someone gets something out of it. Some other information: - I use a lot of hard brushes when sketching and painting, most of them are textured. Usually I only use the soft round brush when adding big shadowed ares and light effects. - Most of the time, I paint on barely more then 2 layers: Background and character. I don’t like painting with dozens of layers and prefer to keep things simple. - I love to overuse too many colors. It’s just a stylistic choice, but I like the look of spashes of different colors everywhere, especially when they are slightly desaturated. (as seen on the second painting step)


.. / … . . / -.– — ..-


It only takes a couple of lines to go from one eye style to the other so I'm always stuck between them cause I love both so much


Oh…Steve…
Metal tutorial
Fire tutorial
Hello!! This may be a weird question but I too am heavily interested in birds but unlike you, I cannot draw them as well. :,^( If it's not too much work (if it is just ignore this, i don't mind), do you know of any good references or sources to learn more about birds from facts to anatomy? I know this is a pretty wide range so again, I totally understand if you can't! I just thought it was worth an ask. Thank you so much!!
i don’t really have any specific reference places but here’s some things i do.
drawing birds is arguably one of the hardest animals because of their feathers. unlike fat and fur that folds to the body in a way that’s usually readable to whats underneath, feathers sort of create a ‘bubble’ around the body which makes a lot of body parts indistinguishable to where one ends and another begins. so its important to always think in terms of skeletal anatomy:

birds are dinosaurs and therefore reptiles. looking at birds this way, it’s a lot easier to see their evolution.

with that in mind, say we wanna draw this dude. owls are pretty tough because their outward appearances are so deceiving.

we’ve got a neutral pose, feathers are generously surrounding most of the body so its no sweat, we don’t really know whats going on. but we can hide it. but now we want to make him move and look cool. without really knowing whats going on we might get stuck on something like this:

its always kind of stiff and frustratingly unrealistic. mostly this is because we just don’t have enough knowledge of the skeletal structure to work with. eyeballing anatomy on our first drawing might get something like the left, more than anything people aren’t generous enough with leginess of birds:

owls do indeed have regular proportioned necks with the rest of their bodies. and their skulls are like that of any other stereotypical raptor under their mask of feathers (minus their freaky eye sockets and ears)) they can open their mouths wide just like a hawk or eagle can. it’s important to remember that birds with large wingspans do not magically lose their length when hidden. they are just conveniently folded in against their bodies.
knowing this we can try again. suddenly things seem to click in place more and have a believable-ness to them.

the rule of thumb for most birds is they have less body mass and more leg/neck than one thinks. they are lanky dinosaurs.


when we are looking at this:

we are seeing this:

with that rule, drawing birds becomes a lot less confusing. with practice you might just eyeball their feathered appearances but if not, going back to skeletal/muscle structure gives the base you need to draw convincing birds.

when it comes to specific body parts, the most challenging part for me personally have always been feet. birds with super twiggy feet are easier because one line per toe is easy to get away with. but when you get to birds with meatier feet, especially raptors, it gets difficult. my way of getting around this is to think of the actual ‘feet’ last. drawing each separate toe first gets confusing because you just find yourself trying to get them to each fit evenly together at the base of the foot. one always seems kind of skinnier or fatter than the others in my experiences, and by the time you correct it the gesture gets muddled and lost.

so i just skip that part until later, i draw talon first.

perhaps this is very unorthodox, but just like artists might square in the hands first on a human before working out the arms, i square in the talons to know where i want them before worrying how they go on exactly.

that way we have a clear gesture captured, and in my experience it is much more readable.
thats’ really all i can think of now in terms of my techniques, i hope this helps :V
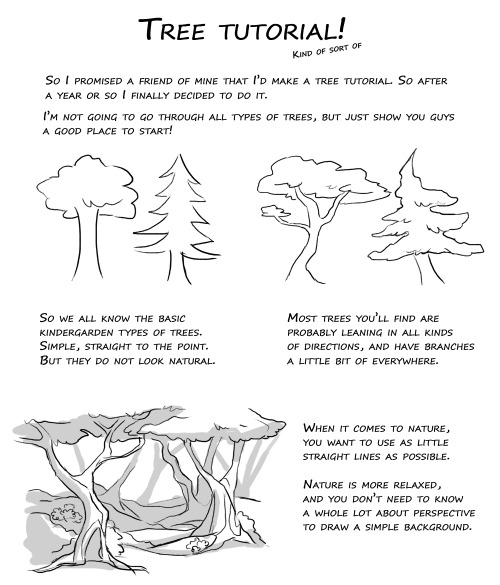
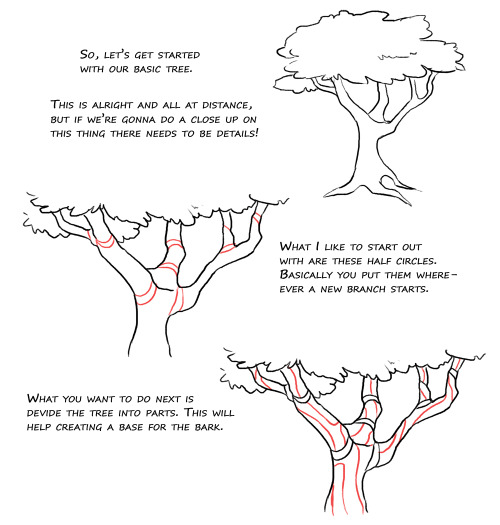

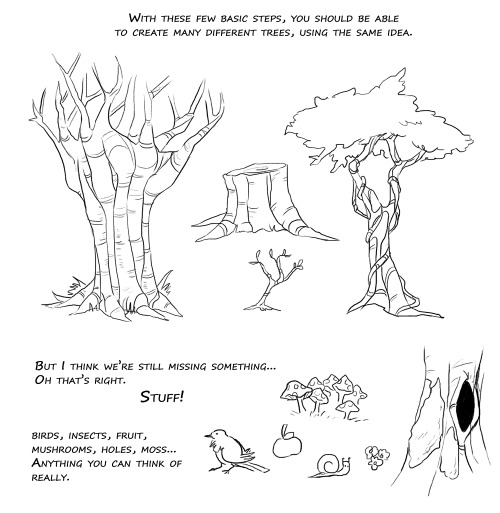

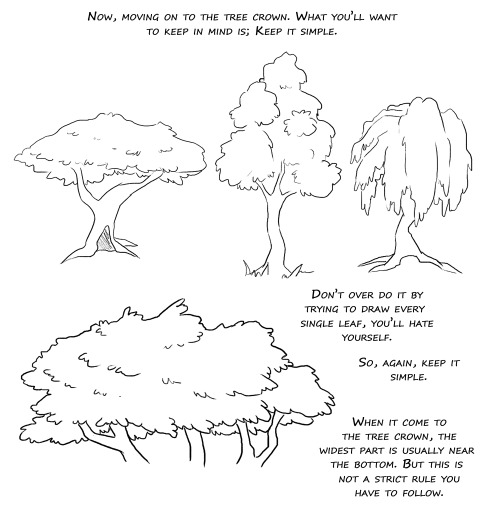


Aaahh so yeah. I’m nothing amazing at trees, but my friend Huispe has been asking for this for such a long time now, I decided to finally do it. Hopefully it can be useful for any of you out there <3 (there’s prolly plenty of typos in there too but I am just so tired right now aughhh)
-
 jesterpanic reblogged this · 1 month ago
 -
 the-awesomeness-of-randomness liked this · 1 month ago
 -
 tryingtolearnartsob reblogged this · 1 month ago
 -
 stars-follow-the-sky liked this · 2 months ago
 -
 krunchycrispy liked this · 4 months ago
 -
 themissionstuff liked this · 5 months ago
 -
 wanderingquill reblogged this · 5 months ago
 -
 purehatred12 liked this · 7 months ago
 -
 great-wolfskin reblogged this · 7 months ago
 -
 napxsoil reblogged this · 7 months ago
 -
napxsoil liked this · 7 months ago
-
 writerjabberwockies reblogged this · 7 months ago
 -
 artking-4 reblogged this · 11 months ago
 -
artking-4 reblogged this · 11 months ago
-
 batsoutlow liked this · 1 year ago
 -
 adamdarkless liked this · 1 year ago
 -
 fomikrai liked this · 1 year ago
 -
 hydrangeahelper reblogged this · 1 year ago
 -
 fritaqtibedbeanc liked this · 1 year ago
 -
 acmatazimne liked this · 1 year ago
 -
 delightfulkingtyphoon liked this · 1 year ago
 -
 ewtalpihelpround liked this · 1 year ago
 -
 friendshapedstranger liked this · 1 year ago
 -
friendshapedstranger reblogged this · 1 year ago
-
 akiralightshiraoka0 reblogged this · 1 year ago
 -
 sucelus1 liked this · 1 year ago
 -
 reflectre reblogged this · 1 year ago
 -
 sylphthedragon liked this · 1 year ago
 -
 sunlaire liked this · 1 year ago
 -
 laukareferencepile reblogged this · 1 year ago
 -
kung-pow7 liked this · 1 year ago

Sylwester | i will mostly post sketches, because i'm too lazy to end them
196 posts