Do You Any Tips About Using Ms Paint?
Do you any tips about using ms paint?
I think I have few tips
#1Use 500x500 px or bigger canvas size. Any smaller size will make a brush look messy and shit.Here look:
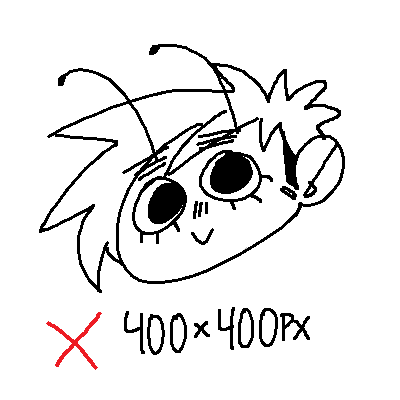

Can you see the difference?? Lineart in 600x600 px is so much smoother
#2

#3

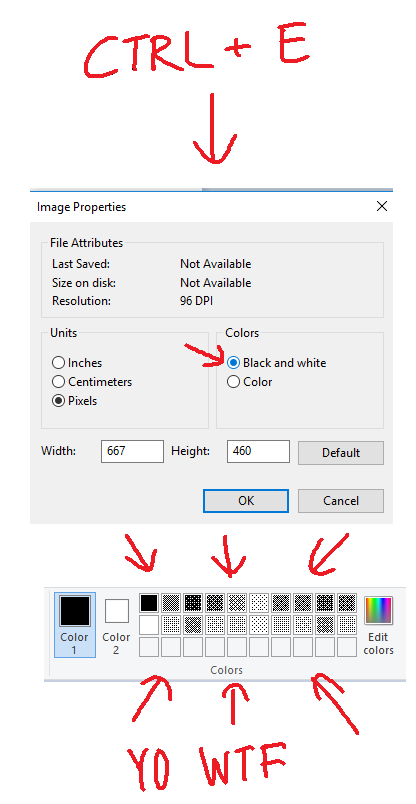
#4 RIGHT MOUSE BUTTON YOU NEED IT

#5

*:・゚✧it’s like manga : *✧・゚
that’s all tbh
i hope this was somewhat helpful
More Posts from Nastysynth and Others
Hi! regarding your latest post, may I know which brushes and program did you use for it? Thanxx


I used Clip Studio Paint, the Rough brush is a standard brush in the program. Rough 2 is a variation of Rough (settings above), and Rough 3 is the same as Rough 2 + an extra marble texture. Hope that was helpful :)
How do you draw noses?
I’m not sure what specific part you’re wondering about, so here’s a run-through of my process from sketching to painting!
1) The first thing I do is simplify the nose into a few basic shapes to get a prism-like block, like so:

2) I can now easily draw the prism shape in three-dimensional space depending on the angle and rotation of the head.

3) Using the guidelines/planes I can draw a proper nose in any angle! There aren’t many tricks or shortcuts for this step, unfortunately (other than practicing lots). I recommend using references, they’re always helpful :)
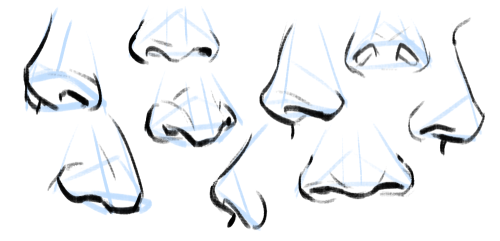
4) Really important to note: all noses vary greatly, especially from different ethnicities! A high-bridge “aristocratic” sort of nose or a ski-slope button nose might be accurate for some people, but definitely not everyone. Compare differences in size, width, a hooked or button nose tip, high or low nose bridge, and so on:

5) Then I paint! I have a skin tone tutorial here, if it helps. Take note of the lighting, skin tone, etc. Here are some things I keep in mind:
For pale skin tones, the nose sometimes has a redder colouration than the rest of the face because of increased blood flow.
The nose also usually has highlights (due to oil). These are located on the tip of the nose, the nostril groove, and where the base of the nose meets the flat area of skin around it!

Hope this helps! In the end, all stylistic choices are completely up to you. Art’s subjective, so feel free to draw any noses you want :)

doctors hate him. one simple trick for more lifelike expressions
so here’s my blender texturing guide! so many tutorial posts lately…
Czytaj dalej
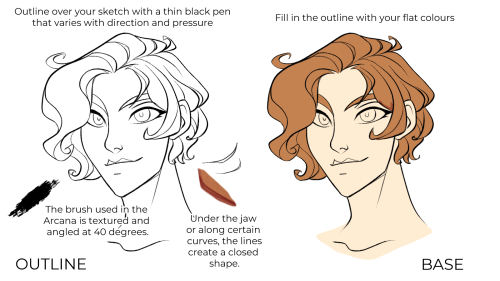
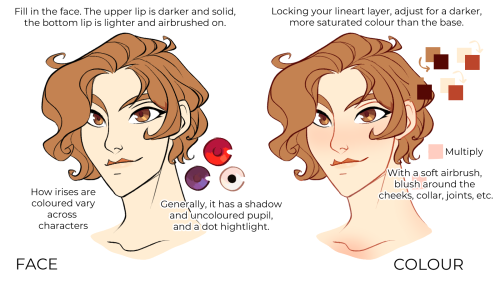
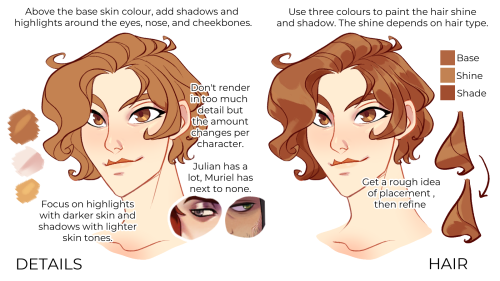
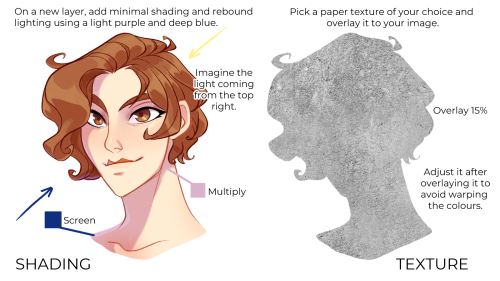
A guide on my process for colouring like in the Arcana which I developed through studying the style.
Now, this is just for sprites or for neutral lighting. In the case of most memories/CGs, you have more interesting colours to use, but the process is identical. There are just extra steps.

Using my favourite memories for each character as examples (hopefully, you can tell which ones) you can see this process. All of this happens on layers above the base drawing.
Usually, you set a colour-filled layer to the setting “multiply” over the entire drawing, then using a “screen”, “add”, or “hard light” layer, you add the lighting. Depending on the intensity of the lighting, the outline will be coloured to be lighter.
The shading colour rarely changes, aside from slight hue changes.
Misc advice/tips/tricks below. I may update it depending on if I get further questions.
Czytaj dalej
Hey got any tips of drawing in the cr style?
Well first off, study the sprite sheets of the characters. They can all be found on the Cookie Run wiki.To draw in a style it helps to study the style too and figure out the elements of how the characters are put together. For Cookie Run it goes hand in hand with my style because a lot of it is very Geometric. Even with cookies who are oddly shaped.

I talked about this with my Discord once about how basic shapes can really go into making the character design solid and this seems to largely be the basis of how CR renders it’s characters.

Even characters build like Purple Yam and Milk Cookie use this more basic geometry when building the foundation of the character. It all comes down to a more simplistic style based on shapes.

That being said, When I build characters I use basic shapes to do it. That’s why a lot of my earlier drawings of the CR OCs look so different compared to now, because back then I was learning it. The easiest way to do it is to try drawing a CR character, build them as you see them, and then adapt that into how you draw.

And obviously cookies aren’t all the same shape! Shapes really can go into how people will interpret your character and their personality! So don’t be afraid to think outside of the box and look at different shapes for different characters!
That’s about as many tips as I have for now, but that’s the fundamentals over how I go about it.


Pearl is one of my favorite characters from cartoons.


Really crappy/quick tutorial on how I draw muscles?
I tend to draw muscles very simply, and there are tons of other tutorials that are waaaaayyyy better! But I hope you enjoy yungterra!
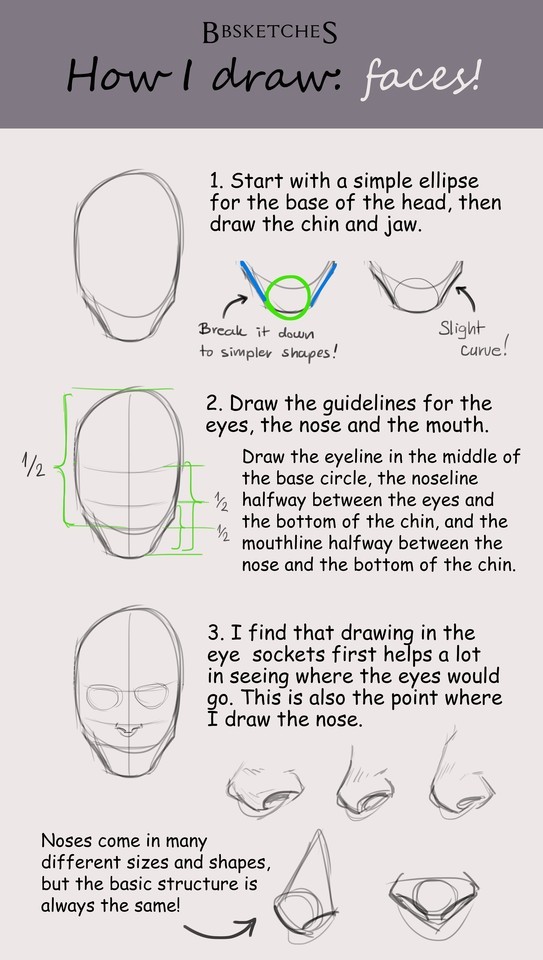

Face tutorial for Anon!
I wasn’t sure whether you meant heads or facial expressions, so here’s a very basic head tutorial! Of course not all faces are the same so proportions and the size of ears/eyes/noses etc. can vary! Feel free to explore and play with them to create unique and interesting characters! I hope this is somewhat helpful, and let me know if you’d like a tutorial on expressions as well!
do you have any tips for drawing a nose when the face is front facing?
This was really fast but I hope this helps:

Depending on the shape of the nose, the way you chose to render the contour lines will change. I used Rose, Quazky, and Glasner as examples in the lower right corner there. For TH, I generally don’t render the bottom of the nose with a line but with a shadow for simplicity’s sake. I hope that makes sense.
PS - I made a new brush for rendering technical drawings and I love it. *A*
-
 mtsveev liked this · 5 days ago
 -
 huhuhuhuimaclown liked this · 1 week ago
 -
huhuhuhuimaclown reblogged this · 1 week ago
-
 biasedblonde liked this · 1 week ago
 -
 pansss liked this · 2 weeks ago
 -
 vnillacone liked this · 4 weeks ago
 -
 archive-of-sorts reblogged this · 1 month ago
 -
 voidpoultry liked this · 1 month ago
 -
 krizste liked this · 1 month ago
 -
 thebgc111-blog liked this · 2 months ago
 -
 paradoxbell liked this · 3 months ago
 -
 lilacskyly liked this · 3 months ago
 -
 chronically-undertronic reblogged this · 4 months ago
 -
chronically-undertronic liked this · 4 months ago
-
 yourlocalxbox reblogged this · 4 months ago
 -
yourlocalxbox liked this · 4 months ago
-
 princesssparkle2005 liked this · 4 months ago
 -
 loveasachoice liked this · 4 months ago
 -
 poppyplate liked this · 4 months ago
 -
 kiraiyugen liked this · 4 months ago
 -
 12user567 liked this · 4 months ago
 -
 falsehuman-exe liked this · 4 months ago
 -
 kiyomizuki liked this · 4 months ago
 -
 katecatloverofficials liked this · 4 months ago
 -
 mimiishii liked this · 4 months ago
 -
 dovembre reblogged this · 4 months ago
 -
dovembre liked this · 4 months ago
-
 azealot liked this · 4 months ago
 -
 coupleabeaches reblogged this · 4 months ago
 -
coupleabeaches liked this · 4 months ago
-
 stalefries liked this · 4 months ago
 -
 will-tostito liked this · 6 months ago
 -
 annita89toyqw9ih liked this · 6 months ago
 -
 astralotl2 liked this · 6 months ago
 -
 beepotatoe liked this · 6 months ago
 -
 slightly-unsure-buryatwoman liked this · 6 months ago
 -
 inedibletreats liked this · 6 months ago
 -
 xenrye liked this · 7 months ago
 -
 thenextphantasm reblogged this · 7 months ago
 -
 blueburial reblogged this · 8 months ago
 -
 bunniesbearsandadventures liked this · 8 months ago
 -
 babyspice89 liked this · 8 months ago

Sylwester | i will mostly post sketches, because i'm too lazy to end them
196 posts