I’m Not Really Good At Explaining Or Teaching Things… So… Here You Go. This Is More Like An Example


I’m not really good at explaining or teaching things… so… Here you go. This is more like an example of how I draw noses, rather than how you need to draw them. I mean, it’s pretty basic, but maybe some artists have other ways to do it }: ? I hope it at least helps a little bit! (nothing fancy, but… yeah). sorry it took me so long to produce this half-assed thing }X D
More Posts from Nastysynth and Others
can you do a tutorial on how you color your artwork? it's so pretty!! 😍🤩
this is not the best and only way to color but personally i think it’s easy and quite effective for beginner artists who are practicing setting the mood for an artwork or laying out ground work for more detailed illustrations
I’m using Clip Studio Paint for this drawing.
Step 1: The base color

Use magic wand and bucket tool to lay out the base color, you can use different layers for each colors to be more precise, and it’s easier to change the colors later on. I use mainly warm tones for my base color because i prefer the look of it. Step 2: Coloring the lineart

Use a clipping layer above the lineart layer to do this step (there are other ways of course, you can search for them online) Color the lines that isn’t intersected with the background, the inner lines. Especially the skin part to reduce stiffness of the lineart, also help adding shadows.


I usually draw the darkest shadow areas with my lineart so i can color them at the same time.
Step 3: Adding shadow
Group the lineart + base color into 1 big group. Add a clipping layer above that group. Switch the layer mode to “Multiply”. Add the shadow area using a desaturated/grayish hue of your choice to set the mood for the drawing.
Example:
If the mood you want is more broody, use more cool tones (blue, purple,..)


If the mood is more festive or happy, use more warm tones


A drawing should consists both cool AND warm tones, other wise it would look dull. The second example has too much warm tones because the base color is already warm.
Step 4: Add filter layers/adjustment layers
This is where the magic happens. Enhance your art work by adding more Multiply and Overlay layers, set the mood as you like it to look, balancing the tones, play around. I wanted this particular drawing to have an overall cold feeling to it, so I added a blue multiply layer

Adding light with a beige overlay layer, using the airbrush with low opacity. This also help creating contrast between the shadow and light areas

But wait,,, it looks,,,,,, it looks too sad!! they are comforting each other after a terrible situation! Adam is not dead! I need another warm multiply layer!

There, it’s now finished. Quick tip: If your colors are looking off/doesn’t go well with each other, group everything and add a beige multiply layer on top! It would look better instantly! Learning color theory, color harmony also helps A LOT!! find tutorials and study from the masters! Good luck with your art, Anon!

Process of one of my drawings of Ardyn!
WHY IS DRAWING HANDS SO FUCKING HARD
Hi! regarding your latest post, may I know which brushes and program did you use for it? Thanxx


I used Clip Studio Paint, the Rough brush is a standard brush in the program. Rough 2 is a variation of Rough (settings above), and Rough 3 is the same as Rough 2 + an extra marble texture. Hope that was helpful :)
Static Texture Tutorial (Blender 2.7)
So it’s been a hot minute since i’ve posted any tutorials on here, and one of my gifs featuring a static texture recently got a nice amount of attention on twitter, so i thought i’d post a tutorial on how to make an effect like this


in blender (blender 2.7 to be exact, i haven’t updated yet because i’m an old senior citizen set in their ways). This one’s super simple, it literally takes about 5 seconds, so let’s get started.
Czytaj dalej
art cheats
hello i am here today to not lose track of the art cheats i have discovered over the years. what i call art cheat is actually a cool filter/coloring style/way to shade/etc. that singlehandedly makes art like 20 times better
80’s anime style
glitch effect
glow effects
adding colors to grayscale paintings
foreshortening ( coil )
foreshortening ( perspective )
clipping group (lines)
clipping group (colors)
dramatic lighting ( GOOD )
shading metal
lighting faces
that is all for today, do stay tuned as i am always hunting for cool shit like this
How do you draw noses?
I’m not sure what specific part you’re wondering about, so here’s a run-through of my process from sketching to painting!
1) The first thing I do is simplify the nose into a few basic shapes to get a prism-like block, like so:

2) I can now easily draw the prism shape in three-dimensional space depending on the angle and rotation of the head.

3) Using the guidelines/planes I can draw a proper nose in any angle! There aren’t many tricks or shortcuts for this step, unfortunately (other than practicing lots). I recommend using references, they’re always helpful :)
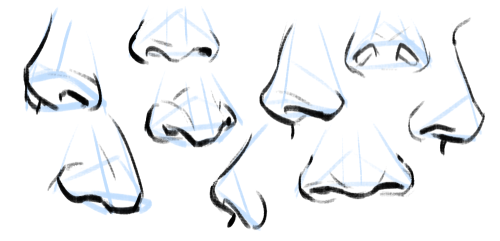
4) Really important to note: all noses vary greatly, especially from different ethnicities! A high-bridge “aristocratic” sort of nose or a ski-slope button nose might be accurate for some people, but definitely not everyone. Compare differences in size, width, a hooked or button nose tip, high or low nose bridge, and so on:

5) Then I paint! I have a skin tone tutorial here, if it helps. Take note of the lighting, skin tone, etc. Here are some things I keep in mind:
For pale skin tones, the nose sometimes has a redder colouration than the rest of the face because of increased blood flow.
The nose also usually has highlights (due to oil). These are located on the tip of the nose, the nostril groove, and where the base of the nose meets the flat area of skin around it!

Hope this helps! In the end, all stylistic choices are completely up to you. Art’s subjective, so feel free to draw any noses you want :)
So

Can we just……

Talk about………

All of……………

The…………………….


Similarities??????????????????
Custom brush tutorial kinda??
Heres how you can make pixel brushes in Clip Studio Paint
first make a little pixel pattern and made sure that the background layer is transparent.

then you want to select edit -> register material -> image. this i remember from trying it before

next name it and choose a place for it to go among the others. doesnt matter where really. also check the texture box.

next to make the brush choose whatever brush that youd like to give it that has the properties you want and copy it. i just chose the standard oil brush. go to the copied brushes settings and click texture

click where it says none and find the brush that you made. after you click it change the setting to this

for me the texture works for subtract, multiply and compare. dont really know the differences between them all or form the others but for what i wanted those three seemed to work.
i did this for a bunch of different pixel patterns and brushes and got some cool effects! check it out!

i appreciate all the help and suggestions yall gave me!

maybe once i figure them out some more i could offer stylized commissions with them :V


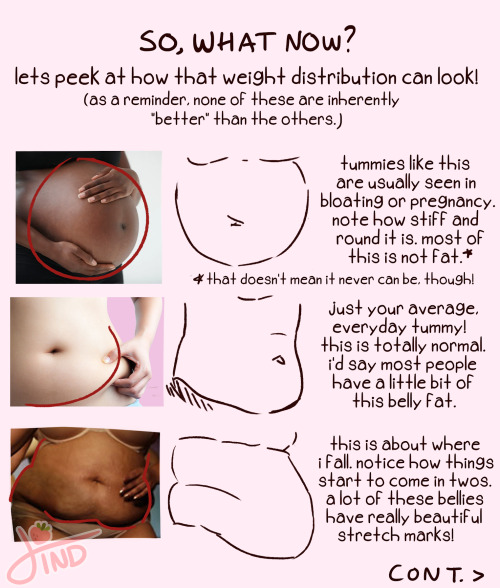


as requested- my zine about fat and plus size body types from instagram!💖 happy drawing everyone!
-
 bitch-what-in-the-ass reblogged this · 3 weeks ago
 -
 fanny-malu liked this · 4 weeks ago
 -
 jesterpanic reblogged this · 1 month ago
 -
 xsolar-ghost reblogged this · 1 month ago
 -
 artking-4 reblogged this · 2 months ago
 -
 kittenofthewoods liked this · 2 months ago
 -
 ramensquid liked this · 3 months ago
 -
 cocainecornelius liked this · 4 months ago
 -
 qara-mohoy liked this · 4 months ago
 -
 lone3321 liked this · 4 months ago
 -
 herobrinna reblogged this · 4 months ago
 -
herobrinna liked this · 4 months ago
-
 winged-wolf-s-collection-of-arts liked this · 4 months ago
 -
 aroacemisha reblogged this · 4 months ago
 -
 aliesawaheeda reblogged this · 4 months ago
 -
 venomseeker liked this · 4 months ago
 -
 pawfulofwaffles liked this · 4 months ago
 -
 joancrawsford reblogged this · 4 months ago
 -
 wonder-rambles reblogged this · 5 months ago
 -
 pastel-kaleesh liked this · 5 months ago
 -
 roughmoon24 liked this · 5 months ago
 -
 inkstellar-alien liked this · 5 months ago
 -
 ari-doodles-stuff liked this · 5 months ago
 -
 3carrie3 liked this · 6 months ago
 -
 funkyybonez liked this · 6 months ago
 -
 thyfrankie liked this · 7 months ago
 -
 lolita7d liked this · 7 months ago
 -
 t3mperanc3 liked this · 7 months ago
 -
 vampyriccandy liked this · 7 months ago
 -
 mag150cul-de-sac liked this · 7 months ago
 -
 heliopeia reblogged this · 7 months ago
 -
heliopeia liked this · 7 months ago
-
 emlovesatla liked this · 7 months ago
 -
 animeschibia reblogged this · 7 months ago
 -
 terrifyingconfusedartkid reblogged this · 8 months ago
 -
 unlikelyfanstranger liked this · 9 months ago
 -
 nezjazz reblogged this · 9 months ago
 -
 arthalo reblogged this · 9 months ago
 -
 crowdoesart21 reblogged this · 10 months ago
 -
 martialwriter liked this · 10 months ago
 -
 ghost-inabucket liked this · 10 months ago
 -
 randomaven liked this · 10 months ago
 -
 comicsartlove liked this · 10 months ago
 -
 somehelpfulart-tutorials reblogged this · 11 months ago
 -
 deactivated20042025 liked this · 11 months ago
 -
artking-4 reblogged this · 11 months ago
-
 popeyomeo liked this · 11 months ago
 -
 kawaiibandlover liked this · 1 year ago
 -
artking-4 reblogged this · 1 year ago

Sylwester | i will mostly post sketches, because i'm too lazy to end them
196 posts