As Requested- My Zine About Fat And Plus Size Body Types From Instagram!💖 Happy Drawing Everyone!


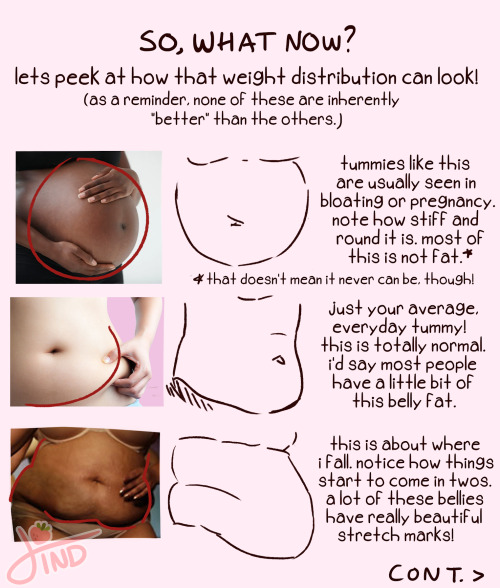


as requested- my zine about fat and plus size body types from instagram!💖 happy drawing everyone!
More Posts from Nastysynth and Others


My friend @nuclear333 asked me how I shaded hair and I promised her a hair shading tutorial, which of course became a hair…everything…tutorial.
Lots of great tutorials have already been been made on the subject so here’s me throwing in my own two cents. The usual disclaimers apply: this is how I think of hair when I draw it, and is by absolutely no means the only way, or even necessarily a correct way, to do it. I’m always happy to hear about how others approach the same subject!

I have no Idea how many people know this but its a life saver

Start off with a crappy scanned/phone taken picture like so

Mess around with the SAI Filters, I usually go color deepen all the way to the left then mess with brightness and contrast until I find a good balance I like, then to top it off with a copied layer on multiply to make the lines darker

Click what I boxed off and the magic has already happened

you now are left with a clean lineart layer that you can color underneath to your liking : 0 Hell you can even color your lines however you want as well for a colored lineart
I have two questions! First: have you ever thought of doing a tarot card suit for your characters? I think it'd work really well for them! And two: help me how do I draw legs
@gravitality
Hi!! I’ve absolutely been thinking about that, yeah, in fact I recently talked about that to my boyfriend just recently. It’ll likely happen after october! And to answer your second question! I made a thing on legs that i hope you’ll find useful!!
So. I’ve already explained basics on legs here, but I don’t think it hurts to go through some extra details to help you understand legs some more.

The very basic thing is to imagine legs as teardrops. Again, this has already been covered in said tutorial above, but I figured it’s still good to mention even the most basic thing that I know of. I still highly recommend you check it out to get in more detail and to see some other examples and practices that you do. But basically, think of legs in the shapes of teardrops, when it comes to shape. If you need a simple stick-figure to connect the legs in the first place, make sure that they bend at the knees a bit so that the legs don’t come off as stiff and unnatural.

As you can see, this method works perfectly for realistic legs as it does for stylistic ones. Remember to use these as a guideline, never to be the exact base of the legs you will be drawing. If you draw traditionally, remember not to draw these guides too hard, or they will be hard to erase/do freestyle!

But how do you actually draw out the legs without drawing them perfectly straight, as shown to the left? The trick is to add volume to them, and how you do that can be winged to your own liking. The idea is to think in curves. As no leg is perfectly straight. You may make these curves minimal if you don’t want them to be curvy, but keep in mind, still, that not even your own bones are perfectly straight, so it is highly recommended that you make them bend, at least a little.

It all depends on how you draw them as well. Say you put your legs together, as shown in this picture, what happens to the fat and muscle? Naturally, they press together, much like how thighs squish on the surface when you sit down (I’m sure most people know what I’m talking about). Make sure this shows in your art! This is very important to keep in mind, because it makes it all look more natural and believable. Try to cross your legs or stand up and sit down again for real-life examples!


The same applies for stretching your legs, more or less, except they appear to become more ‘hollow’ and slimmer. They become less soft to the touch, too, and might show. Try stretching your legs and feel where the muscles tense and where it feels ‘hollow’. This is very helpful with your art.

Many leg tutorials talk about legs without mentioning the behind. It requires a tutorial on it’s own, in all honesty, but this is the most simplest way to draw it connecting to the legs. Remember that it comes in many different shapes, and this is just a super basic guide! Two circles overlapping, while following the line and flow of the legs. Remember the muscle/fat as mentioned above!

Okay, so we got the basics of leg shapes figured out? What if you want o draw them in a certain pose, or with a certain silhouette, but perhaps do not have the reference for it? Or you want to blend your style into it? The key is to not shy away from doodling the form. Make mess, draw lightly and don’t care about the anatomy. That way you’ll get everything down without it appearing stiff. You can clean up the sketch later, always, and if you can, use a reference after you have drawn your pose, to correct your drawing.

Remember that the hips do a lot to the pose of the legs! Make sure they are in flow with your legs, so that it can look more natural. Remembers that hips ‘rotate’ with the spine.

I’ve talked about this method before when it comes to posing, and the same applies for the legs. One way to make legs appear ‘steady’ is to picture them standing in a line, and one of those legs need not to stray from the lines too much, making it steady. If you want a dynamic pose despite the steady pose, you can always have the other leg stray from the line, since it only matters that one leg is steady. This method can create good, casual poses without making them appear boring. (also notice how the teardrop shapes are used here, despite the highly stylized legs)

Do you want a highly dynamic pose, or them to appear unsteady, then skip the line entirely and make both legs aim away from it completely. As you can see, the legs appear more moving, in action, as if they’re fighting, falling, or dancing. As you can imagine, this is not a pose that one could stay steady on, suggesting that it’s taken mid-movement. More about posing and this ‘line’ method is talked about in this tutorial.
Hope this helped you, if you have any questions let me know, and if you’d like to check out all my tutorials they can be found here!
Wobble Tutorial
Someone asked for a tutorial on how I make my art wobble like in the above gif, so that’s what this is! It’s not very hard, all you need is a drawing program with layers, preferably Photoshop or another one with animation capabilities, but if you don’t have one, you can just export the frames individually as jpgs or pngs and compile them in another program or online gif maker. I’ll be using Photoshop in this tutorial because that’s the program I use.
Czytaj dalej
Hi mani ! I started to draw recently and not very sure of my talent I want to improve ,got any tips for me ? Have a lovely day ❤💕
Hello~ and thank you, wish you a wonderful day, dear 🌟
I wanna preface this by saying I’m self-taught, so I probably lack so much of the basics, heh. Everything I say here is based on my personal experience!
Love that you’re eager 💪🔥
It’s a fairly wide range, art is, I don’t know what you want to accomplish in it or what to say to guide you in specific terms, but since you came to me I’ll assume that drawing characters is in your list of interest at least, and I’ll gladly give you general pointers to how to go about it— like in your thought process indulging in drawing.
The first and the most important thing about drawing for me is to enjoy it. If you don’t, it’s frustration, and that probably will not encourage you to get better or have you tolerate the tedious parts of it, heh. Enjoy what you do right now, and never worry because the next one will be always better just simply because of practice, e.x. you’d be training your hands to do certain strokes easier and faster and overall shape your ability. I like to show you my first character, the first masterpiece I considered and still it’s counts as one— I enjoyed the fudge of it, I remember how I was proudly making his eyes mixture of lilac and blue.
Medo, the linker of fairies, 14 years apart from newest in 2018

Don’t be intimidated to do what you really want no matter how hard it looks, if you like it enough you’ll be always on the search for a way to execute. Again, by continuance practice, you automatically train yourself and get better at it, rather than just setting it on a stool and considering it above your abilities. It’s as simple as if you don’t start doing it, you won’t get anywhere with it.
Use tons of reference of things you like, don’t be afraid to, you need a base to start. And please be wary of credit rights and so on.
You can draw anywhere, take as long as you like. You don’t have to set a limitation of time and place to do it, I know I have always done so and it never helped me to do much, but if you function in reverse, set yourself a time and prepare the place to do so, set the mood 🌟
Remember that you don’t need to know how to draw everything to make art. That being said; the more you know the better you can deliver the image and form it the way you wanted. So it’s all about choosing what you want to make, really.
Don’t be discouraged by other people’s views of your piece if you did not expect it, if anything they can be a fresher set of eyes that may spot something you have never noticed (Such as me and not noticing drawing Sev in heels, heh). And remember there’s a massive difference between constructive criticism and rudeness when you find yourself confronted with a situation using the term criticism to justify rudeness. Either way, it lies with you to give it real weight, try to always take from them what inspires you to be better💛
Your art process is yours, not the others’. What works for some might not work for others, and there are always other ways to do it and much to explore and find out. You can have a comfort zone and you can step outside it whenever it suits you.
Now to the actual art advice, I can split them into three broad sections: A good structure, need to learn and observe body’s and shape’s anatomy. Understand basic color theories and how to choose what harmonise with each other. And lastly, inspiration! And you can find all your needs in the endless art tutorials online.
Here are random simple artistic tips about characters that I do:
• Try to distinguish your character with basic shapes for their facial features. Example; Juicy has an oval face, square nose, narrow eyes. Severus has a sort of a triangle face and a triangle nose as well. Albus has a square face and a broken arrow nose, and so one. The same goes for the rest of the body parts.

• Color, hot with cold background, cold with hot background! I made an old post about it here. It gives an easy satisfying look to your piece if you try and include the character with the background.

• Just go wild cuz honestly 57% of the time I don’t know what I’m doing, hehehe
I’m sorry if that’s not the thorough answer you looking for and I hope this helps you in any way.


FLOWER SYMBOLISM IN TOKYO GHOUL
From this gif post (taken with permission)
First off, we have

White carnation: innocence, remembrance
This could both represent the Keneki we see at the beginning of the series, and the inner reminiscing of the past by the current Kaneki.
Don’t forget, don’t forget
Remember who I am
The flower was stained in blood, resulting in a

Striped Carnation: refusal (I’m sorry I can’t be with you, but I wish I could)
This could be viewed as his necessary rejection of his past self, regardless of how strongly he has been clinging on to it so far. This reminds me of these two separate lines from the OP
The me that has stood in this shaken, distorted world-
Was pierced by the memory of the time I laughed so innocently
It starts as just a droplet of doubt, but Kaneki has to accept the reality, no matter how unpleasant it is
and finally,

Red Spider Lily/ Higanbana: the flower of death
Higanbana is a very famous flower in Japan so the meaning is clear here. This flower is associated with loss, longing, abandonment and lost memories. It is believed that if one meets a person one will never see again, this flower will grow along one’s path. I find that there are elements of yearning and regret a midst the finality and interpret this as Kaneki being forced to abandon it all- the death to his former self.
I have changed; I can’t return anymore


Pallete challenge but i did some crappy background lel.

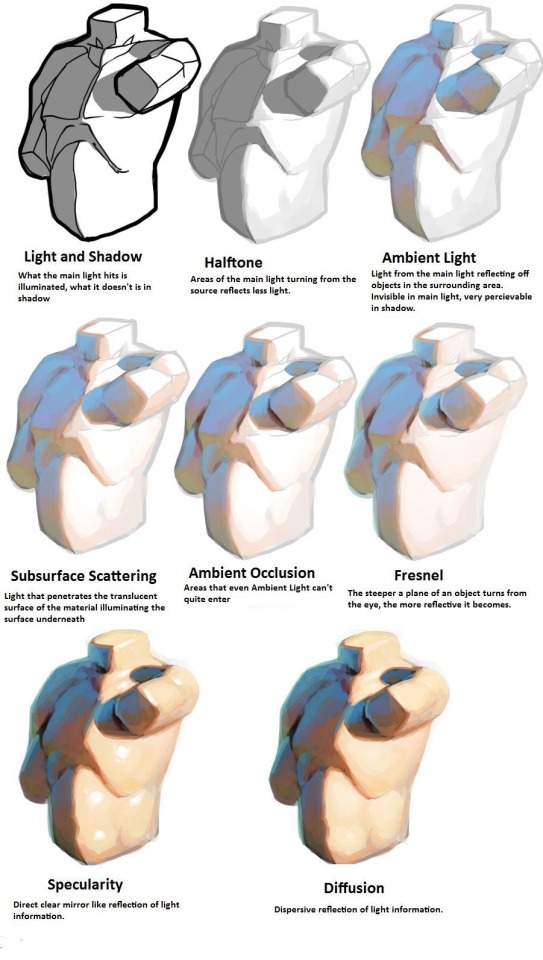

I am so serious when I say if you want to learn about light, you NEED to at least look at modeseven’s tutorials. even if you’re not pursuing a painterly style, this is all essential theory that can be easily adapted to different coloring styles. notice how none of these ever say ‘light with these colors and shade with these colors’? notice how this is teaching how light works on a mechanical level, and reminding the audience to adjust the actual colors they choose by context? THAT is good advice.
(if you’re thinking ‘wow I want to study more of this persons art!’ I encourage you to do so, but proceed with the knowledge that modeseven draws pretty much exclusively weird as hell kink art. sometimes wisdom comes from horny places)

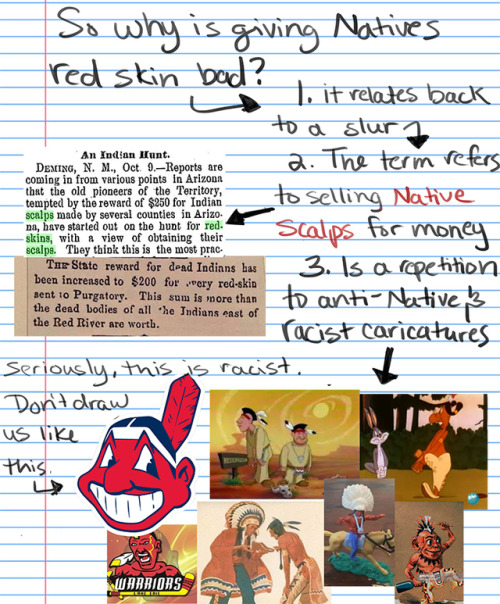
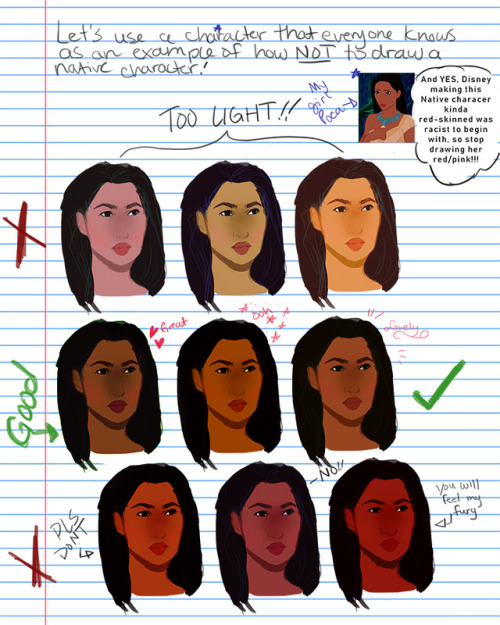
How I draw skin Part 2: DON”T DRAW NATIVE PEOPLE WITH RED SKIN!!!! A tutorial
For the first tutorial on how I draw skin, see the post here.
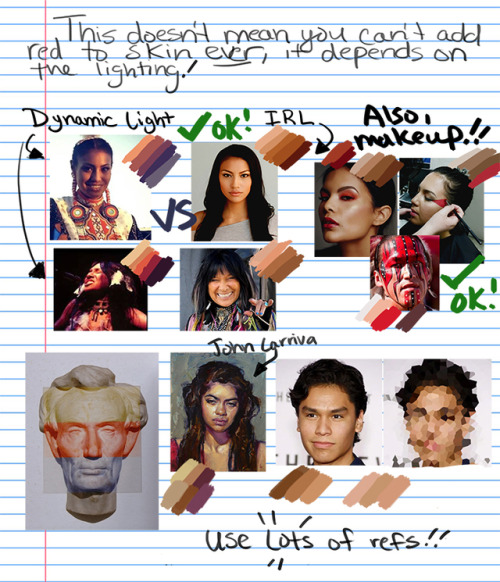
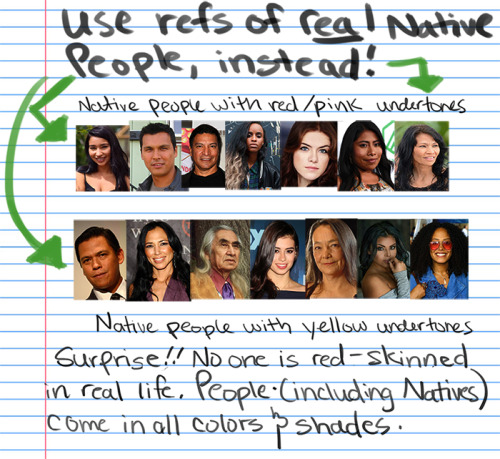
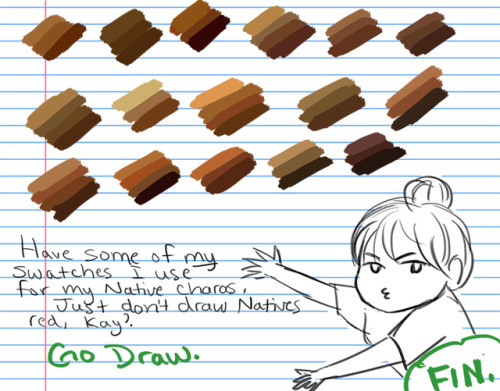
But seriously, I’ve seen too many drawings of Native characters with literal red/pink skin to count so just in case some of you are having troubles with drawing Native people, I’ve provided a guide for you. Please take my swatches if it helps!! and no more red skinned people, please <0<
Disclaimer: this tutorial is mainly about the artistic depictions of Indigenous Peoples in North America, where the slur and redskin caricature originated, but it would still be racist to draw other non-North/Central/South American Indigenous groups like this so…..don’t.
-
 c0smiccreepers liked this · 6 days ago
 -
 asbestoswater liked this · 6 days ago
 -
 its-susume-clawthorne-whispers liked this · 1 week ago
 -
 bibliophile4ever reblogged this · 1 week ago
 -
bibliophile4ever liked this · 1 week ago
-
 thefeyisgay liked this · 1 week ago
 -
 samlotl08 liked this · 1 week ago
 -
 littlechaoscryptid reblogged this · 1 week ago
 -
 authorjones liked this · 1 week ago
 -
 trashsfanficgarden liked this · 1 week ago
 -
 silvashapeshifter reblogged this · 1 week ago
 -
silvashapeshifter liked this · 1 week ago
-
 cassthecrypt1d reblogged this · 1 week ago
 -
cassthecrypt1d liked this · 1 week ago
-
 acetheta reblogged this · 1 week ago
 -
 jinxed-starry-pages reblogged this · 1 week ago
 -
 thecrystalcorvid liked this · 1 week ago
 -
 microwaves-reblogs reblogged this · 1 week ago
 -
 ilov3b00kss0much reblogged this · 1 week ago
 -
ilov3b00kss0much liked this · 1 week ago
-
 blu-stars-blog reblogged this · 1 week ago
 -
blu-stars-blog liked this · 1 week ago
-
 puzzled-pegasus reblogged this · 1 week ago
 -
puzzled-pegasus liked this · 1 week ago
-
 magicis4reel reblogged this · 1 week ago
 -
 friedbrainzz liked this · 1 week ago
 -
 vixiyne reblogged this · 1 week ago
 -
vixiyne liked this · 1 week ago
-
 bobamochi357 liked this · 1 week ago
 -
 oli-bird reblogged this · 1 week ago
 -
oli-bird liked this · 1 week ago
-
 watermelon-jooce liked this · 1 week ago
 -
 vanitythevantropist liked this · 1 week ago
 -
 entomo-maniac liked this · 1 week ago
 -
 peanut-with-wifi-access reblogged this · 1 week ago
 -
peanut-with-wifi-access liked this · 1 week ago
-
 who-is-this-weirdo reblogged this · 1 week ago
 -
 chillwildpaw liked this · 1 week ago
 -
 0reoliaflop69 liked this · 1 week ago
 -
 rikki-999 liked this · 1 week ago
 -
 rikki-tiki-tavi reblogged this · 1 week ago
 -
 fear-roulette liked this · 1 week ago
 -
 asterofthevoid reblogged this · 1 week ago
 -
 penelopevalentine liked this · 1 week ago
 -
 nfinksp9l liked this · 1 week ago
 -
 starcub88 reblogged this · 1 week ago
 -
 itszorrito67 liked this · 1 week ago
 -
 vivid-bun reblogged this · 1 week ago
 -
vivid-bun liked this · 1 week ago
-
 sevencoursemeal reblogged this · 1 week ago

Sylwester | i will mostly post sketches, because i'm too lazy to end them
196 posts