How Do You Draw Noses?
How do you draw noses?
I’m not sure what specific part you’re wondering about, so here’s a run-through of my process from sketching to painting!
1) The first thing I do is simplify the nose into a few basic shapes to get a prism-like block, like so:

2) I can now easily draw the prism shape in three-dimensional space depending on the angle and rotation of the head.

3) Using the guidelines/planes I can draw a proper nose in any angle! There aren’t many tricks or shortcuts for this step, unfortunately (other than practicing lots). I recommend using references, they’re always helpful :)
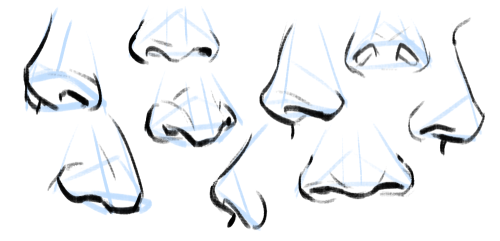
4) Really important to note: all noses vary greatly, especially from different ethnicities! A high-bridge “aristocratic” sort of nose or a ski-slope button nose might be accurate for some people, but definitely not everyone. Compare differences in size, width, a hooked or button nose tip, high or low nose bridge, and so on:

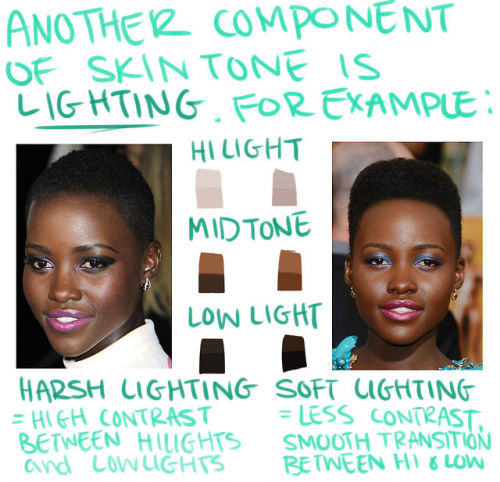
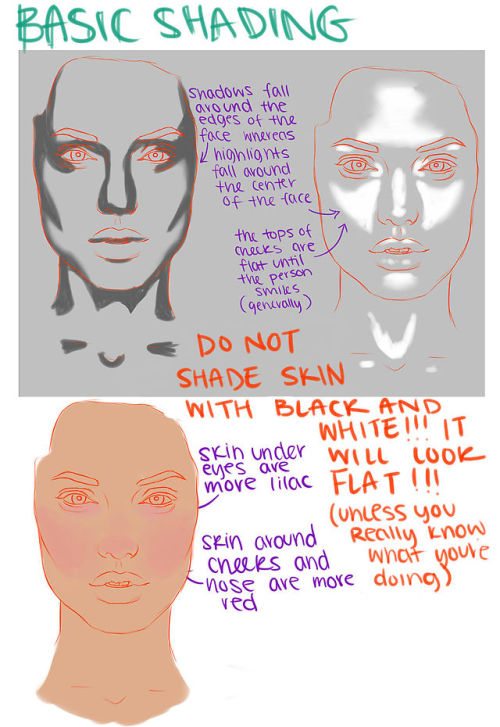
5) Then I paint! I have a skin tone tutorial here, if it helps. Take note of the lighting, skin tone, etc. Here are some things I keep in mind:
For pale skin tones, the nose sometimes has a redder colouration than the rest of the face because of increased blood flow.
The nose also usually has highlights (due to oil). These are located on the tip of the nose, the nostril groove, and where the base of the nose meets the flat area of skin around it!

Hope this helps! In the end, all stylistic choices are completely up to you. Art’s subjective, so feel free to draw any noses you want :)
More Posts from Nastysynth and Others
Custom brush tutorial kinda??
Heres how you can make pixel brushes in Clip Studio Paint
first make a little pixel pattern and made sure that the background layer is transparent.

then you want to select edit -> register material -> image. this i remember from trying it before

next name it and choose a place for it to go among the others. doesnt matter where really. also check the texture box.

next to make the brush choose whatever brush that youd like to give it that has the properties you want and copy it. i just chose the standard oil brush. go to the copied brushes settings and click texture

click where it says none and find the brush that you made. after you click it change the setting to this

for me the texture works for subtract, multiply and compare. dont really know the differences between them all or form the others but for what i wanted those three seemed to work.
i did this for a bunch of different pixel patterns and brushes and got some cool effects! check it out!

i appreciate all the help and suggestions yall gave me!

maybe once i figure them out some more i could offer stylized commissions with them :V
shading colour tips
hey yall its me the Art Mom™ to help you shade pretty
rule 1: DO NOT SHADE WITH BLACK. EVER. IT NEVER LOOKS GOOD.
red- shade with a slightly darker shade of purple
orange- slightly darker and more saturated shade of red
yellow- i think like..a peach could work but make it a really light peach
green- shade with darker and less saturated shade of blue or teal
blue- shade with purple
purple- a shade thats darker than the purple you’re using and maybe a little pink (MAYBE blue)
pink- darker shade of red
white- a really light lavender or blue..or i guess any really light colour??
black- okay listen dont use pure black to colour anything unless you want to leave it with flat colours because you cant really shade black lol
grey- a slightly darker shade of purple or blue (less saturated)
brown- slightly darker and less saturated shade of purple or red
aaaaand thats all i got lol. let me know if there is anything i should add to this list!!

Absolutely!!
Muzzles are one of my favorite parts of drawing animals/furry characters & really fun to draw expressions for. I always start to draw long muzzled characters the same way, by drawing two circles, one representing the basic shape of the head, and the second where the basic placement of the nose is going to be.

From there I sus out the basic shapes without worrying about details. things like the mouth and nose details I always add in last, since theyre less important in the sketching stage than the basic shapes.

For open mouthed or front-view muzzles I basically always use the same process.
This same process also works for shorter muzzled characters as well

It took me a while to get good at drawing muzzles from different angles & stuff, but once you figure out a good method that works for you its WAY easier than it seems. the most important part of drawing muzzles is just understanding the shape of your characters face.
I hope that was helpful! I dont usually make tutorials but I tried to make this as clear as I could, my sketch process is pretty messy lol.
Hey sorry to bother, tumblr mobile is hot garbage and I was looking for something specific you posted a while back. It was a post with some tips for drawing I think outfits, and I honestly only remember a bit I think you said basically pick where you want more details to be focused?? With example like simple top+detailed bottom and vice versa. Sorry if that's a weird or bothersome ask? U don't gotta answer obv. Maybe I imagined the post or smth. I was just wondering if by chance u could reblog
i couldnt find it either but i think you might mean this stuff


enjoy


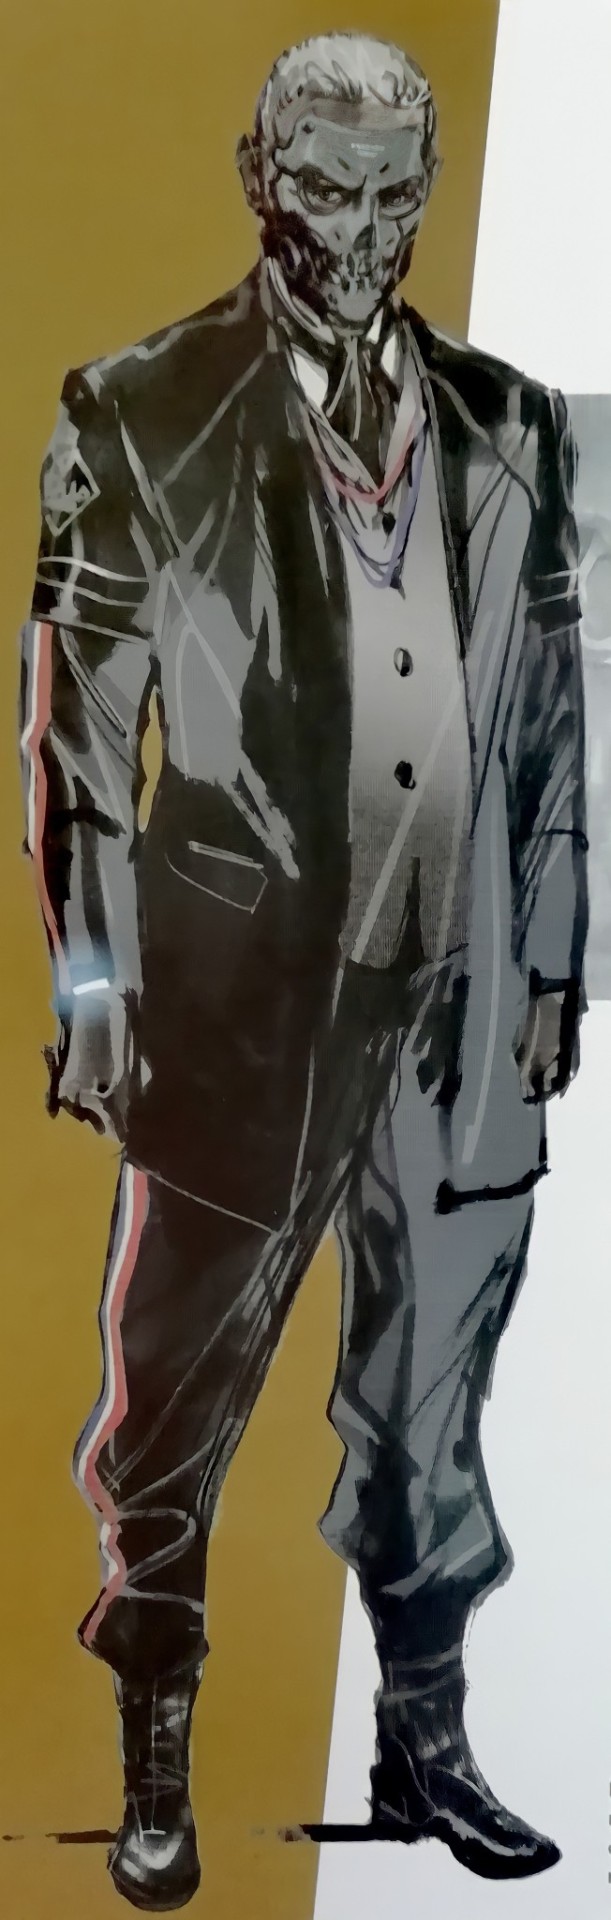
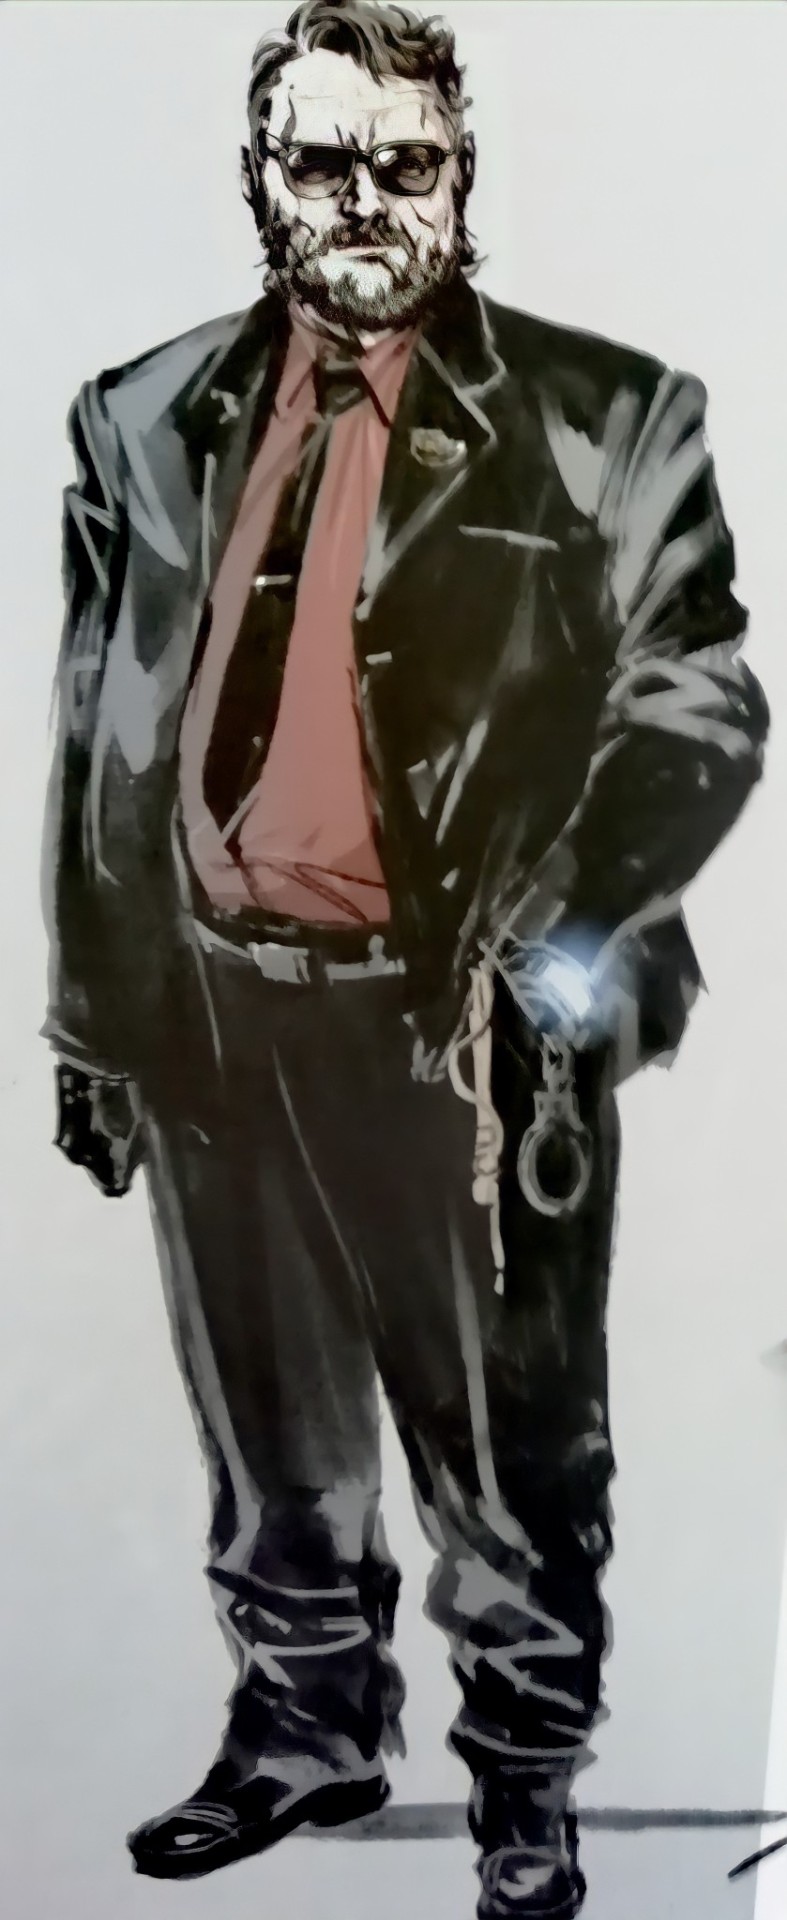
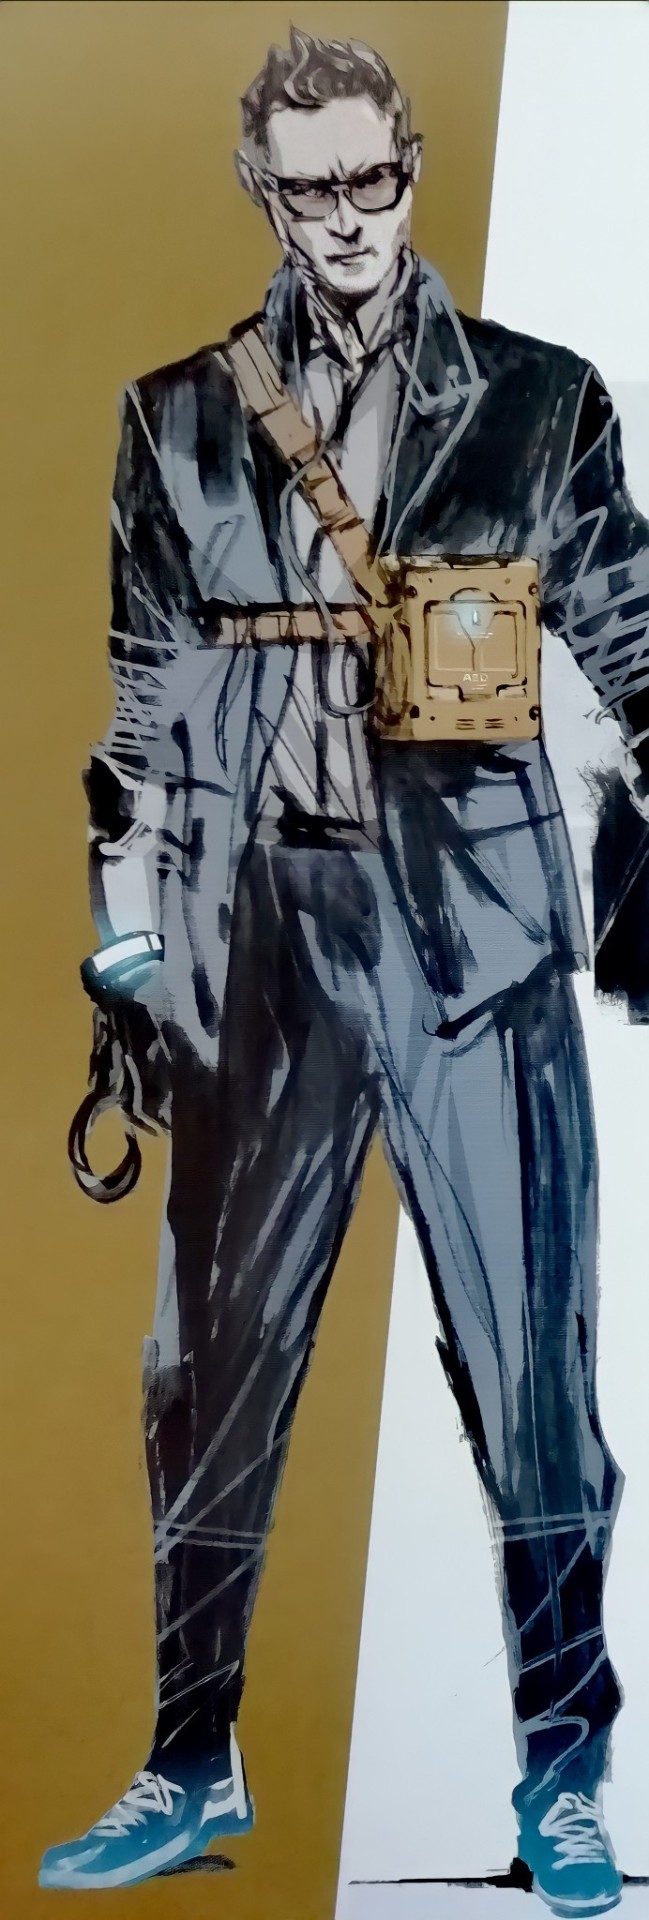

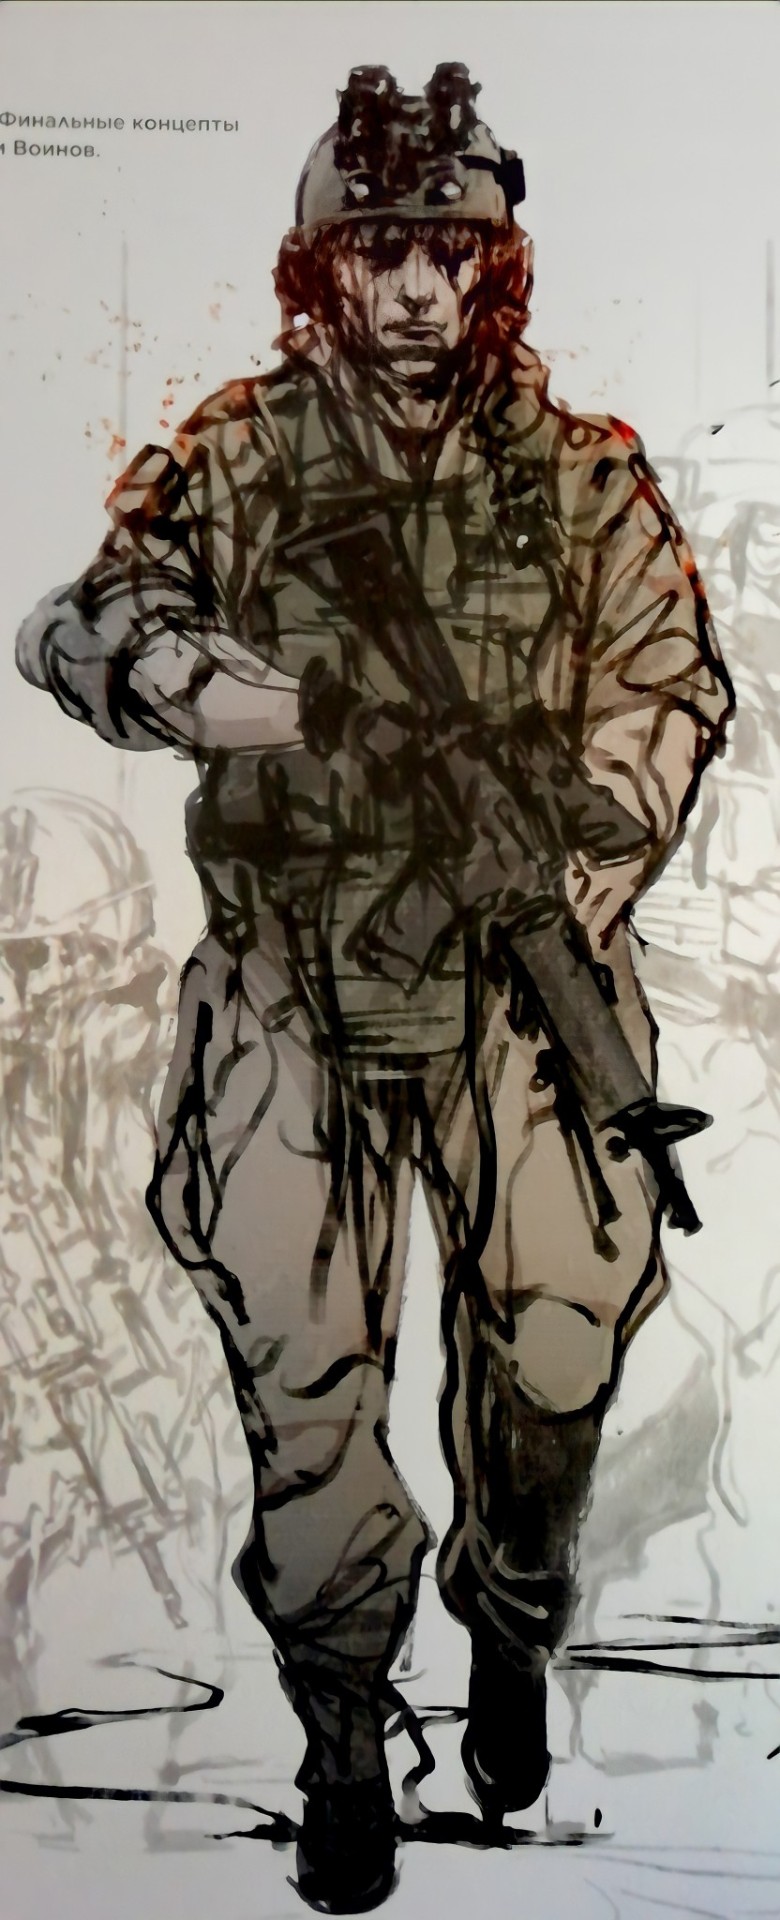
Art of DEATH STRANDING


Pallete challenge but i did some crappy background lel.


Let me know if you have questions!!!

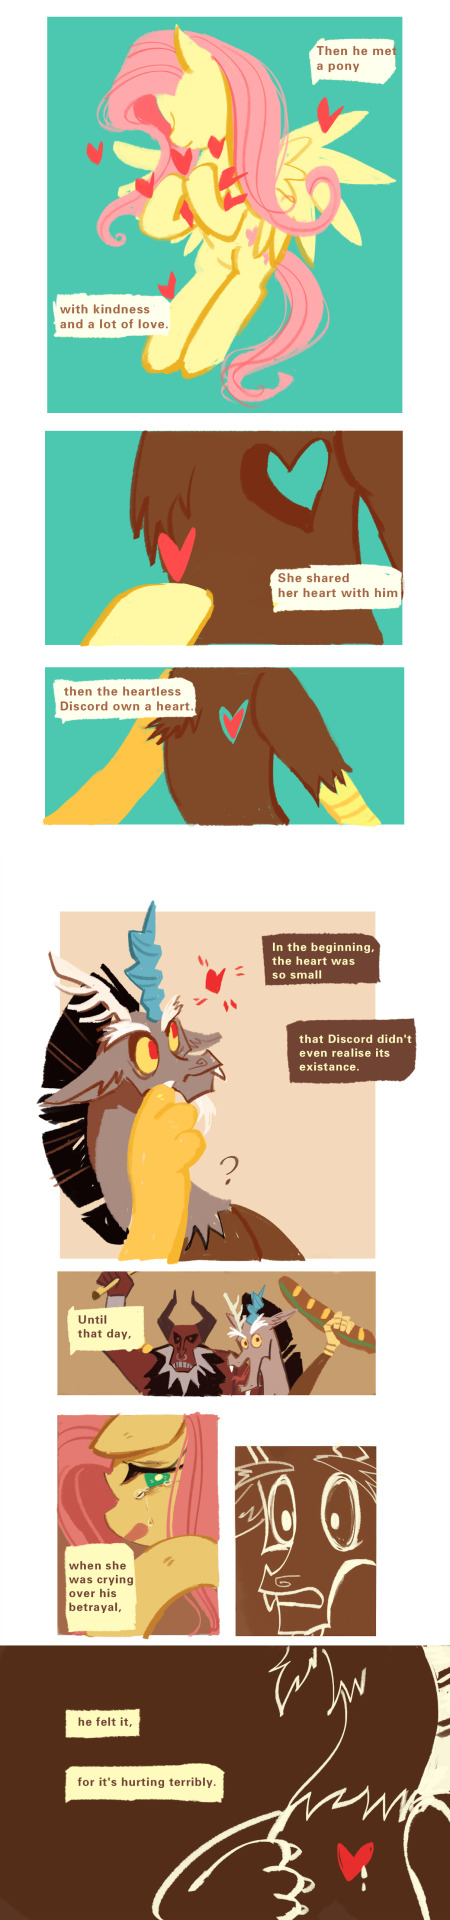

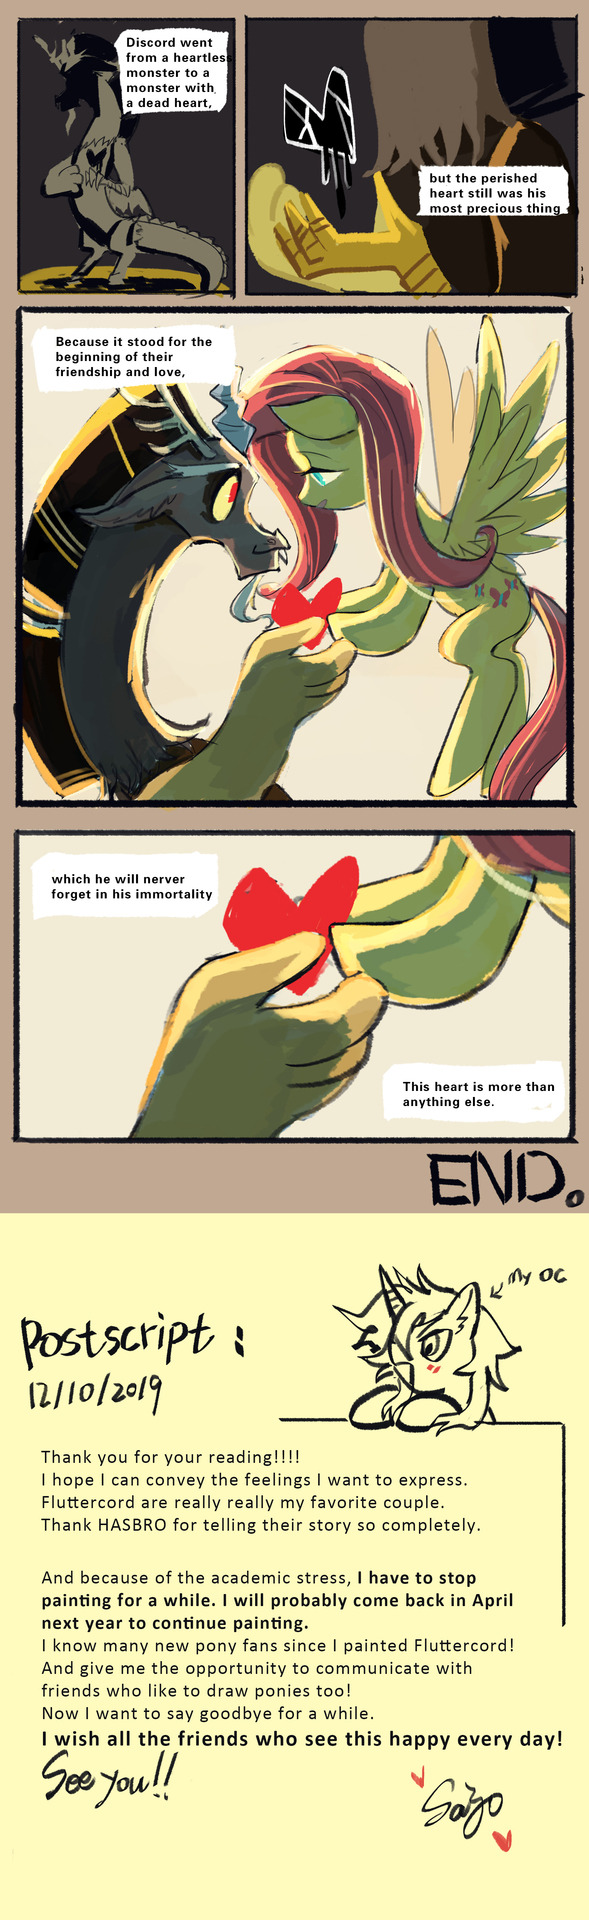
FLUTTERCORD COMIC: <<HEART>>
I’m glad that I can finish this on time.
Season 9 is over, but I know their stories will not stop.
I love them forever.It’s like I know they’ll always love each other.
And now I have to stop updating for study.
I’ll be back in April next year to continue drawing. See U!!!!!
Do you have any tips for drawing in the Pokemon style??
These are just some rough notes. I don’t draw that often in the pokemon style so these are a little more basic than I could give on other styles.
For colouring advice, this is a great resource to use: https://tunnaa-unnaa.tumblr.com/post/162328103349 It goes through the styles of different pokemon artists.
Custom brush tutorial kinda??
Heres how you can make pixel brushes in Clip Studio Paint
first make a little pixel pattern and made sure that the background layer is transparent.
then you want to select edit -> register material -> image. this i remember from trying it before
next name it and choose a place for it to go among the others. doesnt matter where really. also check the texture box.
next to make the brush choose whatever brush that youd like to give it that has the properties you want and copy it. i just chose the standard oil brush. go to the copied brushes settings and click texture
click where it says none and find the brush that you made. after you click it change the setting to this
for me the texture works for subtract, multiply and compare. dont really know the differences between them all or form the others but for what i wanted those three seemed to work.
i did this for a bunch of different pixel patterns and brushes and got some cool effects! check it out!
i appreciate all the help and suggestions yall gave me!
maybe once i figure them out some more i could offer stylized commissions with them :V
-
 auroranorthernstar reblogged this · 2 weeks ago
 -
auroranorthernstar liked this · 2 weeks ago
-
 jaigrefs reblogged this · 1 month ago
 -
 bandeddragonfish reblogged this · 2 months ago
 -
 dohorwarmautumn reblogged this · 3 months ago
 -
 bw3694 liked this · 4 months ago
 -
 kirabasai liked this · 4 months ago
 -
 casablahca liked this · 4 months ago
 -
 coolranchbones reblogged this · 4 months ago
 -
 blogikirjoitusvirhe reblogged this · 4 months ago
 -
 lolita7d liked this · 4 months ago
 -
 roseybloodlust reblogged this · 4 months ago
 -
 fandomhoedamien reblogged this · 5 months ago
 -
fandomhoedamien liked this · 5 months ago
-
 swamp-deity liked this · 6 months ago
 -
 friskyo7puns liked this · 6 months ago
 -
 floor-mac-n-cheese liked this · 6 months ago
 -
 alicecatfan2007-owlfallsau liked this · 6 months ago
 -
 kiratheperson reblogged this · 6 months ago
 -
kiratheperson liked this · 6 months ago
-
 cepheusgalaxy reblogged this · 6 months ago
 -
cepheusgalaxy liked this · 6 months ago
-
 dr-george-ordell liked this · 6 months ago
 -
 loquaciousnewt liked this · 6 months ago
 -
 a-personiftranslator liked this · 6 months ago
 -
 rebirthresource reblogged this · 6 months ago
 -
 snarkissist liked this · 6 months ago
 -
 secretsav liked this · 6 months ago
 -
 lunarsk1es liked this · 6 months ago
 -
 devotedbeefcake reblogged this · 7 months ago
 -
 goddess92a reblogged this · 9 months ago
 -
goddess92a liked this · 9 months ago
-
 mormms liked this · 9 months ago
 -
 shakychameleon reblogged this · 9 months ago
 -
 nothingkindafits reblogged this · 9 months ago
 -
 bigfemboyenergy liked this · 9 months ago
 -
 mothertrucker-dude liked this · 9 months ago
 -
 souldemolition liked this · 10 months ago
 -
 somehelpfulart-tutorials reblogged this · 11 months ago
 -
 deactivated20042025 liked this · 11 months ago
 -
 artking-4 reblogged this · 11 months ago
 -
 whensallymetharry2 liked this · 11 months ago
 -
 chemhazel liked this · 11 months ago
 -
 djmangamer liked this · 11 months ago
 -
 maywillows liked this · 1 year ago

Sylwester | i will mostly post sketches, because i'm too lazy to end them
196 posts