Some Of You Have Been Asking For A Tutorial On How I Draw Faces So I Threw Together A Thing For You.


Some of you have been asking for a tutorial on how I draw faces so I threw together a thing for you. *finger guns*
More Posts from Nastysynth and Others


people have asked me how i draw eyes so i made an extremely slap-dash eye tutorial! this is simply about how i draw a simple neutral eye, nothing to do with expressions (that’s a whole other thing).
start with the horizontal guide on the face, to help place the eyes. put circles where the eyes will go!
adjust the circles into diamond shapes– i got this idea from sinix design on youtube, it’s very helpful and easier to see where the lids should end than with a circle.
draw the top lid/lash lines, leaving a bit of space at the top of the diamond. keep each eye in time with each other– drawing one whole eye first makes it harder to match the other one.
then the bottom lids. i usually try to do all the lid shapes with a single curved stroke each. keep it simple pals!
irises & pupils. sometimes i’ll draw filled-in black circles for the irises, to help figure out where to place them naturally!
lid creases, use the leftover diamond at the top as a loose guide for where to place them. remember that the lid curves around the eyeball.
make adjustments! things don’t always come out perfect immediately. i usually have to thicken the lash line (i like mine quite thick), move the bottom lid up or down, and sometimes resize a whole eye (easier on computer than traditional, i know!). if you’re on a computer make sure to flip your canvas often so you can see these little things ❤
and to practice, just doodle a lot of small eyes! keeping them small makes them easier and faster to finish, so you can focus on your strokes and playing around with shapes, tilt, lid space, all that. don’t worry about making the irises perfect circles/ovals or any of that, just try to capture the character. have fun!
i literally love how your color and shade if it’s ok do you have any tips on digital coloring? you don’t have to answer this if you don’t feel like it :) thanks!!
hello friend!! i have a tutorial i made on twitter a while ago which is more or less how i make my colours more interesting. i still use the technique and in general it’s just a lot of colour adjustment nothing too special LOL here!!


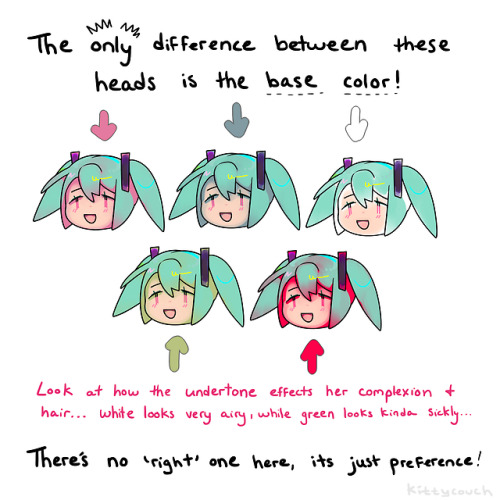

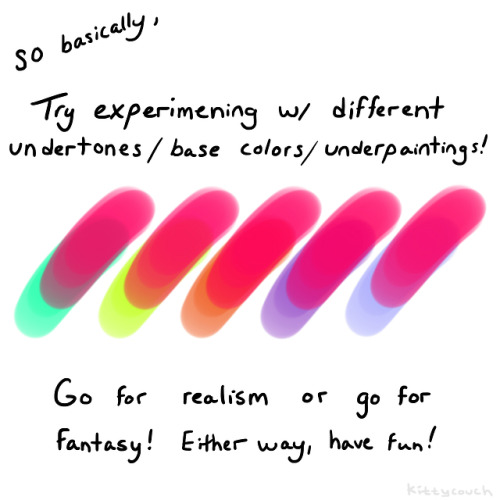
No one asked but here’s a brief tutorial on digital underpainting and how it can add some extra flavor to your art!
(I got asked this a couple times so just to clarify: I used “overlay” in the second slide… but the rest of these examples are JUST painted on, no effects! Try playing with the opacity on your pencil/water/brush tool to allow the base color to show through!)


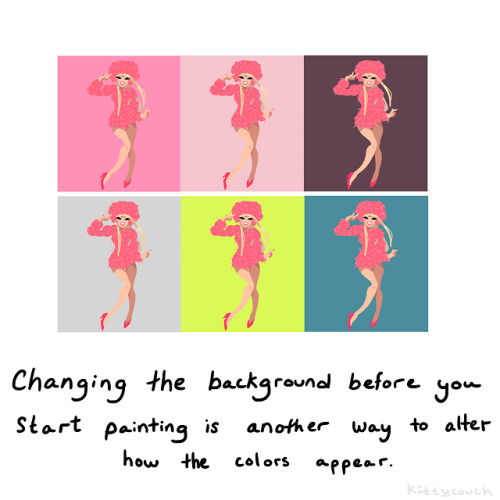
Pallete challenge but i did some crappy background lel.


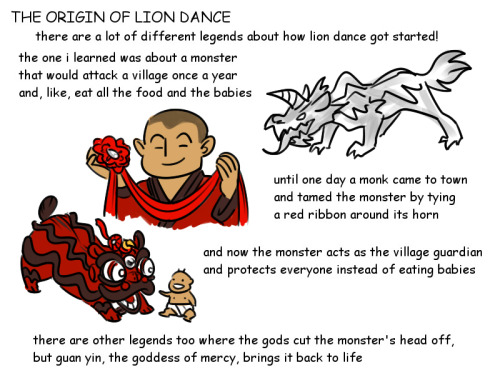


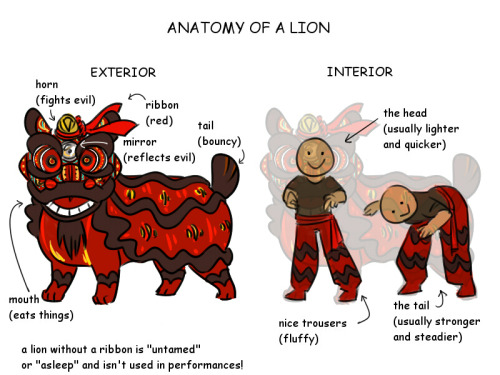
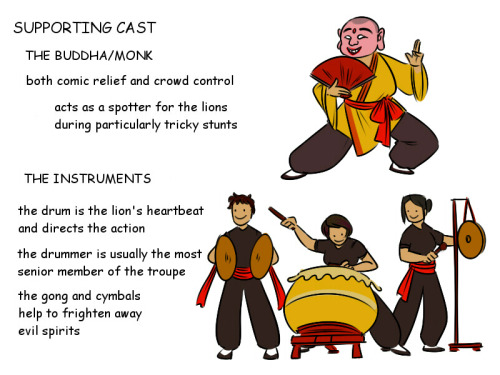
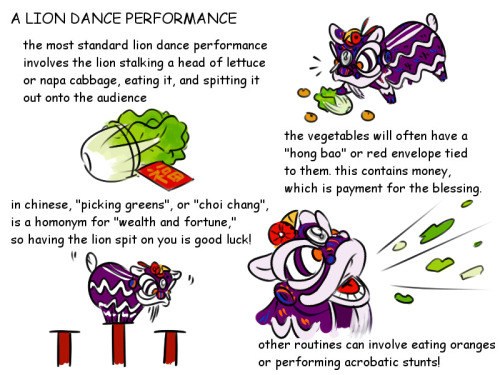


so quite a lot of people expressed interest in a guide to lion dance! and since the lunar new year is coming up in a couple weeks, which means everyone’s exposure to lions is probably going to increase, i figured i’d go ahead and make it! right click + open in new tab to fullview, etc etc, i hope it’s helpful, although if you only take one thing away from this powerpoint, it’s this: lions are not dragons
disclaimer: i learned fut san style at an american university, and the senior members of the troupe were almost all from hong kong and taiwan, so most of my knowledge is drawn from what they taught me. lion dance varies widely depending on the style and the country of origin, and many schools do things differently! this is just an attempt to establish a baseline and give you a really basic intro to one of my favorite art forms. :)

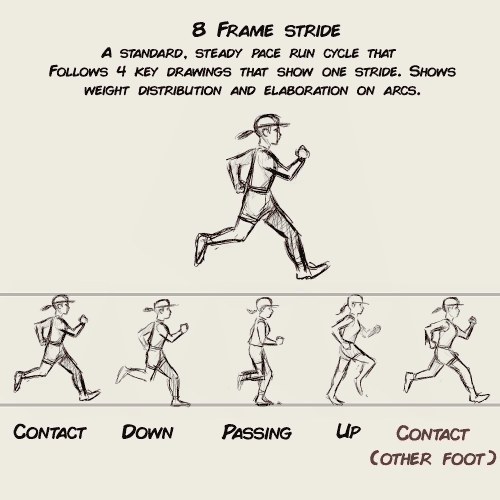

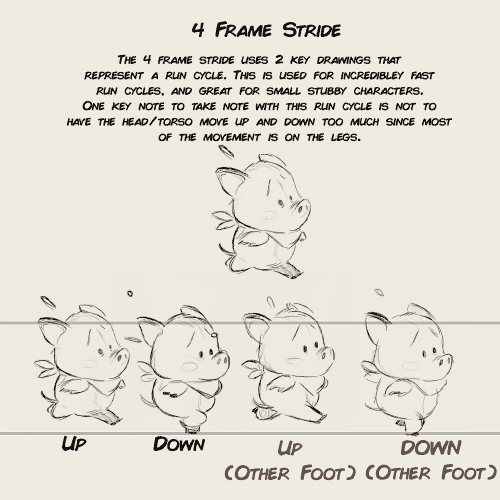
animation run cycle notes for my upcoming 2D animation video course package

Absolutely!!
Muzzles are one of my favorite parts of drawing animals/furry characters & really fun to draw expressions for. I always start to draw long muzzled characters the same way, by drawing two circles, one representing the basic shape of the head, and the second where the basic placement of the nose is going to be.

From there I sus out the basic shapes without worrying about details. things like the mouth and nose details I always add in last, since theyre less important in the sketching stage than the basic shapes.

For open mouthed or front-view muzzles I basically always use the same process.
This same process also works for shorter muzzled characters as well

It took me a while to get good at drawing muzzles from different angles & stuff, but once you figure out a good method that works for you its WAY easier than it seems. the most important part of drawing muzzles is just understanding the shape of your characters face.
I hope that was helpful! I dont usually make tutorials but I tried to make this as clear as I could, my sketch process is pretty messy lol.
BioShock Resource Masterpost
Due to multiple requests I’ve decided to collect all the free BioShock material I’ve shared under one post for ease of access. Because of size restrictions, some will have to be downloaded to be read, but I hope you enjoy anyways!
BioShock Artbooks
Breaking the Mold: The Art of Bioshock
Deco Devolution: Art of Bioshock 2
Art of Bioshock Infinite
If you like the physical books better, you can buy them here: The Art Of Bioshock Infinite & Deco Devolution: The Art of BioShock 2. The art book for the original Bioshock is very rare and expensive.
BioShock Novelizations & Original Pitch Document
BioShock: Rapture (eBook) (audiobook)
BioShock Infinite: Mind In Revolt (Spanish edition)
BioShock: First Person Action Horror
If you’d like a store-bought copy better, you can them here: BioShock Infinite: Mind In Revolt & BioShock: Rapture eBook or audiobook.
Extended Resources
Artbook Masterlist: All non-BioShock artbooks I’ve collected
If you’re worried about the downloads being infected/bugged or whatever don’t be- I bought them legally and am putting them up on a private google docs for easy access.


How i shade !
how do you make ur art look like its glowing?? it's gorgeous!!
I’ll give you a weird secret. After you put the glowing object on a dark background, surround the white parts with a halo of highly saturated color. Observe:

It doesn’t have to be that blatant- smaller outlines of color, blended properly with the background, can make an equally effective glow-y look :)

-
 st7rfall liked this · 1 month ago
 -
 wild-digs liked this · 3 months ago
 -
 generalpiratecollector liked this · 4 months ago
 -
 tamobomb001 liked this · 5 months ago
 -
 iisadiya liked this · 11 months ago
 -
 divinyah reblogged this · 1 year ago
 -
 anxietymuffin liked this · 1 year ago
 -
 twadi-gurl reblogged this · 1 year ago
 -
 local-eldritch liked this · 1 year ago
 -
 jasper-dracona liked this · 1 year ago
 -
 sexwizard liked this · 1 year ago
 -
 odd-alchemist reblogged this · 1 year ago
 -
 terrific-togekiss reblogged this · 1 year ago
 -
terrific-togekiss liked this · 1 year ago
-
twadi-gurl reblogged this · 1 year ago
-
 wzt97 liked this · 1 year ago
 -
 faithcorona liked this · 1 year ago
 -
 merdemonic116 liked this · 1 year ago
 -
 punkili reblogged this · 2 years ago
 -
 effectively-immortal liked this · 2 years ago
 -
 reddstardust liked this · 2 years ago
 -
 lailabailey reblogged this · 2 years ago
 -
lailabailey liked this · 2 years ago
-
 remmoran-kynvahl liked this · 2 years ago
 -
 mainblogging reblogged this · 2 years ago
 -
 shytigercool reblogged this · 2 years ago
 -
 mess-in-public liked this · 2 years ago
 -
 imaginer8th liked this · 2 years ago
 -
 tinfoilscribbles reblogged this · 2 years ago
 -
 bingboop liked this · 2 years ago
 -
 elizabeth-fudge liked this · 2 years ago
 -
 qualitystatesmanvoidpony reblogged this · 2 years ago
 -
qualitystatesmanvoidpony liked this · 2 years ago
-
 gemsofthegalaxy liked this · 2 years ago
 -
 taniushka12 reblogged this · 2 years ago
 -
 lightmooncream reblogged this · 2 years ago
 -
 lonepower reblogged this · 2 years ago
 -
 cereal-and-m1lk liked this · 2 years ago
 -
 chayteaz liked this · 2 years ago
 -
 fun-ishtimes liked this · 2 years ago
 -
 chocokrispiss liked this · 2 years ago
 -
 mrstealyogender reblogged this · 3 years ago
 -
 scentedgardenathleteempath liked this · 3 years ago
 -
 neoshell liked this · 3 years ago

Sylwester | i will mostly post sketches, because i'm too lazy to end them
196 posts