More Helpful Art Tips 2
More helpful art tips 2
* leads to a twitter thread Tutorials
Drawing a mountain with volume*
Painting the chest*
Color in Painting [Part 1][Part 2][Part 3]*
30+ lessons on drawing in perspective
Six types of fold when drawing drapery
Using references*
IMAG master classes (paid)
Planning values*
Reference
Knee Movements*
Kato Anatomy*
Making Products
A beginners guide to zines
Opening an online store [Part 1][Part2][Part 3]*
Studying Design for TV animation (on a budget)
Lighting in a room*
Windows
Bricks
Form rendering cheat sheet
Brushes
Drawmaevedraw brush set (ps)
Traditional Texture Brushes for Photoshop and Procreate (paid)
Other Resources:
Huge list of resources w/ a focus on getting into the animation industry.
Thread of study resources*
Resume guide (for an internship at nickelodeon)
Agents for Illustrators
Filing Taxes as a freelancer
3D art
Low poly horror in blender (paid)
Blending grass with the landscape (UE4)*
Ghibli Style trees in 3d (Blender)
Spritestack - a voxel editor suited for 2D artists.
More Posts from Nastysynth and Others

How to kill someone, a guide by Red.


Oh…Steve…
Metal tutorial
Fire tutorial
Not the same Anon, but hyacinths please
Hi friend, thank you so much for your interest! I’m going to go over how I draw these flowers, but I realized midway that I’m actually very terrible at drawing these in particular, haha. There’s a reason I’ve lowkey avoided doing them so far, and I think it enabled me to highlight a bit more, the way I choose my arts.
It’s quite hard to teach just “how to draw a specific flower” mostly because I myself don’t know - the most important thing I can emphasize is using references!

I personally dislike drawing these flowers in my art, and I couldn’t figure out why until I started this tutorial.
One thing I tend to notice when I look at reference pictures is how flowers move as a ‘whole’ and their relative ‘flexibility’. I pay attention to that because the way I do art, I choose the flower in part based on appearance and how natural they will look in a specific composition.

I tend to like flowers that sprout outwards and have a kind of ‘loose’ appearance. The red lines here show the ‘direction’ I want the flowers to go in.

This is where these flowers pose a bit of a problem. Because arranged in clumps, they are very stiff. It’s not a bad thing if that’s what you’re looking for, but it’s not what I wanted, exactly, for this image.

They just stick straight up, because they have very stiff leaves and a tight packed pattern. (They sometimes tilt though, mine always did). At this point, I could decide the form isn’t right, and this isn’t the flower I want. But there’s also another thing I could do, which is altering it’s appearance when I draw it, slightly.

Left is a simplified version of the shape, while the middle is a more detailed image. The furthest to the right is a close-up of a single flower. Depending on what you want to portray, you can choose to alter what you want your flowers to look like.

As you can see, when drawn closer up, the flower has a lot more flexibility!

So with this, I ended up drawing the batch of flowers a lot larger than how it would be normally, while still retaining the recognizable flower and leaf shape.
So what I’m trying to convey is that sometimes you have to study references, but then know you can pick and choose what aspects to highlight in your art. That’s I think, how you can get your flowers to look extra ‘dynamic’ in your work - by accentuating their specific shapes to work to your advantage! And also playing with their colors and such! But hyacinths come in so many colors that any would work!
I hope this is helpful to you, anon!


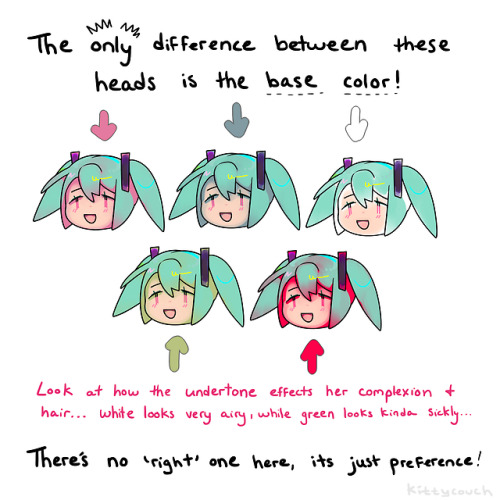

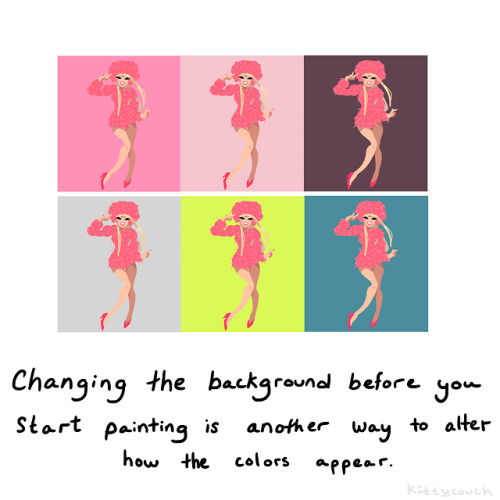
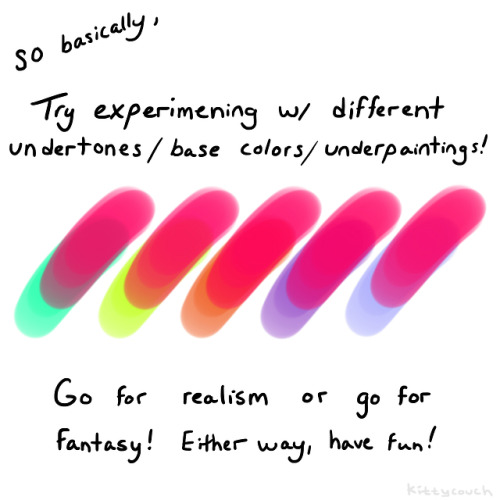
No one asked but here’s a brief tutorial on digital underpainting and how it can add some extra flavor to your art!
(I got asked this a couple times so just to clarify: I used “overlay” in the second slide… but the rest of these examples are JUST painted on, no effects! Try playing with the opacity on your pencil/water/brush tool to allow the base color to show through!)


high quality expression references with varied facial types
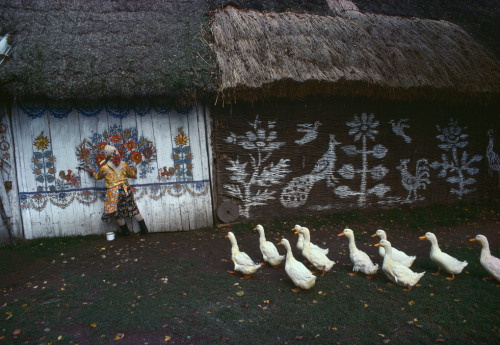
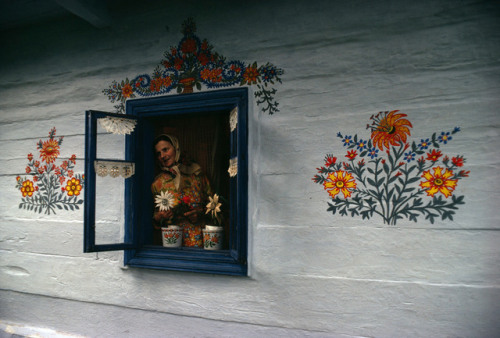
Zalipie, the “painted village” near Ternow. Houses are completely painted on the inside and outside by their owners. 1976.
Location: Zalipie, Poland
Photographer: Bruno Barbey
Art tips for facial features?
I would love to help but you need to be bit more specific. “facial features” can mean a lot of stuff.
Most vague tip i can give is uh - silhouette, shapes and proportions: silhouette helps block out unique features, geometric shapes can aid with structure and keeping the same face consistent between drawings, and proportions convey characteristics like age easily to the viewer.


Absolutely!!
Muzzles are one of my favorite parts of drawing animals/furry characters & really fun to draw expressions for. I always start to draw long muzzled characters the same way, by drawing two circles, one representing the basic shape of the head, and the second where the basic placement of the nose is going to be.

From there I sus out the basic shapes without worrying about details. things like the mouth and nose details I always add in last, since theyre less important in the sketching stage than the basic shapes.

For open mouthed or front-view muzzles I basically always use the same process.
This same process also works for shorter muzzled characters as well

It took me a while to get good at drawing muzzles from different angles & stuff, but once you figure out a good method that works for you its WAY easier than it seems. the most important part of drawing muzzles is just understanding the shape of your characters face.
I hope that was helpful! I dont usually make tutorials but I tried to make this as clear as I could, my sketch process is pretty messy lol.


@qlaude is so nice & wonderful and asked if i’d share some anatomy tips so how could i refuse!!! this is all stuff that’s still pretty new to me, so it’s really just an explanation of my current learning process. hope it all makes sense though!
-
 ooyabbuie liked this · 1 month ago
 -
 saltysaltyso liked this · 4 months ago
 -
 danybunny liked this · 8 months ago
 -
 criticism-4-childrens reblogged this · 10 months ago
 -
 crow-pope liked this · 1 year ago
 -
 shak-es-p-eare reblogged this · 1 year ago
 -
 tantaniumflare liked this · 1 year ago
 -
 trynastudy3 liked this · 2 years ago
 -
 enigmaticwolff liked this · 2 years ago
 -
 coatlsreblogpit reblogged this · 2 years ago
 -
 spacespheal liked this · 2 years ago
 -
 fun-ishtimes liked this · 2 years ago
 -
 onceuponatimethereneverwas liked this · 2 years ago
 -
 dykejet liked this · 2 years ago
 -
 amusedandconfused liked this · 2 years ago
 -
 craniumsandcrayons liked this · 2 years ago
 -
 cy1-ix liked this · 2 years ago
 -
 roses-ashes reblogged this · 2 years ago
 -
 mmmdoughnutsxd reblogged this · 2 years ago
 -
 rainbowsmilesz liked this · 2 years ago
 -
howtogetajob-adulthood reblogged this · 2 years ago
-
 izumi-yami liked this · 2 years ago
 -
 bl00000g liked this · 2 years ago
 -
 zzzelwoowoozzz liked this · 2 years ago
 -
 asters-garden liked this · 2 years ago
 -
 medievalfaerie reblogged this · 2 years ago
 -
 mayamymya liked this · 2 years ago
 -
 jellyfishiing liked this · 2 years ago
 -
 aethesfaelibrarae liked this · 3 years ago
 -
 sunbedo liked this · 3 years ago
 -
 digital-panic-attack reblogged this · 3 years ago
 -
 beneviolentwilyskytreader liked this · 3 years ago
 -
 studyrepository reblogged this · 3 years ago
 -
 owl-eyed-moonlight liked this · 3 years ago
 -
 maenfly reblogged this · 3 years ago
 -
 oceanpup13-blog liked this · 3 years ago
 -
a-brags liked this · 3 years ago
-
 phire-foenix liked this · 3 years ago
 -
 sevenknightingales liked this · 3 years ago
 -
 saitamasleftcheek liked this · 3 years ago
 -
 celestialh4ven liked this · 3 years ago
 -
 fireheart-sims liked this · 3 years ago

Sylwester | i will mostly post sketches, because i'm too lazy to end them
196 posts