Nastysynth - Shrek Husbando


More Posts from Nastysynth and Others

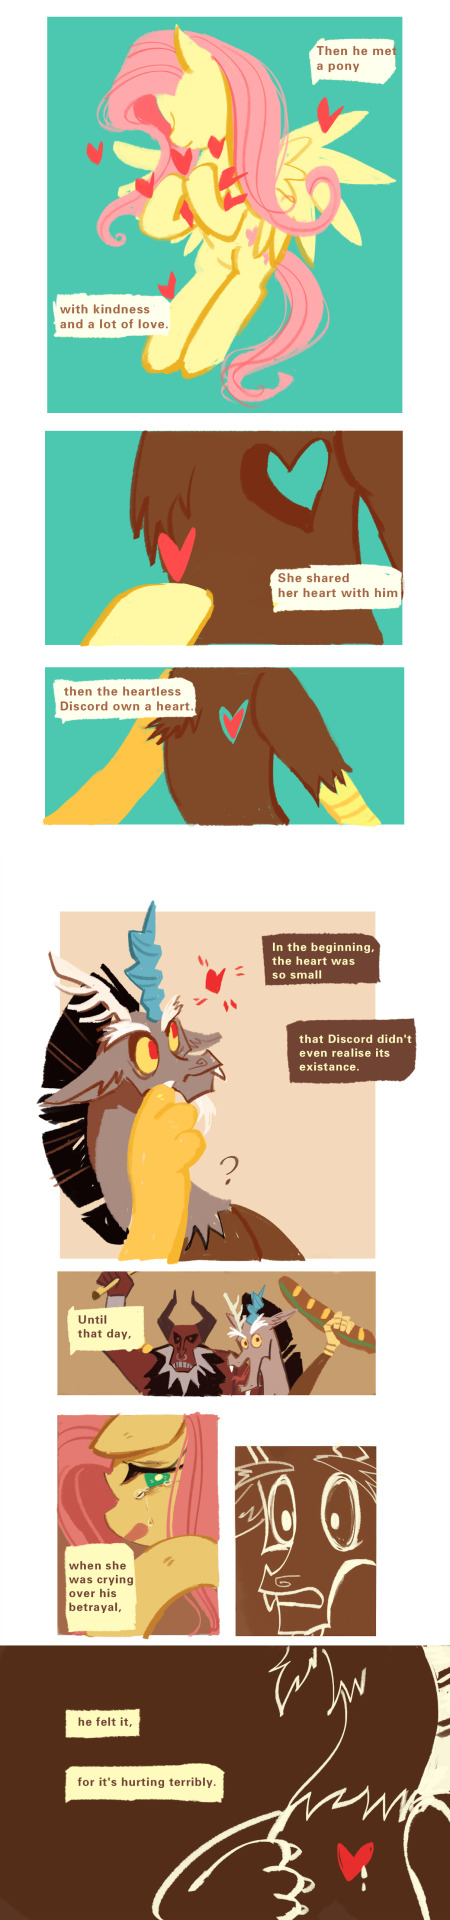

FLUTTERCORD COMIC: <<HEART>>
I’m glad that I can finish this on time.
Season 9 is over, but I know their stories will not stop.
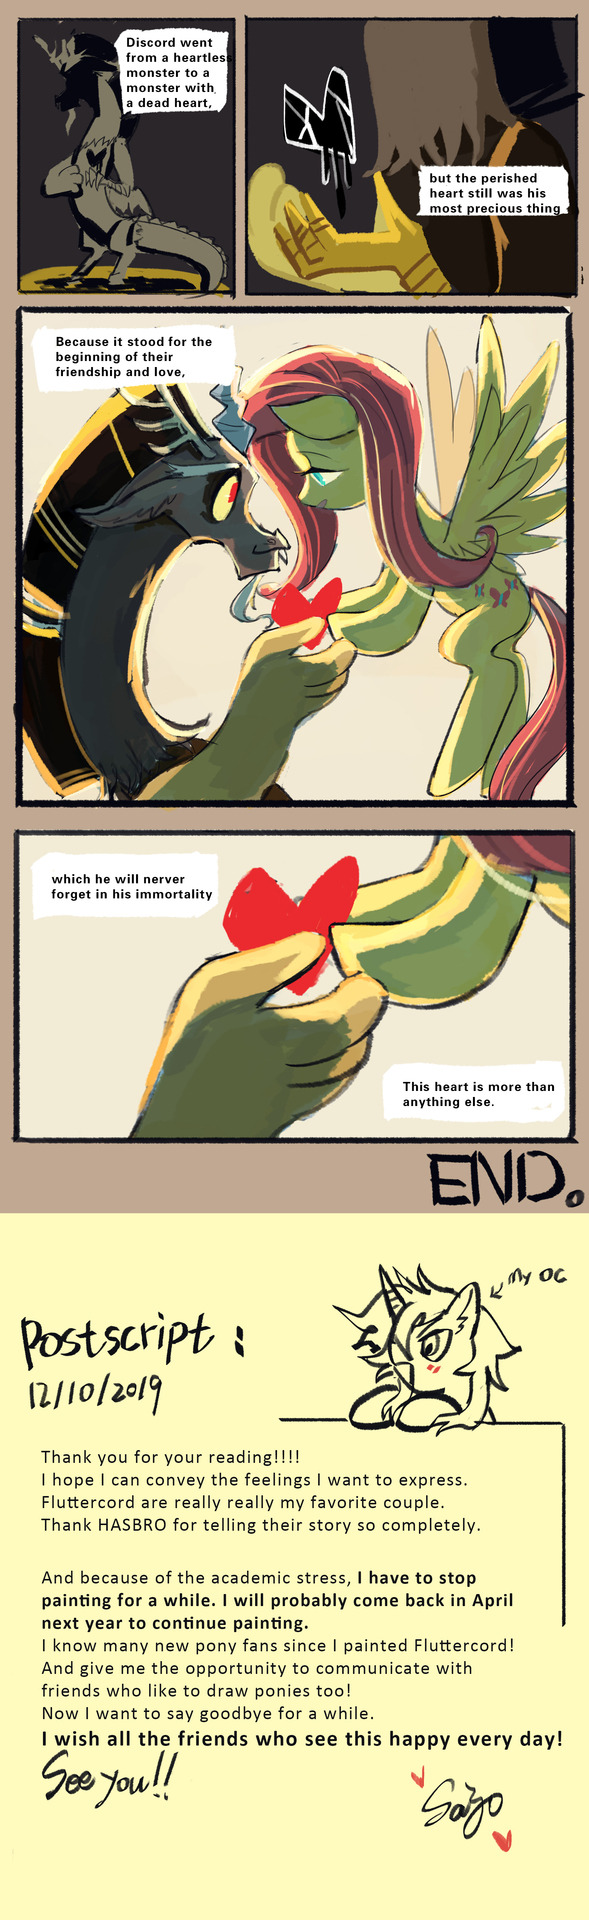
I love them forever.It’s like I know they’ll always love each other.
And now I have to stop updating for study.
I’ll be back in April next year to continue drawing. See U!!!!!
I’ve been using your Arcana tutorials as a reference for a self-insert character. But I’m having trouble coloring the tulle bathrobe, the see-through cloth as well as it’s general texture. Any advice?
What luck. I literally just finished redrawing Isha’s bath sprite.
Note: I use Clip Studio Paint but this method works with any program that has layers and layer styles.
First off, some things I noticed when deconstructing how to draw them.

My Process:

Note about the bottom half: Despite being more opaque, there’s a slight gradient and transparency to it. This can be achieved by airbrushing a very light eraser on the edges of the base colour layer


As for the texture, you can use a worn paper texture on top of this colouring set to “overlay”
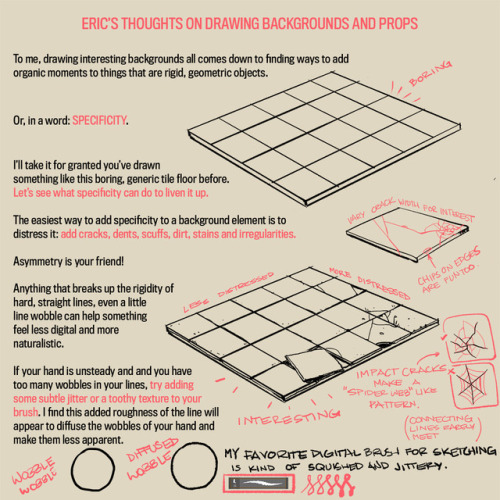
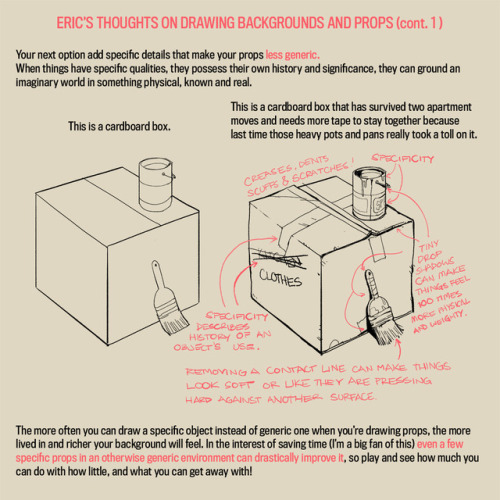
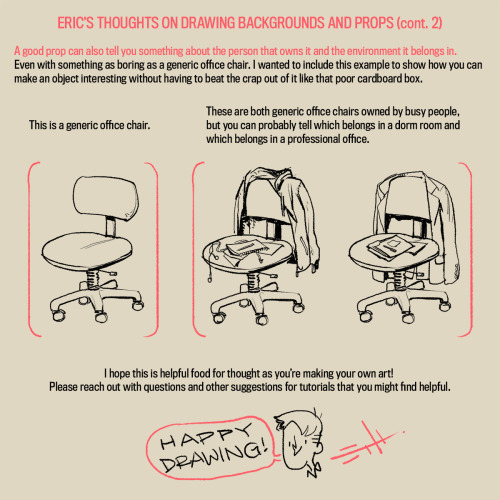
A long time ago an anon asked my thoughts about drawing backgrounds, so I finally got around to putting this together. It’s more prop-centric, but it still represents my philosophy to backgrounds.
I’ll try to do something more about drawing actual background spaces in the future! Please let me know what you think, if anything is unclear, or if you have suggestions for other tutorials you might find helpful!
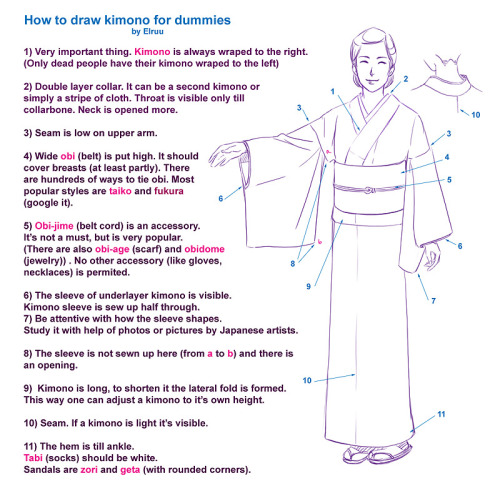

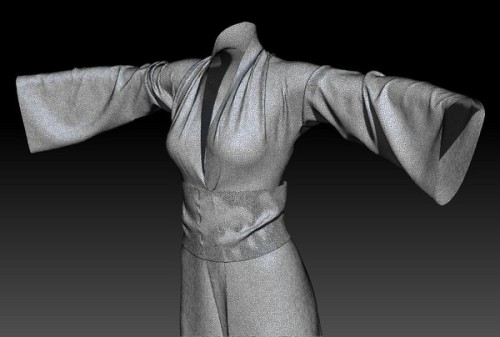


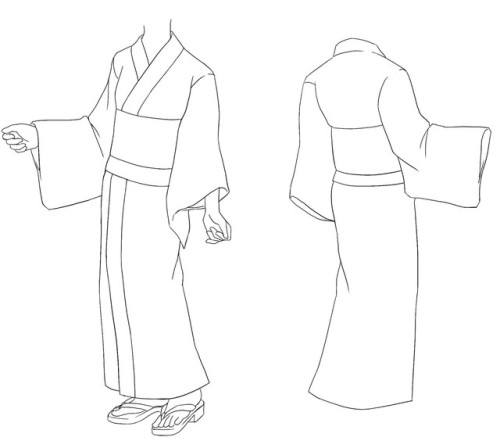
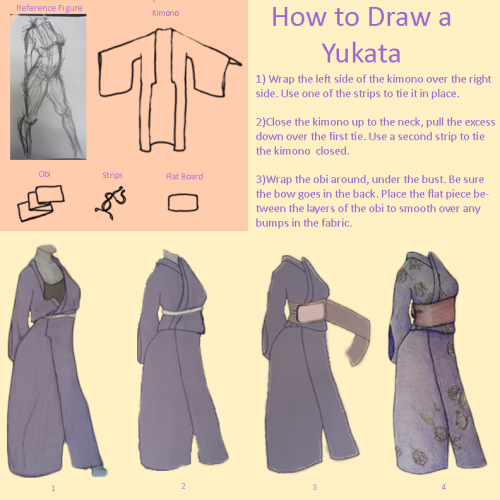


An glorious fuck-ton of kimono/yukata (for females) references.
Yes, the last one is in Japanese… hopefully you’re fluent. And, for the longer images, you gotta reverse-image search ‘em to see the text.
[From various sources]
can you do a tutorial on how you color your artwork? it's so pretty!! 😍🤩
this is not the best and only way to color but personally i think it’s easy and quite effective for beginner artists who are practicing setting the mood for an artwork or laying out ground work for more detailed illustrations
I’m using Clip Studio Paint for this drawing.
Step 1: The base color

Use magic wand and bucket tool to lay out the base color, you can use different layers for each colors to be more precise, and it’s easier to change the colors later on. I use mainly warm tones for my base color because i prefer the look of it. Step 2: Coloring the lineart

Use a clipping layer above the lineart layer to do this step (there are other ways of course, you can search for them online) Color the lines that isn’t intersected with the background, the inner lines. Especially the skin part to reduce stiffness of the lineart, also help adding shadows.


I usually draw the darkest shadow areas with my lineart so i can color them at the same time.
Step 3: Adding shadow
Group the lineart + base color into 1 big group. Add a clipping layer above that group. Switch the layer mode to “Multiply”. Add the shadow area using a desaturated/grayish hue of your choice to set the mood for the drawing.
Example:
If the mood you want is more broody, use more cool tones (blue, purple,..)


If the mood is more festive or happy, use more warm tones


A drawing should consists both cool AND warm tones, other wise it would look dull. The second example has too much warm tones because the base color is already warm.
Step 4: Add filter layers/adjustment layers
This is where the magic happens. Enhance your art work by adding more Multiply and Overlay layers, set the mood as you like it to look, balancing the tones, play around. I wanted this particular drawing to have an overall cold feeling to it, so I added a blue multiply layer

Adding light with a beige overlay layer, using the airbrush with low opacity. This also help creating contrast between the shadow and light areas

But wait,,, it looks,,,,,, it looks too sad!! they are comforting each other after a terrible situation! Adam is not dead! I need another warm multiply layer!

There, it’s now finished. Quick tip: If your colors are looking off/doesn’t go well with each other, group everything and add a beige multiply layer on top! It would look better instantly! Learning color theory, color harmony also helps A LOT!! find tutorials and study from the masters! Good luck with your art, Anon!
hi! i love your art, it's so pretty ♥ and you draw feet really well, do you have any tips?
thank you a lot anon!! ( /)w(\) here, i made a few notes about the steps i follow while drawing feet:

^ that’s assuming you’re not drawing from a low perspective, as if the camera was on the floor or something like that!


SORRY MY HANDWRITING SUCKS and i’m not really good at explaining things bc i don’t really follow a guide and stuff so yeah BUT I HOPE IT WAS HELPFUL TO YOU!!
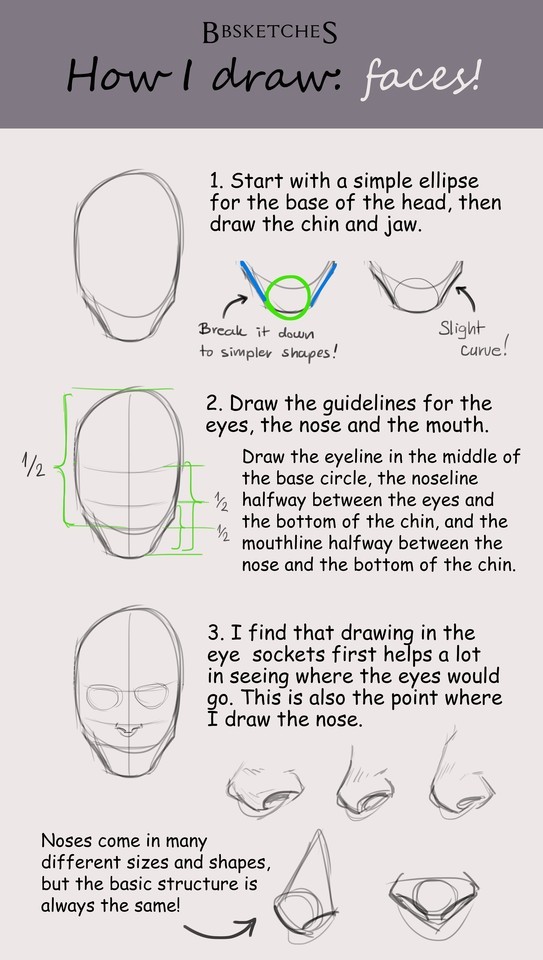

Face tutorial for Anon!
I wasn’t sure whether you meant heads or facial expressions, so here’s a very basic head tutorial! Of course not all faces are the same so proportions and the size of ears/eyes/noses etc. can vary! Feel free to explore and play with them to create unique and interesting characters! I hope this is somewhat helpful, and let me know if you’d like a tutorial on expressions as well!

My best friend and I were talking sigma anatomy (since idk how to draw him) so I doodled over this for future reference, red is her and blue is me


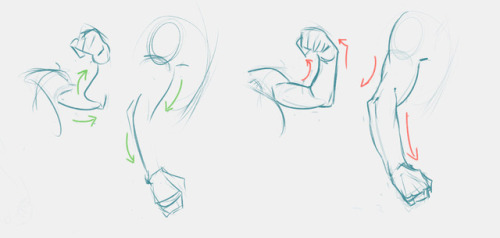
I would like to make a new bunch of tutorials… I wish I could carry out my intention. Incidentally, It’s going to be “How to draw poses by using gesture drawing method ”,


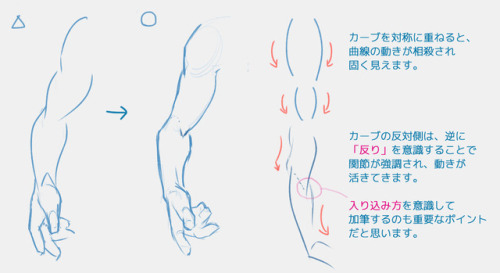
Hi there! Hope you’re having an amazing day as well! :D Here are some tutorial sketches on how I approach drawing male and female characters, and Handsome Jack. I tend to focus on varied uses of curves and angles when drawing male or female characters. Hope this helps!
-
 batsudreamy reblogged this · 2 months ago
 -
 somerandomshithead reblogged this · 2 months ago
 -
 herehaveafandom reblogged this · 2 months ago
 -
 nadjasolace reblogged this · 6 months ago
 -
 goaticusthefirst liked this · 7 months ago
 -
 perry-88 liked this · 8 months ago
 -
 why-must-i-be-like-this reblogged this · 9 months ago
 -
 le-blanc-et-la-noire liked this · 10 months ago
 -
 invaderspleen liked this · 11 months ago
 -
 jumbleberryfields reblogged this · 11 months ago
 -
 icesulphur reblogged this · 11 months ago
 -
icesulphur liked this · 11 months ago
-
 seaweed-official reblogged this · 11 months ago
 -
seaweed-official liked this · 11 months ago
-
 digthehig liked this · 1 year ago
 -
 expectopatronope liked this · 1 year ago
 -
 thedaylightworldofbrian reblogged this · 1 year ago
 -
 only-3-braincells reblogged this · 1 year ago
 -
 amitybrightlights liked this · 1 year ago
 -
 zetsubonoheishi liked this · 1 year ago
 -
 tutan-come-in reblogged this · 1 year ago
 -
 qaz1234etu liked this · 1 year ago
 -
 marsdust-png liked this · 1 year ago
 -
 aeire-ares liked this · 1 year ago
 -
 bespectacledbibliophile reblogged this · 1 year ago
 -
 lchtenberg reblogged this · 2 years ago
 -
 setquartertileplacementon liked this · 2 years ago
 -
 queenslayeroflies liked this · 2 years ago
 -
 golddustedqueen liked this · 2 years ago
 -
 fancyanne reblogged this · 2 years ago
 -
 blackmesa-researcher liked this · 2 years ago
 -
 pandaren reblogged this · 2 years ago
 -
 fallenclay reblogged this · 2 years ago
 -
fallenclay liked this · 2 years ago
-
 sunsetatthedawn reblogged this · 2 years ago
 -
sunsetatthedawn liked this · 2 years ago
-
 leololcat reblogged this · 2 years ago
 -
leololcat liked this · 2 years ago
-
 arentweallcrazytrash reblogged this · 2 years ago
 -
 ichorfall reblogged this · 2 years ago
 -
 wikipediaboyf liked this · 2 years ago
 -
 obsessed-depressed-possesed reblogged this · 2 years ago
 -
 dirkuu reblogged this · 2 years ago

Sylwester | i will mostly post sketches, because i'm too lazy to end them
196 posts