My Best Friend And I Were Talking Sigma Anatomy (since Idk How To Draw Him) So I Doodled Over This For

My best friend and I were talking sigma anatomy (since idk how to draw him) so I doodled over this for future reference, red is her and blue is me
More Posts from Nastysynth and Others
Custom brush tutorial kinda??
Heres how you can make pixel brushes in Clip Studio Paint
first make a little pixel pattern and made sure that the background layer is transparent.

then you want to select edit -> register material -> image. this i remember from trying it before

next name it and choose a place for it to go among the others. doesnt matter where really. also check the texture box.

next to make the brush choose whatever brush that youd like to give it that has the properties you want and copy it. i just chose the standard oil brush. go to the copied brushes settings and click texture

click where it says none and find the brush that you made. after you click it change the setting to this

for me the texture works for subtract, multiply and compare. dont really know the differences between them all or form the others but for what i wanted those three seemed to work.
i did this for a bunch of different pixel patterns and brushes and got some cool effects! check it out!

i appreciate all the help and suggestions yall gave me!

maybe once i figure them out some more i could offer stylized commissions with them :V


All images are used purely for educational purposed and are credited to their sources and owners. Any image without credit was created by me.


It only takes a couple of lines to go from one eye style to the other so I'm always stuck between them cause I love both so much
LITERALLY the most Lynch thing i’ve seen


Pallete challenge but i did some crappy background lel.
Static Texture Tutorial (Blender 2.7)
So it’s been a hot minute since i’ve posted any tutorials on here, and one of my gifs featuring a static texture recently got a nice amount of attention on twitter, so i thought i’d post a tutorial on how to make an effect like this


in blender (blender 2.7 to be exact, i haven’t updated yet because i’m an old senior citizen set in their ways). This one’s super simple, it literally takes about 5 seconds, so let’s get started.
Czytaj dalej


Let me know if you have questions!!!
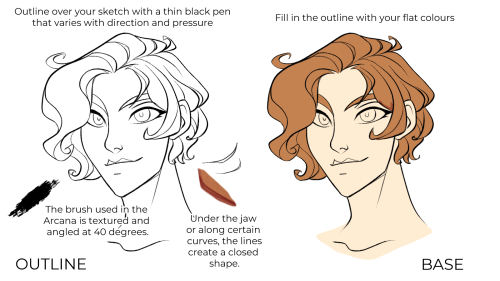
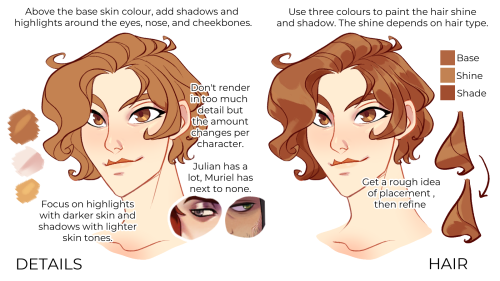
A guide on my process for colouring like in the Arcana which I developed through studying the style.
Now, this is just for sprites or for neutral lighting. In the case of most memories/CGs, you have more interesting colours to use, but the process is identical. There are just extra steps.

Using my favourite memories for each character as examples (hopefully, you can tell which ones) you can see this process. All of this happens on layers above the base drawing.
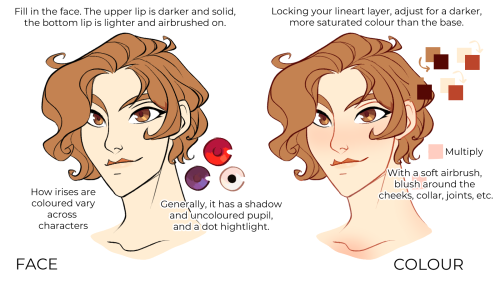
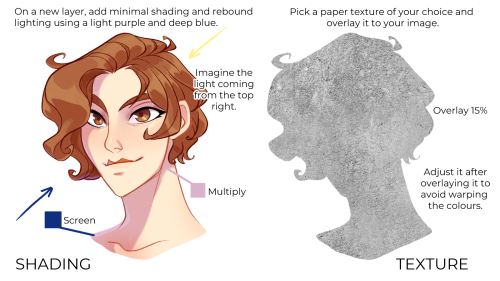
Usually, you set a colour-filled layer to the setting “multiply” over the entire drawing, then using a “screen”, “add”, or “hard light” layer, you add the lighting. Depending on the intensity of the lighting, the outline will be coloured to be lighter.
The shading colour rarely changes, aside from slight hue changes.
Misc advice/tips/tricks below. I may update it depending on if I get further questions.
Czytaj dalej


Oh…Steve…
Metal tutorial
Fire tutorial
art cheats
hello i am here today to not lose track of the art cheats i have discovered over the years. what i call art cheat is actually a cool filter/coloring style/way to shade/etc. that singlehandedly makes art like 20 times better
80’s anime style
glitch effect
glow effects
adding colors to grayscale paintings
foreshortening ( coil )
foreshortening ( perspective )
clipping group (lines)
clipping group (colors)
dramatic lighting ( GOOD )
shading metal
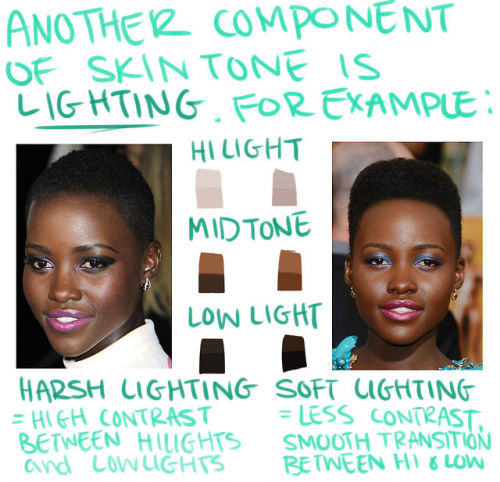
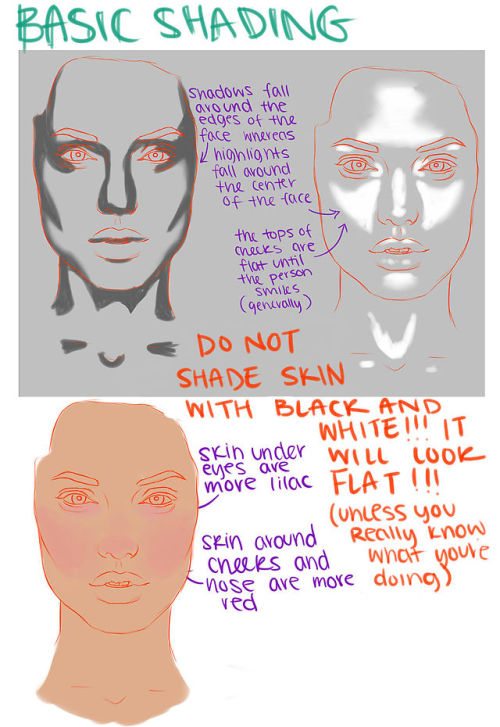
lighting faces
that is all for today, do stay tuned as i am always hunting for cool shit like this
-
 raven-fang liked this · 1 month ago
 -
 weirdo-illusion liked this · 5 months ago
 -
 distorted-smile liked this · 5 months ago
 -
 gamersix06 liked this · 10 months ago
 -
 cryblueofzamorak liked this · 1 year ago
 -
 lotuspuff liked this · 1 year ago
 -
 nights-no-mori liked this · 1 year ago
 -
 toomuchcoffeebye liked this · 1 year ago
 -
 matt-the-second-coming reblogged this · 1 year ago
 -
 matt-theater liked this · 1 year ago
 -
 magicalbuffalotransformerman liked this · 1 year ago
 -
 caterpolarisii reblogged this · 1 year ago
 -
caterpolarisii liked this · 1 year ago
-
 shootlngstxr liked this · 2 years ago
 -
 ball-lightning reblogged this · 2 years ago
 -
ball-lightning liked this · 2 years ago
-
 allidde reblogged this · 2 years ago
 -
allidde liked this · 2 years ago
-
 mellowmonsters liked this · 2 years ago
 -
 silveme reblogged this · 3 years ago
 -
 katzedrache liked this · 3 years ago
 -
 mystic1lurker liked this · 3 years ago
 -
 woomygodness liked this · 3 years ago
 -
 thehiddenwhiterose liked this · 3 years ago
 -
 kuutamon-poika liked this · 3 years ago
 -
 tears-of-moonlight liked this · 3 years ago
 -
 dangerouslychaoticheart liked this · 3 years ago
 -
 kcnwaysworld liked this · 3 years ago
 -
 riruhappy liked this · 3 years ago
 -
 bellherald liked this · 3 years ago
 -
 viciouszombiegnomes liked this · 3 years ago
 -
 spooked-skeleton liked this · 3 years ago
 -
 the5sideddice liked this · 3 years ago
 -
 quailgirlpeep liked this · 3 years ago
 -
 a-very-gneiss-storehouse reblogged this · 3 years ago
 -
 a-very-gneiss-hoe reblogged this · 3 years ago
 -
a-very-gneiss-hoe liked this · 3 years ago
-
 glamurina-vibes reblogged this · 3 years ago
 -
 tricornking liked this · 3 years ago
 -
 spaghettifool liked this · 3 years ago
 -
 fasan4321 liked this · 3 years ago
 -
 spiderfirelillies liked this · 3 years ago
 -
 selinasinister liked this · 3 years ago
 -
 jamjimz liked this · 3 years ago
 -
 commandergoopy reblogged this · 3 years ago
 -
commandergoopy liked this · 3 years ago

Sylwester | i will mostly post sketches, because i'm too lazy to end them
196 posts