My Process:
I’ve been using your Arcana tutorials as a reference for a self-insert character. But I’m having trouble coloring the tulle bathrobe, the see-through cloth as well as it’s general texture. Any advice?
What luck. I literally just finished redrawing Isha’s bath sprite.
Note: I use Clip Studio Paint but this method works with any program that has layers and layer styles.
First off, some things I noticed when deconstructing how to draw them.

My Process:

Note about the bottom half: Despite being more opaque, there’s a slight gradient and transparency to it. This can be achieved by airbrushing a very light eraser on the edges of the base colour layer


As for the texture, you can use a worn paper texture on top of this colouring set to “overlay”
More Posts from Nastysynth and Others
Not the same Anon, but hyacinths please
Hi friend, thank you so much for your interest! I’m going to go over how I draw these flowers, but I realized midway that I’m actually very terrible at drawing these in particular, haha. There’s a reason I’ve lowkey avoided doing them so far, and I think it enabled me to highlight a bit more, the way I choose my arts.
It’s quite hard to teach just “how to draw a specific flower” mostly because I myself don’t know - the most important thing I can emphasize is using references!

I personally dislike drawing these flowers in my art, and I couldn’t figure out why until I started this tutorial.
One thing I tend to notice when I look at reference pictures is how flowers move as a ‘whole’ and their relative ‘flexibility’. I pay attention to that because the way I do art, I choose the flower in part based on appearance and how natural they will look in a specific composition.

I tend to like flowers that sprout outwards and have a kind of ‘loose’ appearance. The red lines here show the ‘direction’ I want the flowers to go in.

This is where these flowers pose a bit of a problem. Because arranged in clumps, they are very stiff. It’s not a bad thing if that’s what you’re looking for, but it’s not what I wanted, exactly, for this image.

They just stick straight up, because they have very stiff leaves and a tight packed pattern. (They sometimes tilt though, mine always did). At this point, I could decide the form isn’t right, and this isn’t the flower I want. But there’s also another thing I could do, which is altering it’s appearance when I draw it, slightly.

Left is a simplified version of the shape, while the middle is a more detailed image. The furthest to the right is a close-up of a single flower. Depending on what you want to portray, you can choose to alter what you want your flowers to look like.

As you can see, when drawn closer up, the flower has a lot more flexibility!

So with this, I ended up drawing the batch of flowers a lot larger than how it would be normally, while still retaining the recognizable flower and leaf shape.
So what I’m trying to convey is that sometimes you have to study references, but then know you can pick and choose what aspects to highlight in your art. That’s I think, how you can get your flowers to look extra ‘dynamic’ in your work - by accentuating their specific shapes to work to your advantage! And also playing with their colors and such! But hyacinths come in so many colors that any would work!
I hope this is helpful to you, anon!
Hey how did you do that line effect on your models? asking for a friend.
So for a simple outline the easiest thing to do is open up your properties window (which should be displayed by default on the rightmost side of the screen. It’s got all of your render and output info displayed) and go to the section marked “Post Processing”


Open it and check the box called “Edge.” This’ll give your model a nice little outline when you render it (you can change the color by clicking on the rectangular box underneath the threshold slider)


and that’s just a simple way to get the basic result.
NOW if you’d like something a little more dynamic-looking, like this

Then you’ll want to go back to the properties window and instead of clicking on “Post Processing,” click on the box marked “Freestyle” (it should be at the very bottom)

Now, at the top of the properties window, click on the “Render Layers” tab. It’s gonna look like a stack of photos, right next to tab with the camera on it.

Once you’ve clicked on that, scroll down to the very bottom of the window, and click on “Freestyle Line Style”

Once you’ve opened that up, click on the “Geometry” tab. This’ll let you alter the style of the line.

and now you can add your modifiers! There are a lot of different styles to choose from, so don’t be afraid to experiment with them! “Sinus Displacement” makes a sort of zigzag pattern, “Blueprint” adds in some fancy circles, and “Spatial Noise” or “Polygonization” will typically get you that sort of loose, sketchy look if that’s what you’re going for.


blender is pretty neat, huh!
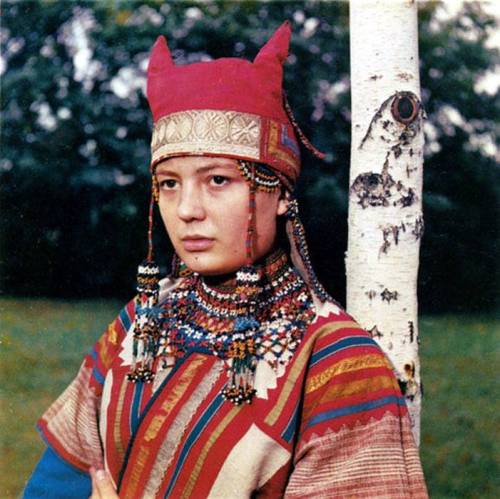

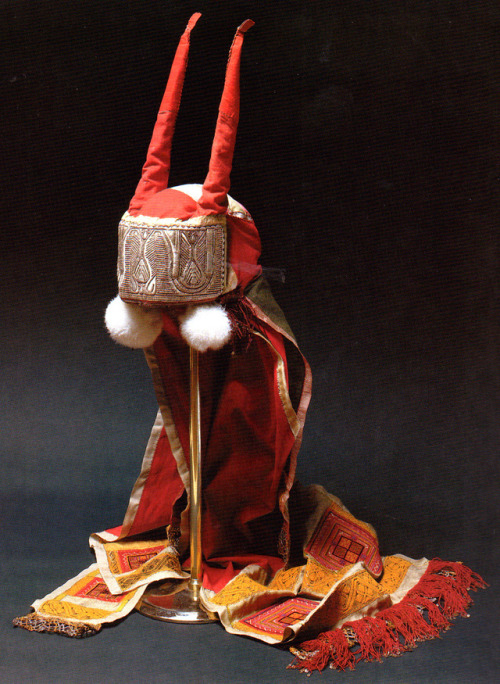
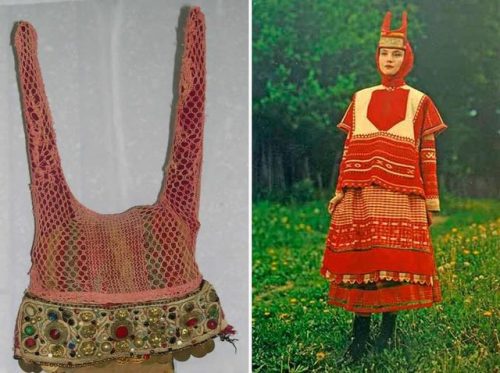
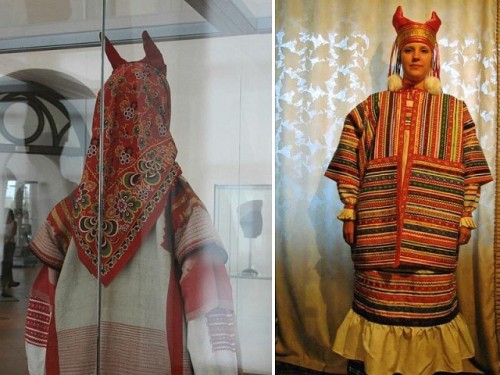
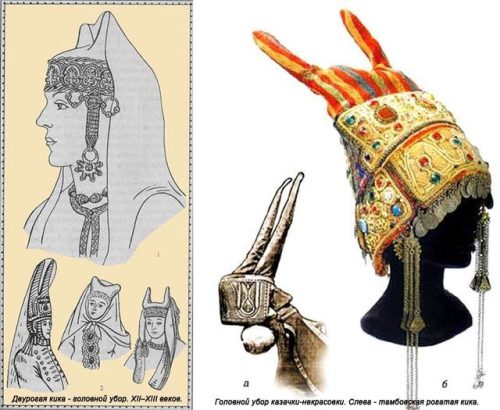
Horned kichka (Russian: рогатая кичка) is a type of ancient russian headdress for a married woman.
The horned kichka was a fertility symbol, and it served as a protection against evil spirits.
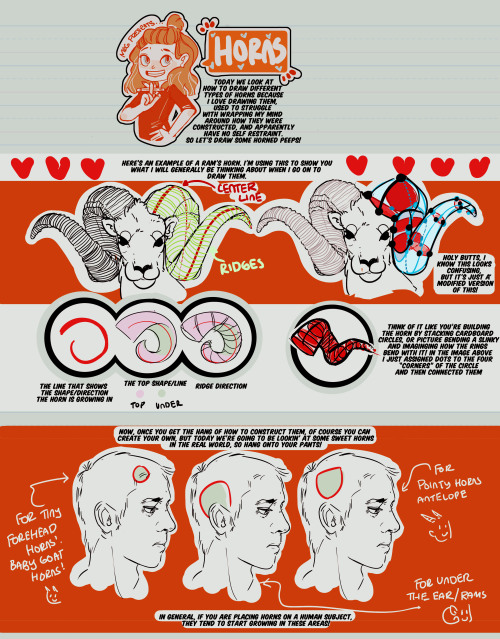
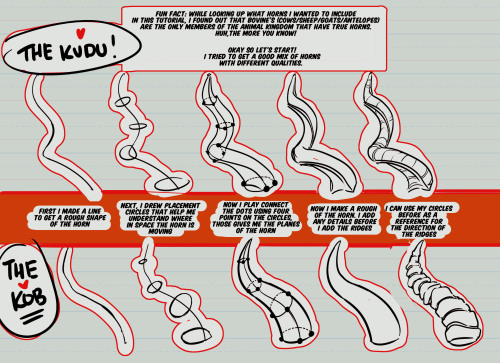
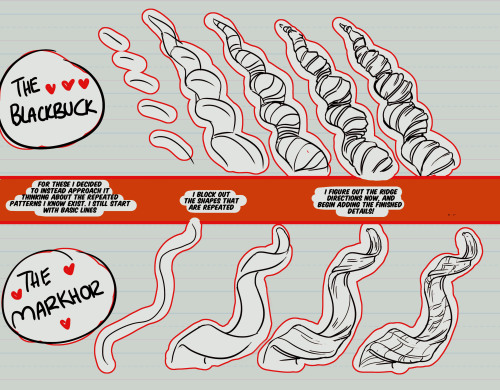
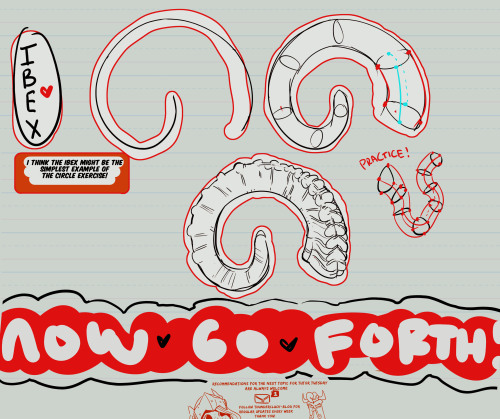
Hey friends!
It’s Meg for this week’s TUTOR TUESDAY! Today we take a little look at hopefully some exercises that will help with drawing horns! So go draw some peeps with horns, my dudes. If you have any recs send ‘em in here or my personal. Keep practicing, have fun, and I’ll see you next week!
Hey got any tips of drawing in the cr style?
Well first off, study the sprite sheets of the characters. They can all be found on the Cookie Run wiki.To draw in a style it helps to study the style too and figure out the elements of how the characters are put together. For Cookie Run it goes hand in hand with my style because a lot of it is very Geometric. Even with cookies who are oddly shaped.

I talked about this with my Discord once about how basic shapes can really go into making the character design solid and this seems to largely be the basis of how CR renders it’s characters.

Even characters build like Purple Yam and Milk Cookie use this more basic geometry when building the foundation of the character. It all comes down to a more simplistic style based on shapes.

That being said, When I build characters I use basic shapes to do it. That’s why a lot of my earlier drawings of the CR OCs look so different compared to now, because back then I was learning it. The easiest way to do it is to try drawing a CR character, build them as you see them, and then adapt that into how you draw.

And obviously cookies aren’t all the same shape! Shapes really can go into how people will interpret your character and their personality! So don’t be afraid to think outside of the box and look at different shapes for different characters!
That’s about as many tips as I have for now, but that’s the fundamentals over how I go about it.
so here’s my blender texturing guide! so many tutorial posts lately…
Czytaj dalej
color blob effect in clip studio paint


hey! >this post< got a some attention and i saw a tag asking for the tutorial, so i decided to go through with it. here’s that tutorial!
tutorial below the cut!
Czytaj dalej
Quick art tip - child proportions
Ok this is a real quick one but let me show you how to get more-or-less accurate sizes for child characters. Kids are tricky to draw, they are - from toddler up to about teens people change radically almost every year so pinpointing character’s size during those years is pure hell.
What you need to do to make everything super easy for yourself is to check their Head Proportion. What makes kids look like - well, kids, is that their heads are proportionally large in comparison to their body.
Average adult is about 7,5 heads tall in comparison to their own body, however with children under 10 that number is just under 6 heads with about 1 head shorter the younger you go down to 3 heads as an infant.
Easiest way to figure the so-so head-height of a certain age is to find images of said age group and do a quick count on them

at which after you can replicate it in your own works - don’t mind if it’s not 1:1 with reference, finding images that are actually of the age you need is tricky and kids in general vary a lot so someone might be a lot taller than others. You have a bout 0,5 -1 heads of wiggle room before it starts to look way older.


Proportions are super important in art and i lovingly recommend everyone to figure out basics of them - it’s the easiest way to get notifically better with art. I could go on about proportions but let’s wrap this up. Need to note however that head proportion is not same as character height - a character can be 15 feet tall but still have head-height of 6, HH is simply a way to scale out the body.
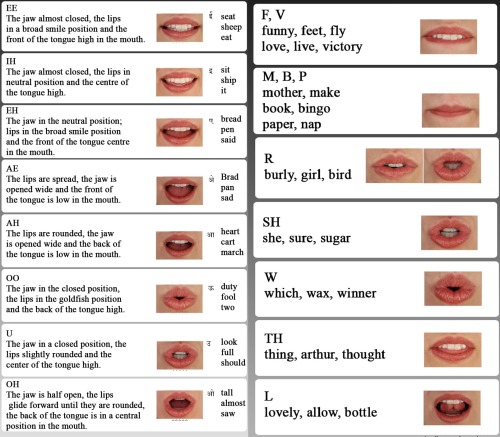
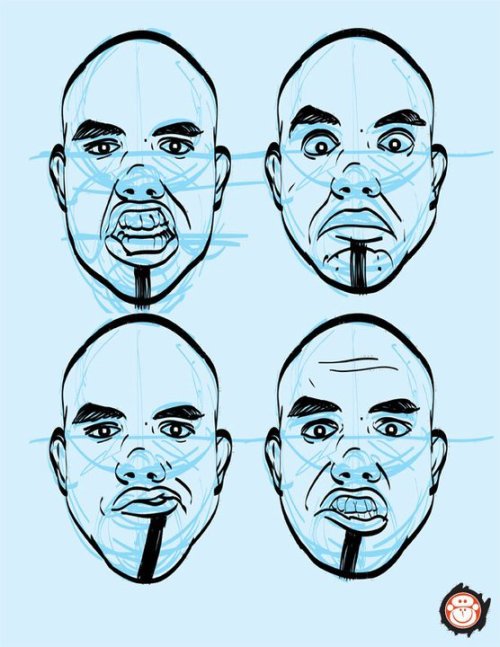
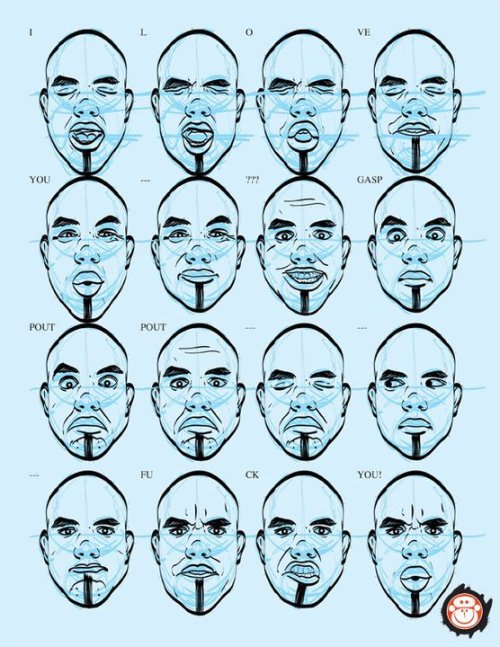
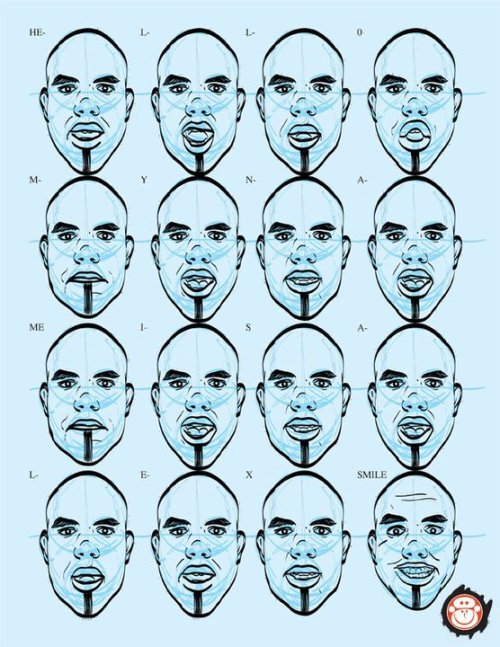
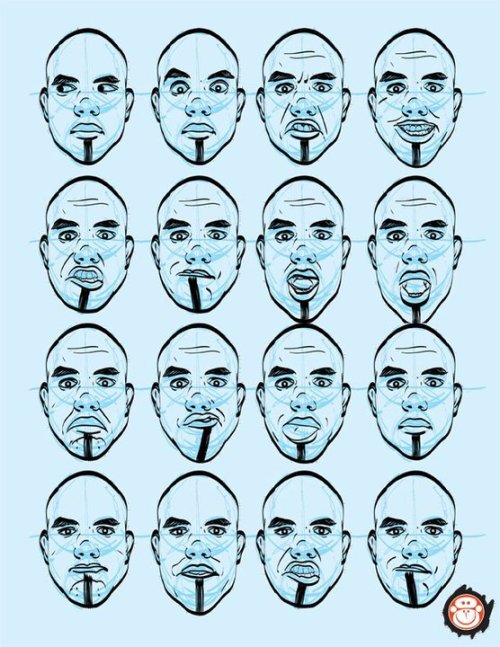
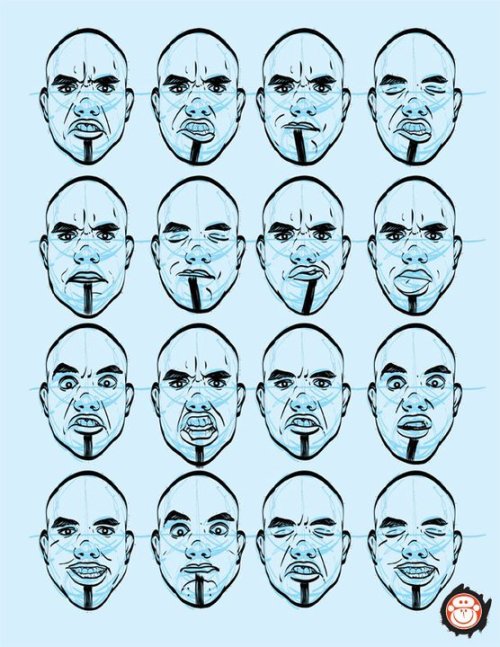
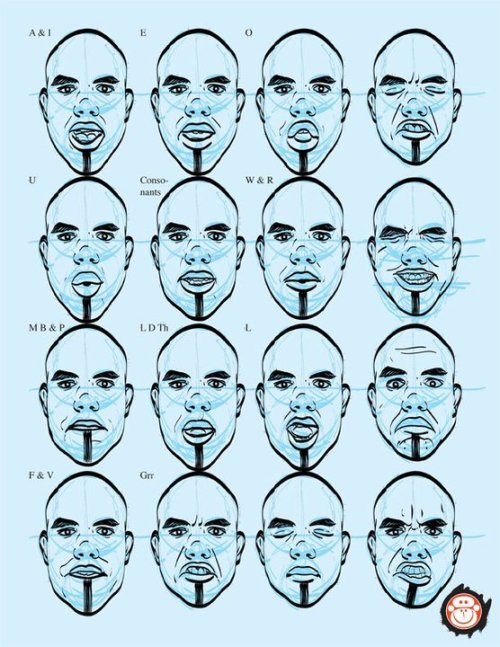
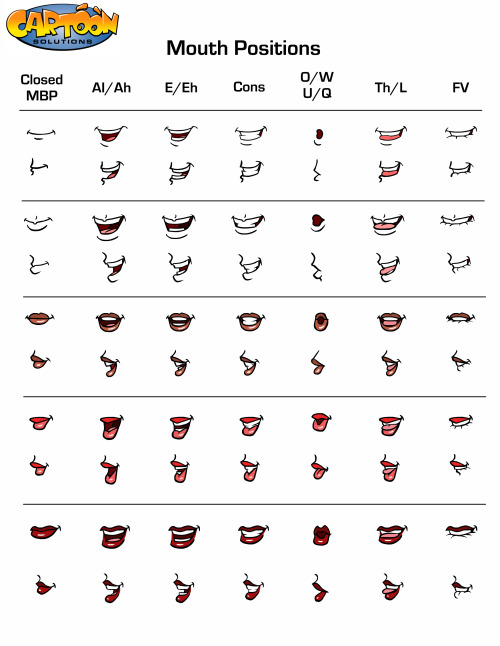
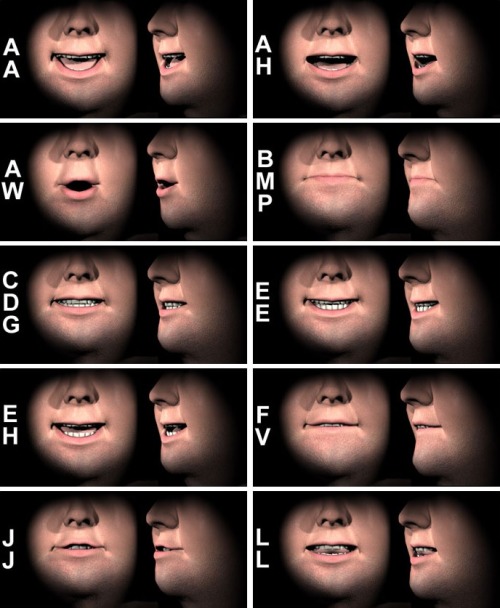
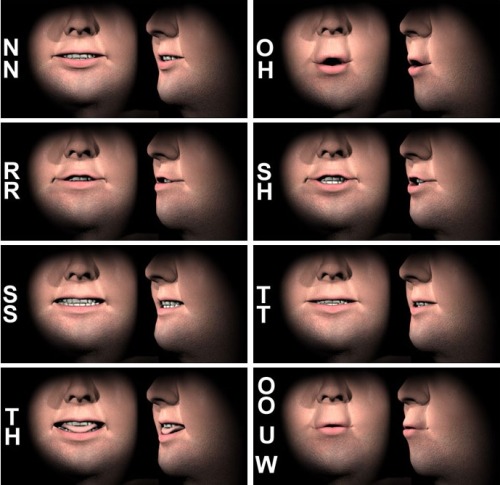
Lip Sync Tutorial Top Image Row 2 - 4 Row 5 Bottom Row
Free to use textures, credit optional.


-
 lxstkitsune liked this · 1 week ago
 -
 misspink-ego reblogged this · 3 weeks ago
 -
 raw-sausig liked this · 4 weeks ago
 -
 beartdraws liked this · 1 month ago
 -
 junofairyart liked this · 1 month ago
 -
 liliannamira liked this · 2 months ago
 -
 anew-flame liked this · 2 months ago
 -
 thepoetjean-makes-stuff liked this · 3 months ago
 -
 unusualmuffin-art liked this · 3 months ago
 -
 baby-a-in-trenchcoat liked this · 3 months ago
 -
 sophsoap liked this · 4 months ago
 -
 crackheadwhohashadenough liked this · 4 months ago
 -
 guacalover liked this · 5 months ago
 -
 jayduztumb1r liked this · 6 months ago
 -
 xxxsl33p-l0vr reblogged this · 6 months ago
 -
 viridian-artist liked this · 6 months ago
 -
 mochikekki liked this · 7 months ago
 -
 blerbs reblogged this · 7 months ago
 -
 macabremayhem liked this · 8 months ago
 -
 sincerelyamia liked this · 9 months ago
 -
 pompkns liked this · 9 months ago
 -
 woomysans liked this · 9 months ago
 -
 lycheeloach liked this · 9 months ago
 -
 evelinn-zaerien reblogged this · 10 months ago
 -
 fanneartist reblogged this · 10 months ago
 -
fanneartist liked this · 10 months ago
-
 cryingpinktears liked this · 10 months ago
 -
 xeas-niamh reblogged this · 11 months ago
 -
xeas-niamh reblogged this · 11 months ago
-
 gh0st0rch1d liked this · 11 months ago
 -
 aliaa-j liked this · 11 months ago
 -
 stickystickyduck liked this · 11 months ago
 -
 rachelle-on-the-run liked this · 11 months ago
 -
 twiinarmiigeddon liked this · 1 year ago
 -
 mnurdolia liked this · 1 year ago
 -
 soapness liked this · 1 year ago
 -
 diegnampf liked this · 1 year ago
 -
 casslescastiel reblogged this · 1 year ago
 -
casslescastiel liked this · 1 year ago
-
 cray0nbits liked this · 1 year ago
 -
 artking-4 reblogged this · 1 year ago
 -
 ninapina liked this · 1 year ago
 -
 let-me-see-my-rbs reblogged this · 1 year ago
 -
 lackytacky liked this · 1 year ago
 -
 helenperrault reblogged this · 1 year ago
 -
lovingwagonrebelplaid liked this · 1 year ago

Sylwester | i will mostly post sketches, because i'm too lazy to end them
196 posts