Nastysynth - Shrek Husbando

More Posts from Nastysynth and Others

Process of one of my drawings of Ardyn!


some puppies studies ( ͡° ͜ʖ ͡°) 🐶 | Instagram
(Edited) + more studies lkdafña
need refs/inspo for period clothing?
here you go:
Medieval (9th-15th century):
10th century and earlier
Romance (1000-1250)
11th century
12th century
13th century
more 13th century
14th century
more 14th
15th century
and more 15th century
Gothic (1150-1550)
Renaissance (1520-1650)
16th & 17th century
16th century
more 16th
Tudors (1500-1550)
more Tudors
Elizabethan Period (1558-1603)
Jacobean Era (1603-1625)
17th century
more 17th century
and again
and even more
this won’t stop
Baroque (1600-1750)
Georgian Period (1714-1830):
18th century
more 18th century
18th century women’s fashion
18th century men’s fashion
Rococo (1720-1770)
Classicism (1770-1790)
children 18th-19th century
Regency Preiod (1811-1820)/ Empire (1800-1820s):
1790-1820s
more stuff on regency and georgian era
even more
that’s not enough regency
and more
how is there so much
early 19th century men’s wear
early 19th century women’s wear
Victorian Period (1837-1901):
Romantic Era (1820-1840s)
Civil War Era/1850-1860s
1870-1890s
more victorian
Edwardian Period (1901-1910):
1900-1910s
Belle Epoque (1880-1910s)
more edwardian/belle époque
Modern:
1910s-1920s [Fashion between the World Wars]
1920s
more roaring 20s
so much 20s
1920s hairstyles
1930s
1930-1940s
1930-1950s
1950s
more 50s
1960s
1960-1970s
1980s
lots of periods in one spot/fashion through centuries:
here, here, and here is almost everything (and properly ordered)
also here with lots of historic fashion magazines
100 years of beauty (includes lots of other cultures too!)
historic fashion
costumes of antiquity
more historical clothing
history of fashion
more history of fashion
“vintage” clothing
historic costumes
children’s historical fashion/toys
details
historic wedding dresses
historic assecoires (hats, shoes…)
hats
masks
parasols
lots of embroidery/jewlery
Short disclaimer: Most pictures show clothes of royalty, aristocracy, and burgoisie as their clothes weren’t worn as much and especially not for labour, which is the issue with farmers/workers’ clothes, which also were reused quite often, whether to sew new clothes or have rags. So please keep this in mind!!
It really is very European-centric as I am European as well, and I apologise for it if you expected more from it. I definitely lack the knowledge to determine what are accurate portrayals of other cultures, and to find content for them is really difficult as well. This is why I would encourage you to submit any resources you have to my blog! If you have any book recs or know good pages, please let me know!
Another edit/note: Pinterest has changed a lot since I made the post, so you need to be signed in now to see more than the first row of the boards, I’m really sorry about that! (Also I tested all the links and on my original post they still work, if you’re having isues with that.)
shading colour tips
hey yall its me the Art Mom™ to help you shade pretty
rule 1: DO NOT SHADE WITH BLACK. EVER. IT NEVER LOOKS GOOD.
red- shade with a slightly darker shade of purple
orange- slightly darker and more saturated shade of red
yellow- i think like..a peach could work but make it a really light peach
green- shade with darker and less saturated shade of blue or teal
blue- shade with purple
purple- a shade thats darker than the purple you’re using and maybe a little pink (MAYBE blue)
pink- darker shade of red
white- a really light lavender or blue..or i guess any really light colour??
black- okay listen dont use pure black to colour anything unless you want to leave it with flat colours because you cant really shade black lol
grey- a slightly darker shade of purple or blue (less saturated)
brown- slightly darker and less saturated shade of purple or red
aaaaand thats all i got lol. let me know if there is anything i should add to this list!!
3D Pixel Art Tutorial (Blender)
so here’s another little tutorial, this time on how to make quick and easy pixelated models in blender, like these


so lets get started!
Czytaj dalej
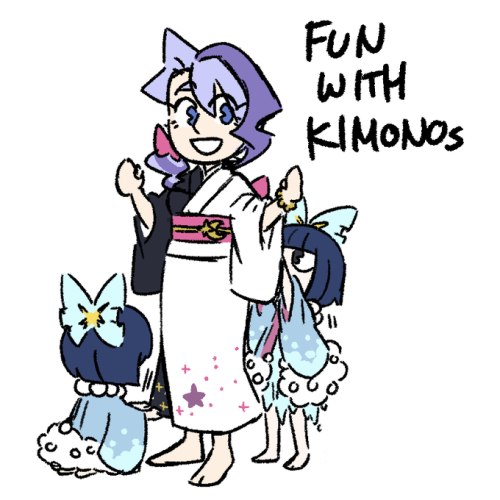
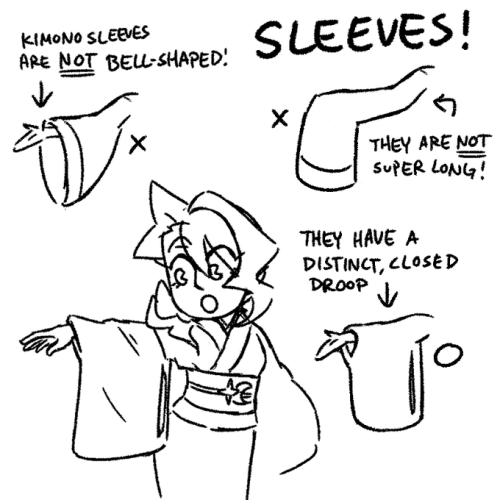
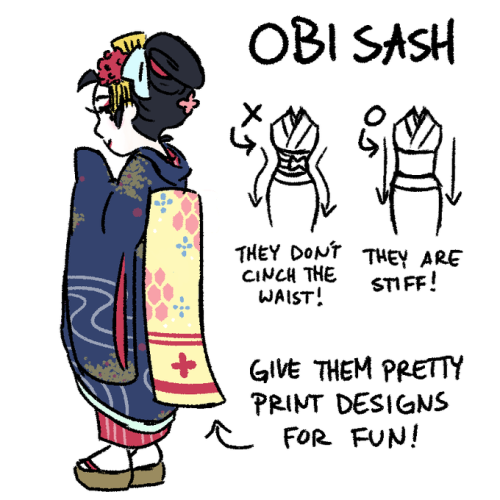
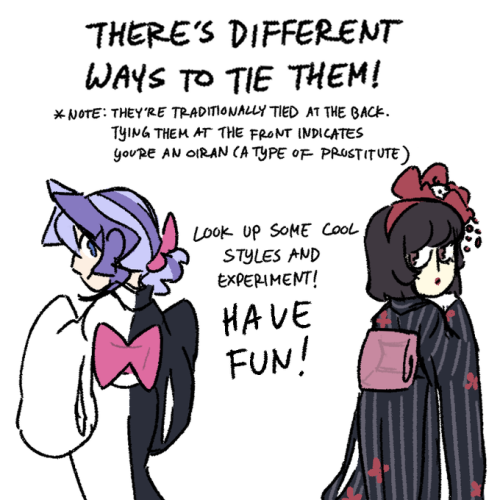
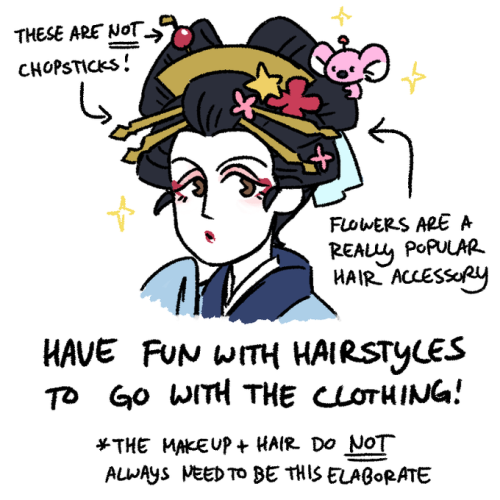
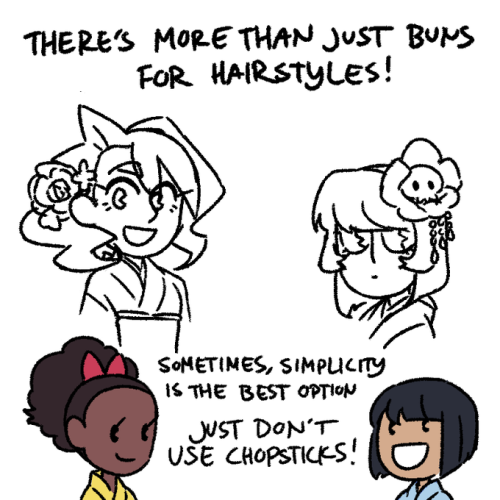
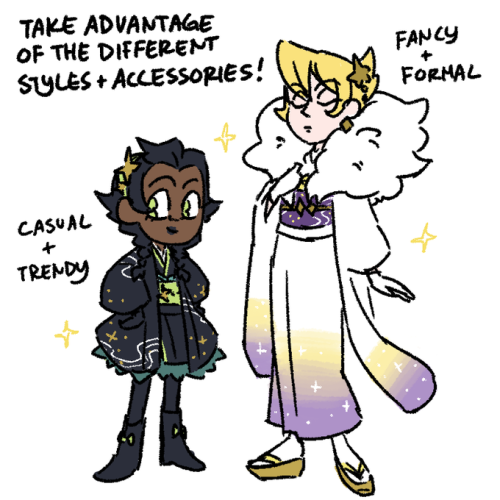
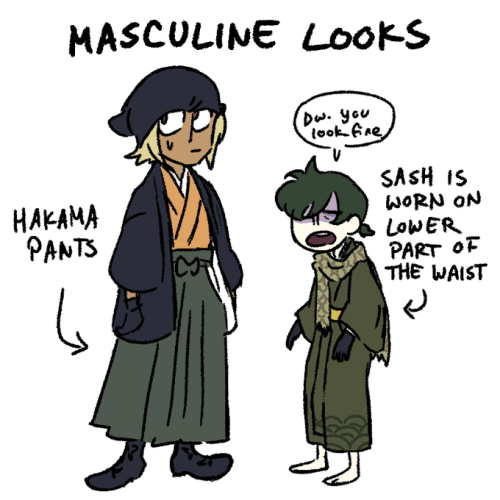
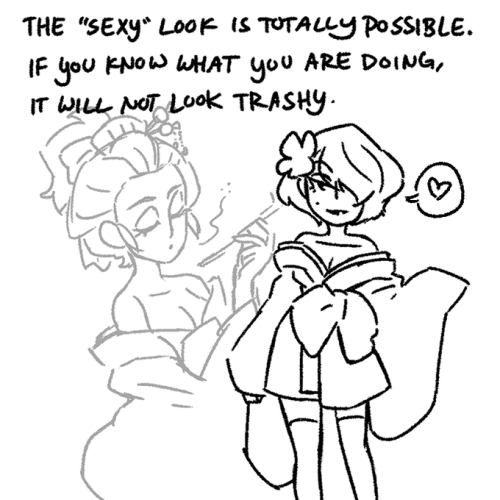
Little quick and light kimono tutorial because I’m noticing a trend of weird things non-Japanese people do with them.
Bathrobes =/= Kimonos
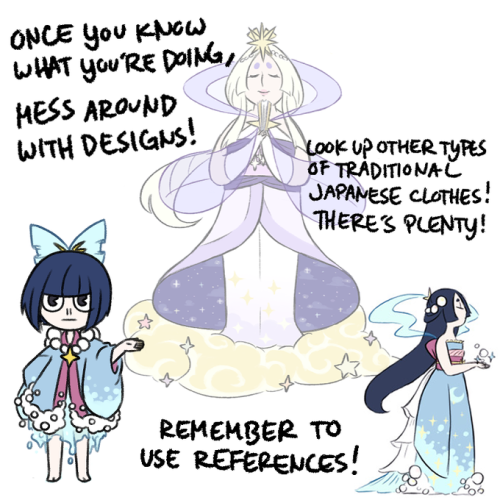
Kimonos aren’t sacred. They’re for everyone. Just practice drawing them, use tons of refs, be respectful, and have fun. There’s also tons of other types of traditional clothes you can mess around with. Research is your best friend


i wanted to update my VERY OLD nose tutorial now that ive learned how to draw! as always, this isn’t an all encompassing guide– just a jumping off point for practice@
I have two questions! First: have you ever thought of doing a tarot card suit for your characters? I think it'd work really well for them! And two: help me how do I draw legs
@gravitality
Hi!! I’ve absolutely been thinking about that, yeah, in fact I recently talked about that to my boyfriend just recently. It’ll likely happen after october! And to answer your second question! I made a thing on legs that i hope you’ll find useful!!
So. I’ve already explained basics on legs here, but I don’t think it hurts to go through some extra details to help you understand legs some more.

The very basic thing is to imagine legs as teardrops. Again, this has already been covered in said tutorial above, but I figured it’s still good to mention even the most basic thing that I know of. I still highly recommend you check it out to get in more detail and to see some other examples and practices that you do. But basically, think of legs in the shapes of teardrops, when it comes to shape. If you need a simple stick-figure to connect the legs in the first place, make sure that they bend at the knees a bit so that the legs don’t come off as stiff and unnatural.

As you can see, this method works perfectly for realistic legs as it does for stylistic ones. Remember to use these as a guideline, never to be the exact base of the legs you will be drawing. If you draw traditionally, remember not to draw these guides too hard, or they will be hard to erase/do freestyle!

But how do you actually draw out the legs without drawing them perfectly straight, as shown to the left? The trick is to add volume to them, and how you do that can be winged to your own liking. The idea is to think in curves. As no leg is perfectly straight. You may make these curves minimal if you don’t want them to be curvy, but keep in mind, still, that not even your own bones are perfectly straight, so it is highly recommended that you make them bend, at least a little.

It all depends on how you draw them as well. Say you put your legs together, as shown in this picture, what happens to the fat and muscle? Naturally, they press together, much like how thighs squish on the surface when you sit down (I’m sure most people know what I’m talking about). Make sure this shows in your art! This is very important to keep in mind, because it makes it all look more natural and believable. Try to cross your legs or stand up and sit down again for real-life examples!


The same applies for stretching your legs, more or less, except they appear to become more ‘hollow’ and slimmer. They become less soft to the touch, too, and might show. Try stretching your legs and feel where the muscles tense and where it feels ‘hollow’. This is very helpful with your art.

Many leg tutorials talk about legs without mentioning the behind. It requires a tutorial on it’s own, in all honesty, but this is the most simplest way to draw it connecting to the legs. Remember that it comes in many different shapes, and this is just a super basic guide! Two circles overlapping, while following the line and flow of the legs. Remember the muscle/fat as mentioned above!

Okay, so we got the basics of leg shapes figured out? What if you want o draw them in a certain pose, or with a certain silhouette, but perhaps do not have the reference for it? Or you want to blend your style into it? The key is to not shy away from doodling the form. Make mess, draw lightly and don’t care about the anatomy. That way you’ll get everything down without it appearing stiff. You can clean up the sketch later, always, and if you can, use a reference after you have drawn your pose, to correct your drawing.

Remember that the hips do a lot to the pose of the legs! Make sure they are in flow with your legs, so that it can look more natural. Remembers that hips ‘rotate’ with the spine.

I’ve talked about this method before when it comes to posing, and the same applies for the legs. One way to make legs appear ‘steady’ is to picture them standing in a line, and one of those legs need not to stray from the lines too much, making it steady. If you want a dynamic pose despite the steady pose, you can always have the other leg stray from the line, since it only matters that one leg is steady. This method can create good, casual poses without making them appear boring. (also notice how the teardrop shapes are used here, despite the highly stylized legs)

Do you want a highly dynamic pose, or them to appear unsteady, then skip the line entirely and make both legs aim away from it completely. As you can see, the legs appear more moving, in action, as if they’re fighting, falling, or dancing. As you can imagine, this is not a pose that one could stay steady on, suggesting that it’s taken mid-movement. More about posing and this ‘line’ method is talked about in this tutorial.
Hope this helped you, if you have any questions let me know, and if you’d like to check out all my tutorials they can be found here!
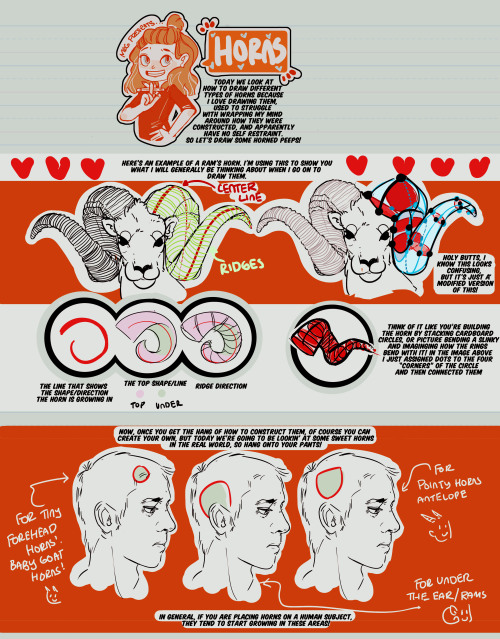
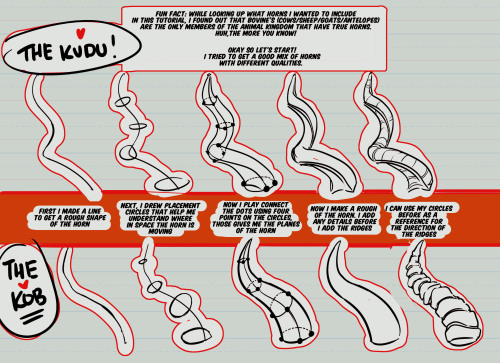
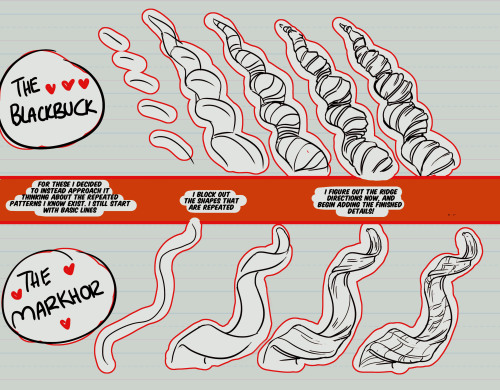
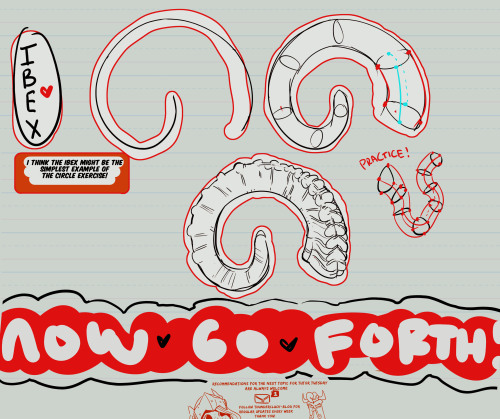
Hey friends!
It’s Meg for this week’s TUTOR TUESDAY! Today we take a little look at hopefully some exercises that will help with drawing horns! So go draw some peeps with horns, my dudes. If you have any recs send ‘em in here or my personal. Keep practicing, have fun, and I’ll see you next week!
so here’s my blender texturing guide! so many tutorial posts lately…
Czytaj dalej
-
 shitthatinspires reblogged this · 1 week ago
 -
 snufkinsnogger liked this · 1 month ago
 -
 starlantern reblogged this · 1 month ago
 -
 archive-of-sorts reblogged this · 2 months ago
 -
 empathmagickgirl liked this · 2 months ago
 -
 anarqveer reblogged this · 3 months ago
 -
 l0stindreamland liked this · 3 months ago
 -
 klayki-fanteshybr reblogged this · 3 months ago
 -
klayki-fanteshybr liked this · 3 months ago
-
 ofwolvesandhistory reblogged this · 3 months ago
 -
 artking-4 reblogged this · 4 months ago
 -
 melonthep00p liked this · 5 months ago
 -
 tintaero liked this · 6 months ago
 -
 siwucha liked this · 6 months ago
 -
 codytheponceboy liked this · 7 months ago
 -
 fluffofy liked this · 7 months ago
 -
 darknovalatte liked this · 7 months ago
 -
 mcflies liked this · 8 months ago
 -
 darknovalatte2 reblogged this · 8 months ago
 -
 doll-eyes888 liked this · 8 months ago
 -
 sunnyxhyne liked this · 9 months ago
 -
 skullblue liked this · 9 months ago
 -
 watermelonmirror reblogged this · 10 months ago
 -
 lordbeezyprinceofhell reblogged this · 10 months ago
 -
 crookedbluebirdfun liked this · 10 months ago
 -
 onionrimgs liked this · 11 months ago
 -
 threestarsmountain liked this · 1 year ago
 -
 equalistaden liked this · 1 year ago
 -
 savvysultrysorcerer liked this · 1 year ago
 -
artking-4 reblogged this · 1 year ago
-
 kitcatia reblogged this · 1 year ago
 -
 doom1993ytp reblogged this · 1 year ago
 -
doom1993ytp liked this · 1 year ago
-
 yami-mashida reblogged this · 1 year ago
 -
kitcatia liked this · 1 year ago
-
 jawnwutson liked this · 1 year ago
 -
 diaphanouz reblogged this · 1 year ago
 -
 oliveswiftly liked this · 1 year ago
 -
 twadi-gurl reblogged this · 1 year ago
 -
 dinosaurcharcuterie reblogged this · 1 year ago
 -
dinosaurcharcuterie liked this · 1 year ago
-
 dandy-daisylion reblogged this · 1 year ago
 -
dandy-daisylion liked this · 1 year ago
-
 gilglirthemaia reblogged this · 1 year ago
 -
gilglirthemaia liked this · 1 year ago
-
 thicquebicth liked this · 1 year ago
 -
 nightbloominglotus reblogged this · 1 year ago

Sylwester | i will mostly post sketches, because i'm too lazy to end them
196 posts