TumbleConnect

Your personal Tumblr journey starts here

Tutorial - Blog Posts

1 month ago
Easily Paleo-ified With Some Tweaks To The Stir-fry Sauce.

Easily Paleo-ified with some tweaks to the stir-fry sauce.

Love healthy food & fitness? Follow Awesome Fitness Recipes on Instagram


Tags
1 month ago
You’re Hearing It More And More

you’re hearing it more and more


Tags
1 month ago

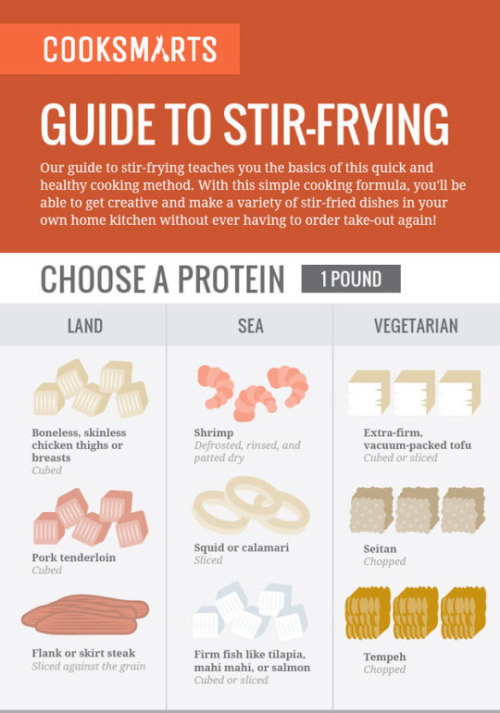
saw a post abt HBO removing shows that suggests ppl just “burn dvds” but everyone doesnt know how to do that so here is one way to do that

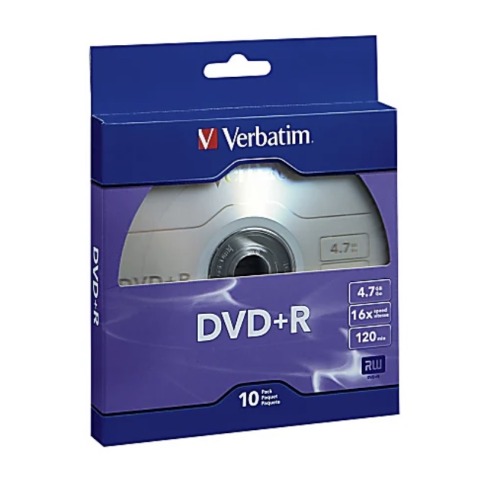
- get blank dvds (Both +R or -R work), these are not very expensive for the amount you can get in bulk (if you are in the US 100 of them is about 30$ at walmart)

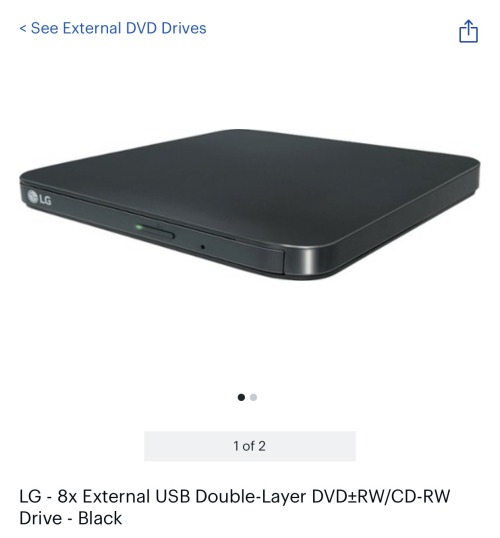
- an external DVD drive that plugs in via usb is also around 20-40$ (it tends to be closer to 20)

Saw A Post Abt HBO Removing Shows That Suggests Ppl Just “burn Dvds” But Everyone Doesnt Know How

- download DVDFlick (free)

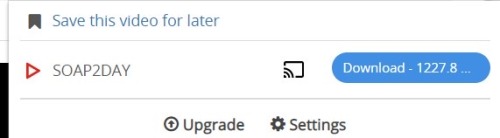
- if you don’t already have the mp4/mpeg of whatever media you want to burn, you can download movies/shows off of sites like gomovies.sx and soap2day

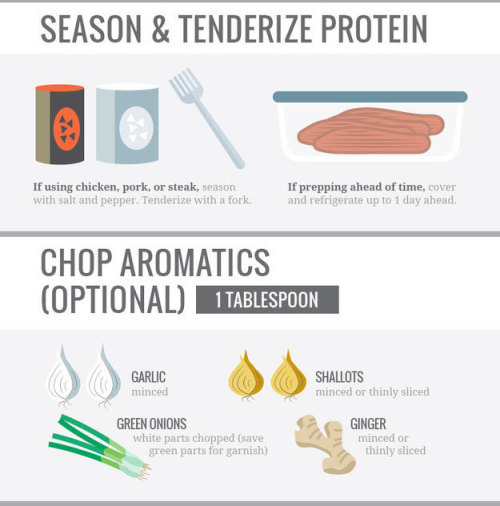
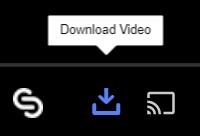
gomovies.sx will have a download button that looks like this

Saw A Post Abt HBO Removing Shows That Suggests Ppl Just “burn Dvds” But Everyone Doesnt Know How

below the video you can choose one of these

Saw A Post Abt HBO Removing Shows That Suggests Ppl Just “burn Dvds” But Everyone Doesnt Know How

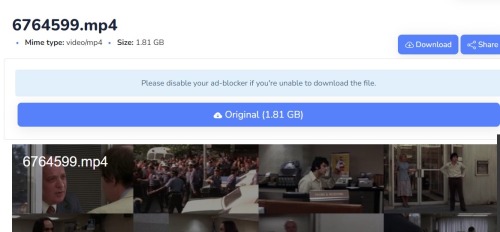
if you click streamlare for example and then the download button it will take you here where the mp4 is

(if you’re on an iphone/ipad, clicking download will save it to your files app)

Saw A Post Abt HBO Removing Shows That Suggests Ppl Just “burn Dvds” But Everyone Doesnt Know How

- if you cant find the download button on soap2day you can also install a video downloader extension which will find the movie for you

Saw A Post Abt HBO Removing Shows That Suggests Ppl Just “burn Dvds” But Everyone Doesnt Know How

- at this point you can drag and drop it into a google drive or keep it on your computer but if you still want it on dvd ->

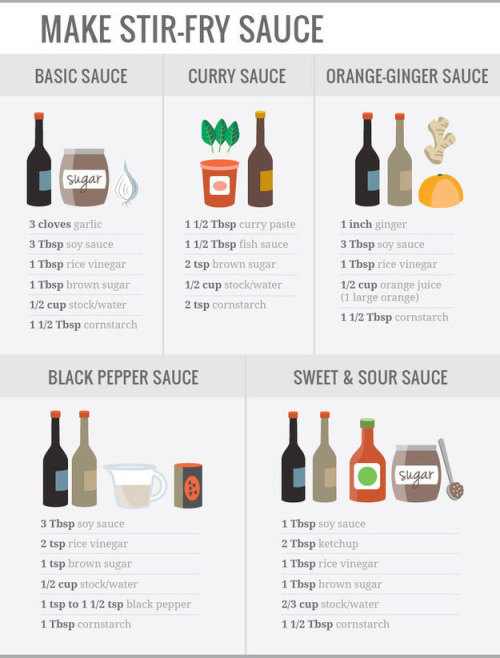
- open dvd flick, drag and drop the video

Saw A Post Abt HBO Removing Shows That Suggests Ppl Just “burn Dvds” But Everyone Doesnt Know How

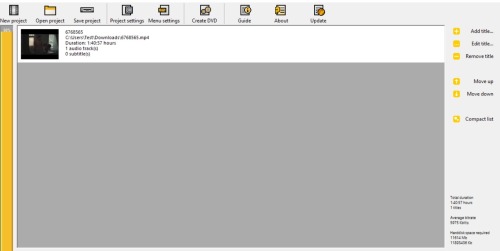
- click “project settings”

Saw A Post Abt HBO Removing Shows That Suggests Ppl Just “burn Dvds” But Everyone Doesnt Know How

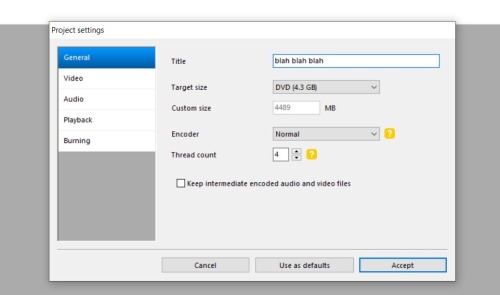
- give it whatever title you want, you can change encoder to “normal” (default is below normal if you are doing other things on the computer). you dont need to change target size or thread count (unless you want to)

Saw A Post Abt HBO Removing Shows That Suggests Ppl Just “burn Dvds” But Everyone Doesnt Know How

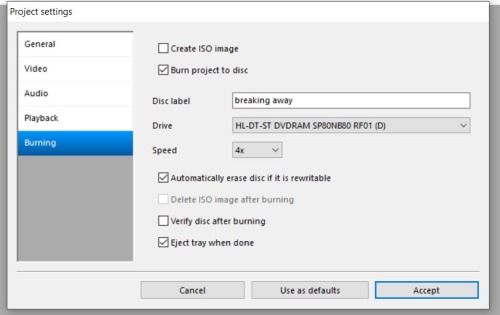
- insert a blank dvd into your drive, make sure you click “burn project to disc”

Saw A Post Abt HBO Removing Shows That Suggests Ppl Just “burn Dvds” But Everyone Doesnt Know How

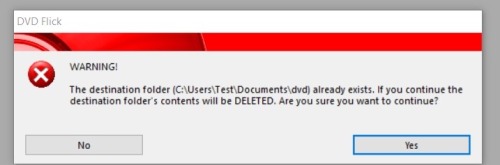
- click accept then click “create dvd” next to menu and project settings. it will create a destination folder and this dialogue box will pop up when you click “create” on more dvds, just click “yes” and then “okay” on the box that appears after it

it’ll take a couple hours, once its done take a sharpie & write whats on it and stick it in a case . or dont . im not ur mom


Tags
1 month ago

Hey I saw your tags on a prev post, can you tell me how you pirate content safely? (you can publish privately) thanks!

ok im going to start out that im not the 'end all be all' of piracy im like. constantly improving my craft (lol) but i'll explain everything i do to make sure i dont get caught while extensively downloading media

before that though if you just want to stream media and not torrent it you can just go to r/piracy's megathread and click the links through there

i WAS going to put this all under a read more but i was trying to link additional resources and this post has most of their explanation under a read more and since they deactivated their account you can't access it anymore. so on the off chance i deactivate i want to keep this post accessible, sorry its so long lol

some of this tutorial is only truly accessible if you have a computer that can stay on 24/7, which i know is not viable for everyone, so i went ahead and highlighted the things you need a computer thats always on for in blue

(honestly, you probably do all the things you need an always on computer for with a raspberry pi but i dont know jack shit about those (yet) so you'd have to look elsewhere on how to do that) i do all of my piracy on a windows desktop computer

1. the first thing you want to do when beginning your torrenting life is purchasing a good vpn.

i personally don't trust any vpn sponsored by youtubers to not sell you data to companies for profit, so i use ProtonVPN since i use their mail service and their servers are based in Norway i believe which has EXTREMELY strict privacy laws. they have a free version of it but it doesn't allow you to torrent.

NEVER USE A FREE VPN FOR TORRENTING EITHER! they are like. the least secure vpns in the world . a vpn is expensive but basically all of them are for plans that last well over a year so its a worthwhile investment

2. the next thing you'll want to do is select and set up your torrenting client

i personally use qbittorrent and it works great. DO NOT USE UTORRENT. while their are some versions that don't have a cryptominer attached to it, basically all of the versions do at this point so its better to just steer clear

once you have your torrenting client downloaded, you will want to set it up to only be able to connect to the internet through you're vpn. the images below show you how to do it in qbittorrent

a screenshot of the inside of the torrent client qBittorrent. an arrow is pointing to the gear icon at the top bar of the client with the caption "click settings" written next to the arrow in black ink
a screenshot of the settings tab within the torrenting client qBittorrent. an arrow is pointing to the "advanced" tab with the caption "click" written next to it in  black ink
a screenshot of the "advanced" tab in the setting of the torrenting client qBittorrent. an arrow is pointing to the drop down next to "Network Interface" with the caption "choose vpn here" written in black ink

(image descriptions available in the alt text)

once you've done the steps in the image, click "apply" and then "ok" in the bottom right of the settings tab

the next part is only necessary if you are going to seed torrents (which i recommend you do if you can)

if you ARE going to seed torrents, you are going to need to enable port forwarding in your vpn and connect your torrenting client to the port specifed. the following images will show you how to do that with ProtonVPN and qBittorrent

a screenshot of the VPN application ProtonVPN. a red arrow is pointing to the "Port Forwarding" button with the caption "click" written in red ink. the port forwarding button has an in-application caption "Port Forwarding". the post OP's port, ip address, and connected VPN address are crossed out in red ink
a screenshot of the VPN application ProtonVPN with the port forwarding button clicked. a red arrow is pointing to the "Port Forwarding ON" button with the caption "click" written in red ink. the post OP's port, ip address, and connected VPN address are crossed out in red ink
a screenshot of the VPN application ProtonVPN. a red arrow is pointing to where the application would specify the port that is being forwarded with the caption "click" written in red ink.  the post OP's port, ip address, and connected VPN address are crossed out in red ink
a screenshot of the inside of the torrent client qBittorrent. an arrow is pointing to the gear icon at the top bar of the client with the caption "click settings" written next to the arrow in black ink
a screenshot of the settings tab within the torrenting client qBittorrent. an arrow is pointing to the "connection" tab with the caption "click" written next to it in  red ink
a screenshot of the connection tab within the  settings of the torrenting client qBittorrent. an arrow is pointing to the the text input box next to the words "port used for incoming connections" with the caption "paste copied port here" written next to it in red ink. the post OP's port is crossed out in red ink

(image descriptions available in the alt text)

once you've done the steps in the image, click "apply" and then "ok" in the bottom right of the settings tab. you will want to make sure that connection status button, located two buttons to the left of your displayed download speed is a GREEN electrical cord plug. if it is red then you cannot download or seed. if it is yellow then you can download, but you cannot seed. it will take a couple of minutes for the specified port to update and the connection status to turn green.

3. now that you've done the hard part, its time for the EVEN HARDER part (this is, however, all completely optional). it is now time to set up tracked tv shows, movies, etc to automatically torrent when updates or a better quality becomes available

you do this using Radarr (for movies), Lidarr (for music), Sonarr (for TV shows), and Prowlarr (as your indexer to manage what torrent hosting clients you want these applications to use). when you download these applications and install them, you are going to want to

you first want to download all of these applications using the links above. you can choose which applications to download based on the things you're going to be downloading, however for any of these applications to work you are going to NEED to download Prowlarr. for simplicity sake i will walk you through setting up all of these from the beginning of my list to the end, except im starting with prowlarr first because that's what you need to set up the rest.

however, when installing ANY of these applications, you are going to have to choose whether to install it as a system tray application or a windows service. I'm going to copy and paste from the Prowlarr wiki what the difference means, though it applies to all of the applications

A Windows Service runs even when the user is not logged in, but special care must be taken since Windows Services cannot access network drives (X:\ mapped drives or \\server\share UNC paths) without special configuration steps.

Additionally the Windows Service runs under the 'Local Service' account, by default this account does not have permissions to access your user's home directory unless permissions have been assigned manually. This is particularly relevant when using download clients that are configured to download to your home directory.

It's therefore advisable to install Prowlarr as a system tray application if the user can remain logged in. The option to do so is provided during the installer.

now that you've installed the programs you want, its time to set up prowlarr. i am once again going to show you how to set it up using pictures

a screenshot from the application Prowlarr. a red arrow is pointing at the "Add Indexer" button with the caption "click"
a screenshot from the add indexer tab in the application Prowlarr. a red arrow is pointing at the protocol dropdown. within the drop down the word "torrent" highlighted in gray with white text. a caption for the arrow reads "choose torrent protocol, continue filtering from there" in red text
a screenshot from the add indexer tab in the application Prowlarr with the torrent clinet "TorrentGalaxy" selected. a red arrow is pointing at the "Test" button in the bottom right corner with the caption "click 1st". another red arrow is pointed at the "Save" button in the bottom right corner with the caption "once green check, click 2nd"

(image descriptions available in the alt text)

that is how you add what torrent indexers (the websites that host torrents) you want to use to prowlarr. I only used TorrentGalaxy as an example, I don't actually use that site. I recommend being VERY careful and selective with what websites you use if they are a public tracker, as any of their torrents can host viruses. do your research before adding them. for convenience, however, I will list all of the public trackers I use so you can add them to Prowlarr if you like:

1337x

IBit

Internet Archive

Nyaa.si

Rarbg

Shana Project

SubsPlease

Torlock

YTS

you can also add private trackers, which is basically the same setup except you will have to input your username and password and/or an api key to allow prowlarr to access your account. I will explain private trackers later.

i will now show you how to connect prowlarr with the other applications you downloaded, once again with images

a screenshot from the application Prowlarr. a red arrow is pointing at the "Settings" tab with the caption "click"
a screenshot from the application Prowlarr within the "Settings" tab. a red arrow is pointing at the "Apps" tab with the caption "click"
a screenshot from the application Prowlarr in the "Apps" tab of the setting menu. a red arrow is pointing at the plus sign underneath the "Applications" subheading with the caption "click"
a screenshot from the application Prowlarr within the "Add Application" screen. written in red are the words "choose what you're adding"
a screenshot from the application Prowlarr within the "Add Application" screen. The window is scrolled all the way down to the bottom of the window with an arrow pointing at the text input field "ApiKey". written in red is the caption "paste API key from chosen app." Underneath the text input field the words "The API key generated by LIdarr in Settings/General" are highlighted in yellow

you want to do this with every application you're using.

that's the basics for setting up Prowlarr. you can further customize it with the help of the Prowlarr wiki if you'd like, but this is all I'll be covering in this tutorial.

setting up the other applications pretty intuitive if after setting up prowlarr, however if you do need help this is the video i watched to set up the rest. you only need to watch how to set up one of these applications to know how to set up the rest, and you can ignore literally everything this person is saying besides how to set up sonarr radarr and lidarr. seriously, don't listen to the rest of what this person has to say it will only confuse you. i have the video hyperlinked to where you need to start to learn how to set up these applications (the one she walks you through in depth is sonarr)

4. now that you've set up the torrent trackers (or skipped that part, those are, again, optional), it's time to go back to your torrenting client and configure how it handles your torrents.

you can only download so many megabytes a second, and when you have a million torrents downloading at once it makes every single torrent download at a snails pace because of that. so, what you're going to want to do is set it to download only a certain number of torrents at a time, and queue the rest to download once one torrent finishes.

this setup is pretty self explanatory, so I won't use images and just explain it.

go back to the settings of your torrenting client, and click on the "BitTorrent" tab (this might be a tab specific to qbittorrent, if you are using a different client look for a tab that is called something similar) (you can alternatively just google how to set torrents to queue for your specific client)

click the checkbox next to the option "torrent queuing"

customize how many active downloads and uploads you want. I personally recommend having no more than 6 torrents downloading at a time so that way they can all download relatively fast. i have my seed (upload) limit set to 60 because I'm in private trackers (which i will explain more about later), but if you don't want to seed for whatever reason you can set that to 0 and it SHOULD (don't quote me on this) automatically stop your torrent once its finished downloading. this could also potentially throttle your download speed because torrents don't like it when you're not uploading them while downloading them, don't quote me on that either having downloads set to 0 is not something im familiar with at all

you can optionally also set your download and upload limits in the "speed" category of settings, though i recommend keeping them both at infinity

5. setting up your downloaded media so you can watch it

this part is really easy and ALSO technically optional but it makes your life so much more convenient so i really recommend doing it. we're going to set up Plex Media Server so it can auto sort through your libraries and organize everything.

download plex and create an account

launch the server and go to the settings page, indicated by the wrench icon in the top right

scroll all the way down the settings directory until you get to the 'Manage" subheading and click on "Libraries"

assign your media libraries to the folders on your hard drive. for this you are going to want to keep movies, tv, and music all in separate folders, and you are going to want to keep your tv shows within your tv folder separate as well.

click 'scan library files' and watch plex update your library in real time

there will be times where plex isn't able to grab the metadata for a piece of media you have, but i can tell you how to (hopefully) prevent that from happening:

in the settings menu, go to the "network" tab under the "settings" subheading

uncheck the box next to "Enable server support for IPv6"

thats it! it should be able to get the metadata for all your media now

6. joining private trackers

this is honestly some Advanced levels of torrenting, and you shouldn't join them if you don't have a device that can be on and seeding 24/7

private trackers are torrent trackers that you can only use if you have a registered account with. they generally have a higher quality selection of torrents with faster download speeds due to a higher seeders to leecher ratio. each tracker has their own rules you need to follow, but they all have similar baselines

maintain your download-to-upload ratio (this will be specified in the trackers FRQ)

after you finish downloading something, you then need to seed it for a certain amount of time (normally a week) or else it will be considered a 'hit n run' and you will face the appropriate consequences

some things are free leach, which means you can download them without it contributing negatively to your ratio. if you seed and upload free leaches they will count to your ratio positively, however

most private trackers are invite-only, but some do occasionally have open signups which you can track on r/opensignups

when joining any private tracker, i recommend only downloading things that are free leach until you have built a good buffer between your upload to download ratio.

this is barely a drop in the water explanation of private trackers, but it's a part of torrenting that i feel like most people don't know about and/or don't know how to get started with, so i felt like it was worth mentioning. r/piracy has a more in-depth explanation (and a better "how to get started" guide on their megathread

and that's it! this is my indepth beginners guide to torrenting and piracy. i will maybe come back to this later and add more / make the formatting better (tumblr post formatting has such bad options...)

linked below are some useful resources for torrenting and pirating in general that i have saved.

my favorite public torrent tracker

r/piracy megathread

r/roms megathread for video game console downloading (direct downloads mostly, not torrents)

r/FREEMEDIAHECKYEAH megathread

r/FREEMEDIAHECKYEAH beginners guide to piracy

nintendo switch roms (direct downloads)

nintendo switch emmulator

ns emmulator setup guide

sideload apps on an apple device

hacked spotify ipa (ios app) that you can use above link to sideload

a less convient way to sideload apps onto apple if altstore doesnt work for you


Tags
1 month ago
Exercises For All The Homies Who Want To Have A Long Career Drawing.
image
image

Exercises for all the homies who want to have a long career drawing.

The true problem with being an artist and drawing all day (as I wanted my whole life) is that human backs are not designed to hold that position, so it is very common for artists and designers to have really stiff shoulder blades, creating a chain of muscle strain towards the arm AND the back… and a lot of pain.

These are some physical exercises for artists and honestly anyone who works at a desk.

(all credit to my physiotherapist)


Tags
1 month ago

blog dedicated to categorizing and saving various posts i find helpful. main blog @venomgender ;

newly rbed posts almost definitely won't be tagged, but (in theory) they'll all be tagged within the month

tag explanations below cut:

#piracy - self explanatory. has both piracy tutorials and masterposts of pirated media

#digital privacy - posts dedicated to resources on digital privacy; has things ranging from browser extensions to google product alternatives

#cooking - cooking resources. both general how-tos and actual recipes

#trans - trans resources. more dedicated to transmasc than transfem posts just because im transmasc, but has several generalized posts as well

#art resources - self explanatory. has both tutorials and things like resource packs and stuff

#writing resources - self explanatory

#learning - learning resources, typically dedicated to masterposts about learning a specific "thing" (language, sewing basics, etc)

#media rec - media recommendations

#sewing - sewing resources. has both tutorials and sewing patterns

#tech - technology resources. stuff like removing windows 10 bloatware, switching to linux, improving pc performance

#video game resources - resources centered around making video games

#coding - coding resources. from basic language how-tos to how to make your own websites

#save - any other helpful post i see that doesnt easily fit into the above categories. typically has things that help with "adulting" but i dont like that word so im not making a tag for it.

#megathread - any post containing large amounts of links for different things. contains a variety of categories. mildly depreciated in terms of how often i actually tag things this...

#tutorial - posts that teach you things. normally will also be tagged with a more specific category. also mildly depreciated...

additionally anything tagged 'kinda' means it only sort of falls into the tagged category. i tag these things to in theory go through later and see if theres enough similar items to have them been grouped into a new one


Tags
1 year ago

Can you reupload that one mspfa style tutorial you posted to twt once? Its fine if not

Can You Reupload That One Mspfa Style Tutorial You Posted To Twt Once? Its Fine If Not

i can not reupload it, so instead ive made you a new one.. hopefully it can be helpful !

here is the brush again that i used to draw this entirely :

Google Docs

Tags
3 months ago
first slide, titled "how to draw some burn scars" with "some" being underlined. The text under reads "3rd/4th degree mostly, because most people on this website apparently never seen a burn survivor." below that is a red box with text reading "(all caps) all scars are different! (end caps) there is no one correct way to draw a scar. this is more of an overview than a step-by-step tutorial".
the right side of the slide has three drawings, each showing a person's forearm. The text above them reads "there's many types of scars, actually". The first one shows a hypertrophic scar, with the text "draw a darker patch of skin and shade underneath to show depth. notes: it sticks out a bit, it can be slightly discolored (darker), it's not really this bright red color that people draw burns with, it interacts with the rest of the skin - you can see it pull skin inward".
The second one shows a keloid scar, with the text "it sticks out a lot, much more discolored, it can be red, pink, purple, it doesn't with the rest of the skin as much - it has sharper, more defined edges". The third and last arm shows a severe contracture with the top of the hand resting on the forearm, with the text "burns make skin contract; scars affect range of motion (ROM) and can lock or limit movement, they afect all areas of the body vbut are most visible on the neck, joints, and hands". There's a fourth additional drawing showing a man's torso; he has a lighter burn scar on the far side of his ribcage, with his arm seemingly fused to it above the elbow. He has visible body hair but is lacking it on the scar itself. The several notes around it read "healed scars can also turn lighter; a burn scar has a tendency to pull surrounding structures* inward, here it makes a contracture. *-not only skin. scars affect cartilage (like in ears), nipples, etc. also notice the lack of hair on the scar".
second slide, titled "how do burns look like (for people who draw them but don't seem to know)". there's an arrow labeled "not like this (heart)" leading to a drawing of an anime girl with half of her skin being plain red and no other changes. text box below her reads "'don't worry man I watched ATLA when I was 14' type OC", with the following noted; "the Red, has fingernails despite 3rd degree burns, has eyebrows despite 3rd degree burns, has hair despite 3rd degree burns, eye is totally fine it's only fire LOL, nose and ears also fine, why is it red, more flexible than your average abled person, why is it red". below is a disclaimer reading "(one or two is fine, but why is it always all of it? burns do things, especially one as seveer as implied here)". the right side of the image shows pictures of body parts with burn scars on them, the first being a hand with a severe contraction in the fingers. the burn and contracted joints are labeled on the image. next to it is a drawn comparison between a non-burned hand with stretched out fingers, and a burnt hand with curled fingers. photo under that is of a pair of feet being held by a hand. the link below goes to "SurvivorNotVictim.com/Scar-Photos". my added text reads "not red! the scars mostly show through texture and tissue damage" and "no toenails". next to that is art of a scarred leg from the mid-calf down, it has visible skin pulling, no nails, and discolored patches of skin. text reads "some pinkness/redness can show, but it's A) not going to be a consistent color, B) other aspects of the scar still show up. Remember the body is 3D and skin pulls accordingly (more or less); scars form toward the ankle because it sticks out". at the bottom of the image is a portrait photo of Marzieh Ebrahimi, an Iranian woman with a chemical burn on one side of her face, smiling. Text next to her reads "a scar can be more defined in one place and less in another (forehead/chin); the skin is darker and less saturated, not red; Marzieh's scar is more visible because of her eye and nose than the discoloration". Next to that is a simplistic portrait drawing of her recreating the picture. Note reads "just some darkening of the skin, lighter and darker lines to imply skin pulling, and attention to some basic effects of burns (e.g., scar on eyebrow ridge = no eyebrow) looks more like an actual burn than the red paint thing".
Third slide, titled "skin grafts". On the right is a photo of a white woman posing with her scars visible to the camera, the source is linked as SurvivorNotVictim.com/Scar-Photo. Text reads "one of the most common visible kinds of skin grafts is the mesh one", with an arrow pointing to the woman's arm, where her skin has a mesh pattern. There is a drawn comparison of non-burnt skin and skin with the mesh graft for comparison. Text box reads "it leaves a specific kind of texture in the skin. Grafts sometimes have stronger highlights than other parts of the skin (you can see it on both photos)". Under that is a photo of Kenny Matthews (@IKenDawg), a Black man with burn scars. There is a text box on the right that reads "skin grafts will usually be thicker than the rest of the skin and thus can stick out; they can be discolored (both darker or lighter, more yellow or red, more/less saturation, etc.) and have a visible start and end. It applies to all skin colors BTW". Below that are two portrait drawings, one of a Black man with a large, darker skin graft on his cheek, and a white woman with yellowish grafts on her jaw and nose.
Fourth slide, titled "nose and eyes". The left side features various nose drawings, while right and bottom show different kinds of eyes. The text in the nose section reads "Usually if nose was visibly burned, it will be seen on the nostrils and septum". The first nose drawing shows someone with pale skin and nostrils pulling strongly downwards. Second one shows a person with darker skin and fourth degree burns; his eyes are covered by skin and the external parts of the nose are largely gone, leaving the red internal part visible. Text attached reads "With very severe burns, the external part of the nose can be removed. In this case the nose will be red because the insides of the nose are red". Third drawing shows a white man with burns below his eyes; his septum is completely gone, and the nostrils pull to the sides. Attached text reads "Nostrils can also pull to the sides, making the nose wider. Sometimes the septum will be absent if burns were severe enough. That generally causes some degree of asymmetry". Last nose drawing shows someone with a lot of keloid and hypertrophic scars on his face, with one of them formed around their nose. Text attached reads "Nose can also pull to one side. The constricted nostril can then be very flat". There's a simple sketch underneath that shows a nose with symmetric and asymmetric nostrils from below. Eye section. The first text box reads "Eyes are not affected as often as you'd probably assume (mostly because blinking and all) but eye damage is frequent in chemical burns (as opposed to thermal)". First drawing features a darkskin person with burns on their forehead and around their left eye. The skin pulls their eyelids upward and to the side at a 45-degree angle, resulting in the red of the eye showing on the sides. Attached text reads "Eye pulls out and up, so the red parts show accordingly. The eyelids themselves are stretched, eye is fine". Second drawing is of an Arab man with a chemical burn on the left side of his face. He's missing his eyebrow and eyelashes on that side. He has ptosis and his actual iris is blurrier while the white part is redder. Text reads "Here eyelids pull down so the eye looks like it's drifting up". Third drawing shows a person with tan skin and severe burns. They have no hair of any kind, and their nose bridge is significantly pushed to the side. Their right eye is wide open with a red shiny eyelid at the bottom, their iris pointing extremely outward, and blood vessels showing. Their left eye looks very small with swollen eyelids and partially opaque iris. Text reads "The redness you can sometimes see is a result of chronic conjunctivitis, it's not an open wound situation. Here the right lower eyelid is missing so it looks like it's red and shiny. The left lower one is turned outward and it causes corneal scarring, which results in parts of the eye looking white(r) and the eyelids to swell". The bottom section features four eye adjacent conditions and their characteristics. The first one shows a person with one of their eyes missing and an empty pale-red socket visible. It's titled "Enucleation". Text underneath reads "If the eye is as badly damaged as in 90% of OCs with burns then they will get it removed. Despite popular perception there is quite literally nothing 'gore' about an eye socket. The redness/whiteness is the same thing as on your eyelid when you pull it. The empty socket has a much smaller opening and is very flat in comparison to a full socket. If the character has a protruding brow ridge, the shadow will fall on the whole area". Second one features a dark-skinned person's eye, which is brown with a white spot on the lens. Text reads "Cataracts is a condition of the lens, so it affects the lens by making it to appear clouded. Causes blindness". Third one shows an eye of a pale person; it's slightly red with blood vessels visible and the irid is blurry with a large opaque spot in the middle. Text reads "Corneal scarring causes pain, red sclera, and the opaqueness that can happen over the whole eye, not just lens. Also causes blindness".
Continuation from the previous slide. Last one shows an eye with the upper eyelid fallen down. Text reads "Ptosis is caused by nerve damage more than anything else. It makes the eyelid fall down, but does not affect the eye itself. Can technically make someone unable to see if the eyelid doesn't open". Fifth slide description starts from here. It shows a three-step process of drawing the skin texture. First step shows a patch of light skin, titled "get a base". Second step puts various brown lines of different sizes on the skin, largely going from the upper left to bottom right, spreading out on the right. Text reads "Draw slightly darker lines of various lengths to imply contractures". There’s a second, smaller drawing, first with the lines going in similar direction and the other with the lines all pointing different ways and going over each other. Text above them is "try to keep them going in a direction that makes sense" and "not just random strokes" respectively. Third step adds some shadows and highlights on the scars. Text reads "add subtle shading to show texture changes, can also add highlights". Below that is a small drawing of a patch of skin with a red line going through it; one side is shaded and one isn't for comparison. The upper right has a drawing of a man shown from the back; he has burn scars on his left shoulder. That shoulder is less muscular than the right one, and he has keloids and grafts visible. Text underneath reads "You really don't have to draw 10000 lines to show the contractures. A few smaller and some bigger ones do it just fine. Remember that you can ad keloids, hypetrophic scars, and graft discoloration!".
sixth slide, titled "other things to think about". it features a few different burn survivor characters and the text "no two burn survivors are the same". first one is a Black woman with a burn just on her face and neck, empty eye socket, and no ear, wearing a very wide-brimmed sun hat. note next to her reads "sun protection". below her is a white man with scarring on the side of his head, including two large keloid scars. he's missing a lot of hair on his scalp. underneath him is a drawing of a Latino man with short black hair and contracture scars on his forearm, fusing it around the elbow; he's wearing a large compression glove on his hand. in the center of the image are two women; a South Asian young woman wearing a pastel hijab using crutches with a visible prosthetic leg, and a Black woman with short pink hair and all four limbs amputated using a powerchair. The first woman has no actual burns visible while the second one has her stumps covered in distinct discolored scars, but they're both smiling at each other. text between them reads "burns can result in amputation, either because of the initial damage or infection. sometimes burns are visible, sometimes not so much". under them is a portrait of a white woman scratching her neck with her remaining fingers. she's completely bald with scars on her head, face, and hand. her eye is slightly red with a discolored white part in the middle of the iris. text next to her reads "research actual symptoms of burn scars (like scratching) (like sun protection), etc."

Overview of some topics when it comes to drawing characters who are burn survivors.

DISCLAIMER. Please keep in mind that this is an introductory overview for drawing some burn scars and has a lot of generalizations in it, so not every “X is Z” statement will be true for Actual People. I'm calling this introductory because I hope to get people to actually do their own research before drawing disabled & visibly different characters rather than just making stuff up. Think of it as a starting point and take it with a grain of salt (especially if you have a very different art style from mine).

Talking about research and learning... don't make your burn survivor characters evil. Burn survivors are normal people and don't deserve to be constantly portrayed in such a way.

Screenshot that reads, "In a 2022 survey of the burn community, Phoenix Society for Burn Survivors found 59% ranked 'burn survivors & the media: changing the portrayal of the survivor' as a top need for support."

edit: apparently tum "queerest place on the internet" blr hates disabled people so much that this post got automatically filtered. cool!


Tags
9 months ago
I Just Realized I Never Posted These And Recently Got An Ask About How I Draw Cats. I Do Plan On "continuing"

I just realized I never posted these and recently got an ask about how I draw cats. I do plan on "continuing" this series (hopefully better organized) at some point.


Tags
1 year ago

i love love love the way you paint back lighting!! do you have any tips/ a step by step for the way you do it?

ended up making a whole painting just to break it down and explain my general process for subjects lit from behind so heres that + a timelapse!

I Love Love Love The Way You Paint Back Lighting!! Do You Have Any Tips/ A Step By Step For The Way You

main thing for drawing anything with a strong light source behind is to make the main subject Darker and more desaturated to convey that the light is behind them rather than to their sides (face cant be properly lit if the light is behind). Also making the Main highlight the brightest hue in the image helps to intensify it. I tend to use teeth/eyes as a good comparison point

I Love Love Love The Way You Paint Back Lighting!! Do You Have Any Tips/ A Step By Step For The Way You

some people have a tendency to make the sclera white out of habit but darkening that+ the rest of the whites helps the image read as Darker compared to the brighter highlight


Tags
9 months ago

UMBURGRR!!!!!!!!!!!! PLEASE DRAW A DOODLE OF RIDDLE ROSEHEARTS AND MY LIFE, IS YOURS.

OKAY but fr though your art is so MAJESTIC!!!!???!! I swear it has this aura that makes it so compelling, the way you color and render makes all of your works so appealing to the eye and your style is genuinely just AMAZING!!!!!! (if you don’t mind, what art program and brushes do you use??) anyways sorry for talking so much THANK YOU SO MUCH AND HAVE A GREAT REST OF YOUR DAY!!!!!!

GIGGLING right now you're too kind 😭❤️ but honestly, thank you so much it means so much to me (i cry) and ofc! here's my brushes, program, and process 😎 (ft. mr riddle rosehearts)

For my art program I use procreate with a canvas of 300 dpi and for brushes I use kraymer's hard brushes on gumroad !!

Anndd here's how I apply them:

UMBURGRR!!!!!!!!!!!! PLEASE DRAW A DOODLE OF RIDDLE ROSEHEARTS AND MY LIFE, IS YOURS.

Tags
2 years ago
@churchydragon This Is My First Time Ever Making A Tutorial, So Hopefully It Makes Sense! Monty Is My

@churchydragon This is my first time ever making a tutorial, so hopefully it makes sense! Monty is my favorite and I wish he had more fanart, so I'd love for people be able to draw him a little easier. ❤️ If this helps you in any way, I'll be thrilled. That comic panel was such a pain in the neck. 😂

If there's something that doesn't make sense or needs clarification, feel free to ask! :3 ✨️ Mind, there's no right or wrong way to draw what you love, this is just my personal method.


Tags
4 years ago

Hylian more like hyliconfused how tf do I do this shrine???


Tags
4 months ago

RESOURCES FOR POSES

Line of Action

RESOURCES FOR POSES

JustSketch.Me

RESOURCES FOR POSES

PoseManiacs

RESOURCES FOR POSES

Human-Anatomy-For-Artist.com

RESOURCES FOR POSES

MagicPoser

RESOURCES FOR POSES

MIXAMO

RESOURCES FOR POSES

Pose Archives

RESOURCES FOR POSES

Bodies in Motion

RESOURCES FOR POSES

Posemy.art

RESOURCES FOR POSES

ReferenceAngle

RESOURCES FOR POSES

CroquisCafe

RESOURCES FOR POSES

Tags
13 years ago

thegatekeeper26:

How to play L490 by 30 Seconds To Mars! (Video tutorial by me (: )

THANK YOU!


Tags
4 years ago

Good lawd, the way your draw the clones is just.... indescribably amazing! Like, how do you do that??? Your style is just fantastic!

Here are the stills from the video ! Sketch and structure :

image

Lineart :

image

Shading and additional details :

image

Tags
10 months ago

Any reference for hands is a gift from God.

My Recipe For Drawing Hands!

my recipe for drawing hands!

(small note that this is a shortcut that is more abt style and ease than anatomical accuracy. it helps to take time to really properly study hands, makes it easier to bend the rules a bit like this and have it still look good!!)

(learn rules b4 u break them or whatevah)


Tags
11 months ago
“Thinking About Compression From A Side View”

“Thinking about compression from a side view”

Source: Anime Private School on Twitter


Tags
1 year ago
I Have To Draw A Lot Of Gold And Metal For My Work, But Wasn't Happy With Any Of The Metal Tutorials

I have to draw a lot of gold and metal for my work, but wasn't happy with any of the metal tutorials i could find around. I prefer really specific instruction, so after some research i put together what i think works as a generalist's guide/tutorial. Not perfectly accurate, but i hope it's helpful!


Tags
Hi Here’s A Mech Tutorial

Hi here’s a mech tutorial

I use shitty pc builds and cars as references


Tags
Loading...
End of content
No more pages to load
Explore Tumblr Blog
Search Through Tumblr Tags