Your personal Tumblr journey starts here
Art Tips - Blog Posts
Oh my god, could you do a wing tutorial? The way you draw wings is just absolutely incredible 😭😭😭can't stop thinking about it
Hi! Thank you 🧡🧡🧡
I did a little tutorial for you (for the first time in many years), I hope it will be useful


Reblogging because I'm feral for wing anatomy (in other words I have Opinions about it) and maybe people will find it useful
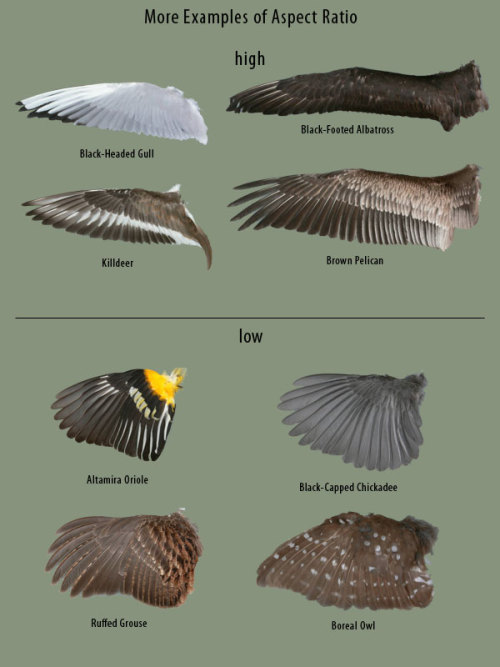
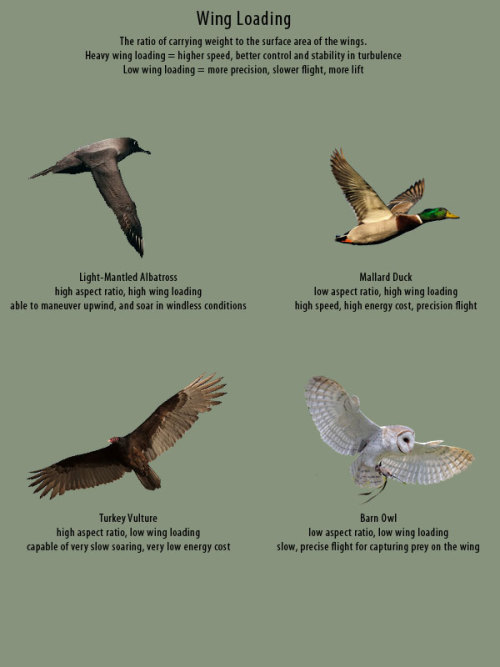
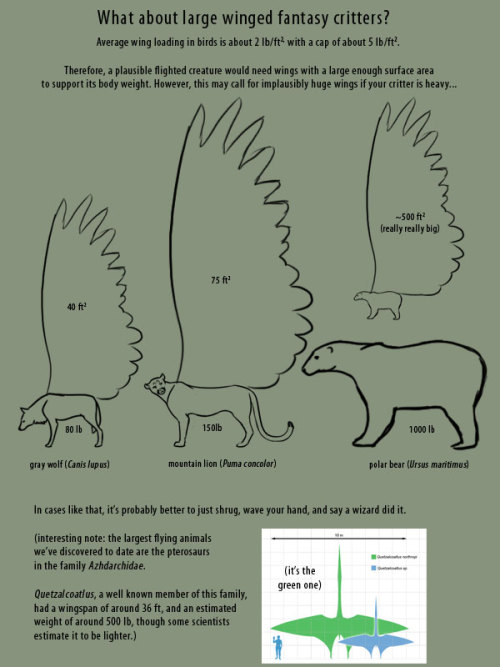
here, have wings.
Good Resources:
Puget Sound Wing and Tail Collection (where all the wing images I used came from)
Origin of Flight in Birds
Animating Bird Flight (great resource for ALL artists)
Faces


I spent an insane amount of time researching all of the hex codes for these colors and companies so I could have them since I mainly do digital art, and since i made the, to have for free, I am sharing so we ALL can have them for free.
Pls enjoy
Ps. I am working on actually writing down each individual hex code, but y’all will have to wait for that
The gasp that left me, THIS IS GENIUS
You draw hats so well and im like so amazed by it because every time i try it looks like they're wearing buckets?? how do you draw them?? :o


pringles
How do I add shadow to this drawing?

Yep, I hate anatomy
ANYWAYSSSS

He give apple <33

art tips? plz
ok so i want help with getting out of my anime phase of drawing, and draw in a more carton style.
So if you have a cartoony Style. can I get any tips on how to fix that. have a nice day

You don't need a lot to draw you just need a pencil. Any pencil. A pencil you may steal from your classroom or a pencil you begged your parents to buy.
Art doesn't need to be perfect or aesthetically pleasing.
These are Nicopro mechanical pencils that my friend gave me for my early birthday, the 0.3 and the 2.0 auto pencil. Plus my eraser that I stole... Borrowed from my art classroom.
My sketchbook is a Shore & Marsh hardback sketchbook!
:D
i dont consider myself a 'fashion guru' by any means but one thing i will say is guys you dont need to know the specific brand an item you like is - you need to know what the item is called. very rarely does a brand matter, but knowing that pair of pants is called 'cargo' vs 'boot cut' or the names of dress styles is going to help you find clothes you like WAAAYYYY faster than brand shopping
A general cane guide for writers and artists (from a cane user, writer, and artist!)
Disclaimer: Though I have been using a cane for 6 years, I am not a doctor, nor am I by any means an expert. This guide is true to my experience, but there are as many ways to use a cane as there are cane users!
This guide will not include: White canes for blindness, crutches, walkers, or wheelchairs as I have no personal experience with these.
This is meant to be a general guide to get you started and avoid some common mishaps/misconceptions in your writing, but you absolutely should continue to do your own research outside of this guide!
This is NOT a medical resource!!! And never tell a real person you think they're using a cane wrong!
![[Image text] Arm bends a little. Cane height at hip joint. Many canes have adjustable height. Cane sits within the natural center of balance. Causes stress on: Triceps, upper back, wrist (pressure) fingers (grip). Helps with: Joints (lower back, hip, knee, ankle, foot), weakness, balance, pain.](https://64.media.tumblr.com/0c8731401f496885dc8d4309a7dbe7ee/f831b3159e1d7635-e7/s500x750/6e5fe00081a6ce3b64cbe1a648f0c967f9f601e9.jpg)
The biggest recurring problem I've seen is using the cane on the wrong side. The cane goes on the opposite side of the pain! If your character has even-sided pain or needs it for balance/weakness, then use the cane in the non-dominant hand to keep the dominant hand free. Some cane users also switch sides to give their arm a rest!
A cane takes about 20% of your weight off the opposite leg. It should fit within your natural gait and become something of an extension of your body. If you need more weight off than 20%, then crutches, a walker, or a wheelchair is needed.
Putting more pressure on the cane, using it on the wrong side, or having it at the wrong height can make it less effective, and can cause long term damage to your body from improper pressure and posture. (Hugh Laurie genuinely hurt his body from years of using a cane wrong on House!)
(some people elect to use a cane wrong for their personal situation despite this, everyone is different!)
(an animated GIF of a cane matching the natural walking gait. It turns red when pressure is placed on it.)
When going up and down stairs, there is an ideal standard: You want to use the handrail and the cane at the same time, or prioritize the handrail if it's only on one side. When going up stairs you lead with your good leg and follow with the cane and hurt leg together. When going down stairs you lead with the cane and the bad leg and follow with the good leg!
Realistically though, many people don't move out of the way for cane users to access the railing, many stairs don't have railings, and many are wet, rusty, or generally not ideal to grip.
In these cases, if you have a friend nearby, holding on to them is a good idea. Or, take it one step at a time carefully if you're alone.
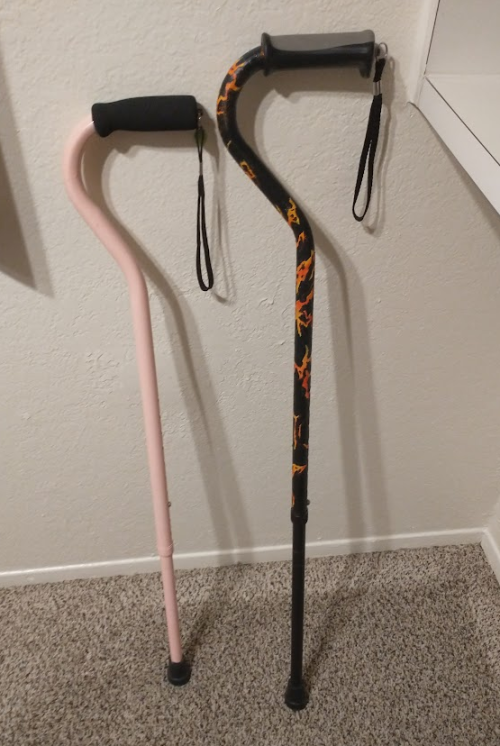
Now we come to a very common mistake I see... Using fashion canes for medical use!
![[Image text] 4 Major Handle Shapes (significant variation and uses). Tourist/Crook/Hook. Classic shape, fashion and medical, easy to hook on things (arm, door, chair, etc), generally solid wood (stronger, heavier). Offset. Newer design, not a fashion handle, only handle for quad-bases, generally better balance, usually aluminum (light + cheap), soft handle, adjustable (rattles/clicks when swinging). Derby/Fritz/Anatomical/Contour. Classic medical shape, many fashion variants, some fashion + medical, varies in many ways, sometimes contoured to hand, comes in foldable styles, many aluminum styles, many customizable styles. Knob/Decorative. Fashion exclusive, knob shape hurts the hand after prolonged pressure (especially with designs), tend to be heavy, "sword canes" have the same issues.](https://64.media.tumblr.com/102d2e5f13a88817eaa44974bc5a7486/f831b3159e1d7635-e2/s500x750/887023dbcfc758db12a7fcf3f258bca52eba2d53.jpg)
(These are 4 broad shapes, but there is INCREDIBLE variation in cane handles. Research heavily what will be best for your character's specific needs!)
The handle is the contact point for all the weight you're putting on your cane, and that pressure is being put onto your hand, wrist, and shoulder. So the shape is very important for long term use!
Knob handles (and very decorative handles) are not used for medical use for this reason. It adds extra stress to the body and can damage your hand to put constant pressure onto these painful shapes.
The weight of a cane is also incredibly important, as a heavier cane will cause wear on your body much faster. When you're using it all day, it gets heavy fast! If your character struggles with weakness, then they won't want a heavy cane if they can help it!
This is also part of why sword canes aren't usually very viable for medical use (along with them usually being knob handles) is that swords are extra weight!
However, a small knife or perhaps a retractable blade hidden within the base might be viable even for weak characters.
![[Image text] 4 Major base shapes (significant variation and uses). Adjustable base. Aluminum, standard modern medical, adjustable height, rubber base, wears down over time. Tripod/ quad base. If you need extra balance. Terrain attachment (varies, this is for ice). Removable, helps stop slipping on ice/snow/sand/etc, some canes have a retractable tip for ice. Classic base. Non-adjustable, custom only, modern standard still has a rubber base.](https://64.media.tumblr.com/78d350cfac4077376b7ce521a9a7d929/f831b3159e1d7635-ab/s500x750/4b4a6b8062c06686baf17c83c28b793bfb89e05b.jpg)
Bases have a lot of variability as well, and the modern standard is generally adjustable bases. Adjustable canes are very handy if your character regularly changes shoe height, for instance (gotta keep the height at your hip!)
Canes help on most terrain with their standard base and structure. But for some terrain, you might want a different base, or to forego the cane entirely! This article covers it pretty well.
Many cane users decorate their canes! Stickers are incredibly common, and painting canes is relatively common as well! You'll also see people replacing the standard wrist strap with a personalized one, or even adding a small charm to the ring the strap connects to. (nothing too large, or it gets annoying as the cane is swinging around everywhere)
(my canes, for reference)
If your character uses a cane full time, then they might also have multiple canes that look different aesthetically to match their outfits!
When it comes to practical things outside of the cane, you reasonably only have one hand available while it's being used. Many people will hook their cane onto their arm or let it dangle on the strap (if they have one) while using their cane arm, but it's often significantly less convenient than 2 hands. But, if you need 2 hands, then it's either setting the cane down or letting it hang!
For this reason, optimizing one handed use is ideal! Keeping bags/items on the side of your free hand helps keep your items accessible.
![[Image text] Where to put your stuff. Purses/bags. A lot of size range, Can mess with balance, Zippers are too hard with one hand, Handheld means you have no hands, over the shoulder only. Fanny pack. Accessible with one hand, Limited space, Good for balance. Backpack. Very physically comfortable, evenly weighted, holds a lot (medicine, foldable cane, emergency supplies, etc) can't access without fully stopping and putting cane down/hooking it on arm/dangling on strap. Pockets. Can only use on free side, many outfits don't have good pockets.](https://64.media.tumblr.com/de0f85e864c0ac470fb08900d78d8375/f831b3159e1d7635-21/s500x750/dbc646d95d144bb9c097f220361f074cc4b59584.jpg)
When sitting, the cane either leans against a wall or table, goes under the chair, or hooks onto the back of the chair. (It often falls when hanging off of a chair, in my experience)
When getting up, the user will either use their cane to help them balance/support as they stand, or get up and then grab their cane. This depends on what it's being used for (balance vs pain when walking, for instance!)
That's everything I can think of for now. Thank you for reading my long-but-absolutely-not-comprehensive list of things to keep in mind when writing or drawing a cane user!
Happy disability pride month! Go forth and make more characters use canes!!!

I'm still trying to learn how to draw different body types if anyone has any tips.


I know you probably get these asks a lot, but I've really been trying to try drawing comic pages. I really admire how free and flowing your style is! I've seen your little tutorials and tips and idk what's wrong but I just can't seem to wrap my head around panel composition? Like I do wonderful painting comps, but I can't seem to break out. Do you have any resources or help to get started?
thank you very much!!!!! im just using this ask as an excuse to draw random comic tips i hope thats okay and that you’ll get something out of it

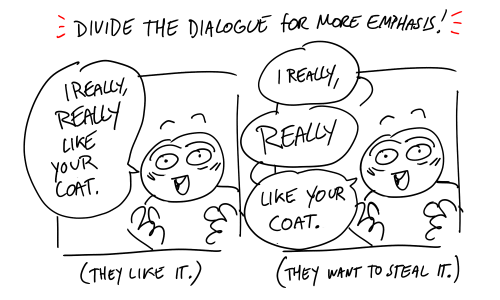
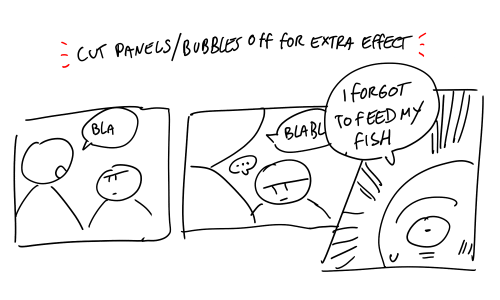
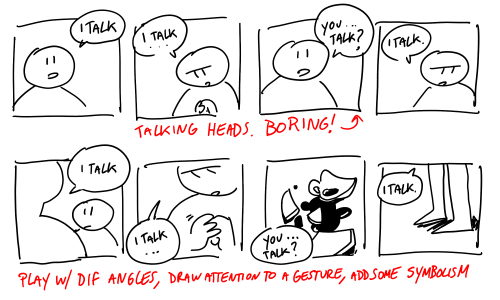
did that help…
tumblr has an AI toggle you should turn on to prevent your work being shared with training models/etc! it's under settings & visibility.

btw. i made this quick guide of some of the natural size and proportion reference points in the human body. of course this all varies even irl, and you can stylize however you want, so ymmv but thought it might be helpful for some folks.


I have some older art tips that I keep forgetting to post here. I'll add a few in the next few days, at least those that aren't too outdated!
This one is about giving an extra feel of weight to your characters.


I wanna do more of these… >:U


Young artists
I’m so, so sorry to tell you. The experts are right. The magic is in the editing. I know it’s not fun, AND you have to make the thing before you get to edit it.
When I edit photos I feel kind of “meh” about, I often fall in love with them through editing. When I edit photos I think are really good, I often become obsessed with them. I’m debating submitting some Pride photos to major magazines because I love them so much.
My writing has always been good. I’ve been told that my whole life. I never really felt like it was true, it was just something I did. Recently though, I’ve started to train my editing skill in writing. All of a sudden, I see the art in my work.
Make art. Make as much art that excites you as you can. The worst thing you can do is hold off on doing projects you’re impassioned about because you aren’t happy with your skill level yet. It will eat away at your love for the thing.
Do it badly. Remake it later. Sometimes the true beauty of the peace is the enthusiastic enjoyment apparent of the thing, not the 10,000 hours that went into skill. Skill without passion is no art at all.
New ideas will always come. It is much harder to reignite passion in a place you burned out in shame.
since it’s been about a year and i’ve learned many new things, i wanted to reblog this with some more art tips :D (also more digital art centered ones!)
try to use the erase button over the undo button more. i really do think that it helps to not be constantly undoing every line you make and be able to make more adjustments and not be so perfectionist (been doing this a lot since making going to the eraser one of my actions on my apple pencil)
definitely explore programs/materials your using- i managed to get a graphics tablet for free and i’ve used it to mess around (and struggle) with different programs like krita and csp. and anyways, who knew it was so nice to draw with crayola markers??
learn your layer modes - my person favorites are overlay, add, and multiply, but there’s a lot for a reason! messing around with them can lead to cool things! (this goes for other features you may not use in your program!)
if your coloring - EDIT your colors!! you might not realize how desaturated you’re making things, or maybe how they aren’t totally working together. i recommend duplicating your color layer(s) and messing around with curves, saturation, and gradient maps (these are procreate features i do not know what exists on other programs-)and then using layer modes + opacity to make everything nicer. also - if you want to just tone everything one color (or just make everything warmer or cooler) - fill a new layer thats above either the colors or everything and set it to the layer mode “color” and adjust opacity :)
the liquify tool - im not sure if this is just a procreate thing or not but its so awesome to use when editing proportions. i like to flip my canvas and select all my layers and push things around and make things bigger and smaller. it can be a lot more efficient than redrawing things :)
dont use like a billion brushes - sometimes less is more, i use about 3-4 for every drawing. id recommend using a textured brush among some less textured brushes to so its not overwhelming or underwhelming with so few brushes.
draw traditionally!!! - drawing traditionally will do things like give constraints and force things like line confidence and problem solving (especially if you are using (semi) permanent materials!!!). it doesn’t have to be anything particularly fancy, it can just be little sketches and practice, or just messing around with materials.
and again - have fun!!! art is a fun thing that you should be enjoying. none of these tips matter if they aren’t making you happy/enjoying the process of creating! just make things, cause thats really cool, the technical stuff only matters if you want it to matter :)
btw if you have anything specific you want me to talk about, ask! i love talking about art and giving art tips!
Have any art tips, your art is cool and I've been trying to get into digital art recently.
thanks :)
something ive learned recently: set ur layer to add on digital art for lighting - best things ever
but if you're just starting out with digital art, find a program ur comfortable with (i recommend procreate), and just play around and figure out what brushes and stuff you like, find digital artists on youtube for more specific tips (i recommend LavenderTowne for more cartoon-ish style digital art, but some of her tips can be good for any style)
if you've been doing traditional for a while, it'll just kinda throw you off to start digitally drawing, but eventually you figure it out and get the hang of it and to have pretty much every tool and color at your disposal is cool, just gotta learn how to use them :)
but if you're new to art entirely, just draw and have a good time, like thats my biggest tip, explore your style while also having fun, dont worry if it's not the next mona lisa, that's not important, it's gonna take time, and there will never be a point where you will have the skills to draw every single thing you want exactly how you want it, its just impossible. also you can look at other peoples art also take inspiration to start creating your style, i swear though i feel that step by step tutorials can hurt your art SO BAD, unless they give a thorough explanation into why you are doing what you're doing, you haven't learned anything, and when you try to do it again, but in different contexts, it's gonna look weird, because you don't actually know what you're doing.
ALSO JUST GENERAL TIP JUST WATCHING PEOPLE DRAW, IT DOESNT EVEN HAVE TO BE A TUTORIAL OR ANYTHING, ITS JUST SO HELPFUL TO WATCH SOMEONE'S PROCESS
heh i don't know if this helps, i can totally give more specific tips if anyone asks ^^
Art thoughts? Tips? Advice??Whatever fits best I guess
So you think you are bad at anatomy?
Well what if I told you that what it is you're bad at isn't anatomy and it's portion?
What is portion? You ask well portion can help you draw anatomy if you understand portion and if you know those then well you don't really need to learn realism lol
Portion is how big an object is compared another one..
Example:
The middle finger is typically, usually, the roughly same length as the palm and the total length of the hand is typically, usually, roughly the same length as the face not head but face
The pinky fingers are the same length as the thumb and the total length of your hand is roughly the same length as your foot and your foot is roughly the same length as your bicep? Upper arm :D
So ultimately just learn portion it will help you a lot!
What can portion also help with?
Perspective!
What? You may be thinking so let me explain!
Perspective is how far or close the subject is to the viewer in the art work in the form of a painting, illustration, or photograph
Learning portion can also help you with perspective in some ways specifically to keep things in roughly the same size and in the same plane
Learning perspective can also help you with your art game regarding of what it is you're drawing
As well as you guessed it say it with me: Portion!
Which in the case you aren't drawing just a human but a landscape too
Let's say a tree and some mountains
So this case you would use a combination of portion, scaling, and perspective
In this case scaling is how big an object is compared to real life and portion is how much space an object should take up compared to another and perspective is how far away the object is
You would eye subject bigger compared to the others
For instance
If it's a human you would make the mountains and trees appear farther which would make them smaller
But if it's a tree or mountain you would make those bigger and the human as something interacting with them so the don't look like they don't belong in the small image
Would learning anatomy help you draw?
Yes but as well as perspective portion and a little bit of scaling
Instead of learning how to draw realism learn anatomy, portion and perspective!
That will help you most in your drawing career!!
And if you don't feel like doing all of that use a reference pertaining to real life or a real person for art study instead of fan art
That should help with a lot of your drawing problems
As the people say work smart not hard
And if you need to be like me and stare at your reference for such a long time you look stupid because you forgot how to draw then do it I'm not stopping you
Also...
Start by drawing everything with a simple shape and adding more lines and shapes (and erasing!!) till you get the form or the shape of the object you are happy with then add extra details
Trust me you will thank me later :)
Please tell me if any of the links aren’t working
Faces:
Face Tutorial
How to Draw the Human Face
Quick Face Tutorial
How to Sketch Faces
Profile Anatomy
Drawing Heads
Basic Head Layout
How to Draw Ears
Basic Ear Tutorial
Ears and Noses
Drawing Noses
How To Draw Mouths
Mouth Tutorial
Lips
Lips Ref
Semi-Realistic Eye Tutorial
Tips for Drawing Eyes
Manga Eye Tutorial
Pixel Eye
Eyes in Different Angles
Expressions
Step by Step Expressions
How to Avoid the Same Face
Head Angles
Beards
Neck Help
Skull Tutorial
How to Draw a Skull
Hair:
How To Draw Braids
Headband Braid Tutorial
How To Draw Hair
Hair Tutorial
Another Hair Tutorial
Also Another Hair Tutorial
Tutorial: Hair
Tutorial for Hair
Simple Hair Tutorial
Hairstyle Tutorial
50 Male Hairstyles Revamped
Let’s Do Hair!
Female Hair Tutorial
Curls
Pixel Hair Tutorial
Manga Boys Hair Tutorial
Bodies:
A Guide to Drawing the Human Body
How To Draw Hands
Hand Tutorial
Hand Gestures
More Hand Gestures
Arm Tutorial
Feet Drawing Guide
Foot Tutorial
Drawing Feet
Knees
Sitting Poses
Drawing Torsos
Abs Tutorial
Clothes and Accessories:
Clothing Tutorial (Notes)
How to Draw Flower Crowns
Helmets and Hats
Hoods
Fashion
How to Draw Tights
Jeans
Boot Tutorial
Plaid Tutorial
Lace Tutorial
Armour Tutorial
Creatures:
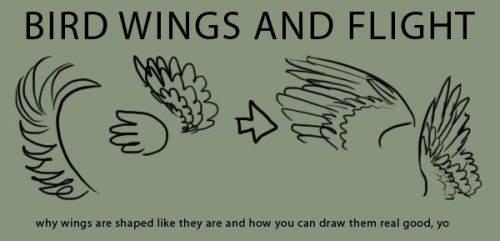
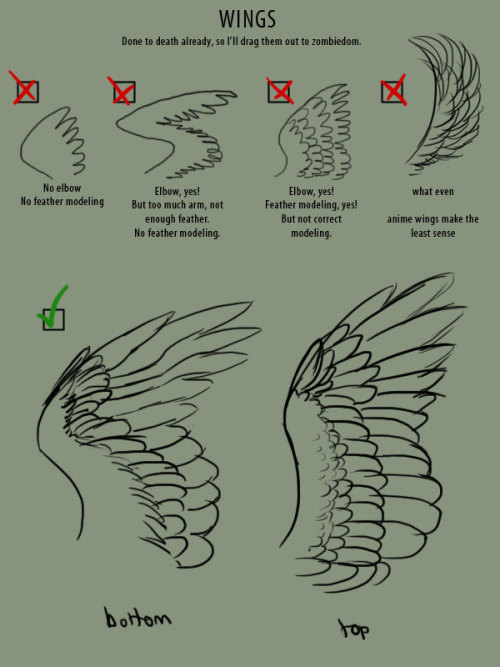
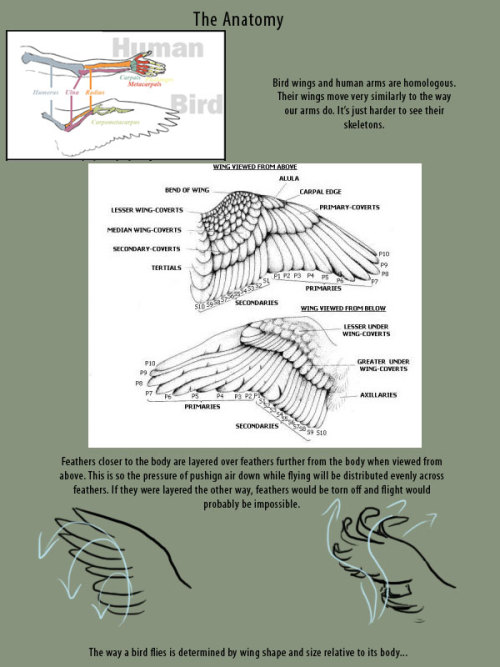
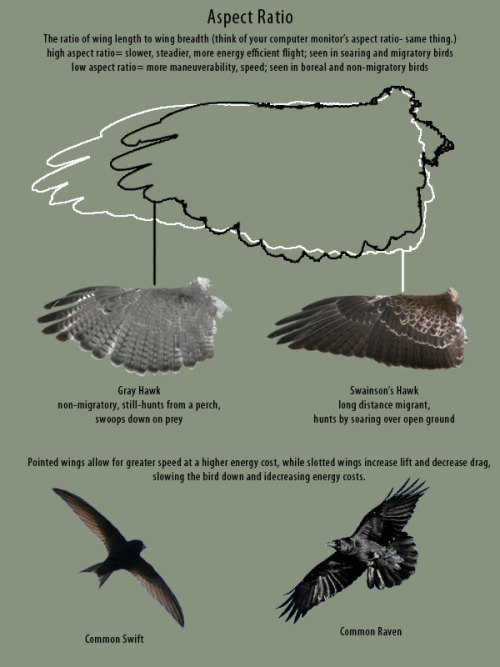
Wings
Folded Wings
Thoughts on Wings
Tutorial on Creature Design
Bat Wings on Humans
Pegasus Wings
Animal Legs on Humans
Dragon Tutorial
Dragon Wing Tutorial
Dragon Hands and Feet Tutorial
Dragon Mouth Tutorial
Dragon Head Tutorial
Dragon Scales
Clawed Hand Tutorial
Basic Horn Tutorial
Sauropod Tutorial
How to Draw Centaurs
Werewolf Anatomy
Animals/insects:
Animal Noses
Basic Animal Anatomy
Paw Tutorial
Fur Tutorial
Pixel Fur Tutorial
Painting Fur
Fur Painting Tutorial
Horse Tutorial
Horse Proportions
Horse Hooves
Horse Legs
Dog Anatomy
Simple Dog Tutorial
Wolf Paw Tutorial
Wolf Head Tutorial
Drawing a Wolf
Canine Leg Tutorial
Feline Comparison
Big Cat Paw Tutorial
Lion Head Tutorial
Cat Faces Tutorial
Snow Leopard Tutorial
Tiger Tutorial
Fox Tutorial
Rabbit Drawing Tips
Butterfly Tutorial
Rat Tutorial
Owl Anatomy
Feather Tutorial
Bear Anatomy
Objects:
Glowing Stuff
How to Draw 3D Rooms
Gun Ref
Slime Tutorial
Chain Tutorial
Gemstone Tutorial
Bullet Metal Tutorial
Lightsaber Tutorial
Gold Coin Tutorial
Jewel Tutorial
Nature/Food:
Tree Tutorial
How to Create Stars (With Photoshop)
Stars Tutorial
How to Draw Clouds
How to Draw a Rose
Simple Roses
Grass Tutorial
Another Grass Tutorial
Quick Grass Tutorial
Bush Tutorial
Rain Tutorial
Water Tutorial
Underwater Tutorial
Fire Tutorial
Snow Tutorial
Light Tutorial
Light Sparkle Tutorial
Mountain Tutorial
Another Mountain Tutorial
Moon Tutorial
How to Draw a Apple
Strawberry Tutorial
Colours:
The Psychology of Colour
Basic Colour Theory
Colour Theory 101
Quick Colour Reference Sheet for Designers
The Art of Colour Coordination
Colour Profiles and Printing Explained
The Colour Strata
The Art of Harmonious Colour Schemes
The Ten Commandments of Colour Theory
How to Use Colour in Your Design Scheme
Colour Theory: The ABC’s of RGB
RGB vs CMYK
The Business of Colour Psychology
The Psychology of Colour
The Psychology of Logo Colour and Font Style
What Colours Communicate
A Colour Guide for Designers
Colour Theory: What People Really Think
Colour ROI
The Colours of the Web
Colour Design
Colour Help
How To Colour
Colour Blender
Colour Scheme Designer
Colour Meanings For Roses
Colour Palette Generator
Upload an Image and Get a Colour Palette
Another Colour Palette Generator
Color Hex
Colour Harmony
Skin Colour Palette
Pastel Colours
Greyscale Tutorial
Colouring Cloth
Hair Colouring
Photoshop Colouring Tutorial
Other:
How to Draw Dimension
Pixel Art Tutorial
Another Pixel Art Tutorial
Photoshop Brushes
Photoshop Layers Tutorial
Glitch Effect (with Photoshop)
Gimp Soft Shading
Blending Tutorial
Free Digital Sculpting Tool
Skeleton Drawing Tool
Repeating Pattern Tutorial
Free Art Programs
Silk - Interactive Generative Art
Creativity Cards
Don’t Know What to Draw?


tutorial for drawing characters with cleft lip! sorry that it's mostly unilateral-centric but it makes up the vast majority of resources and photos. still tried to get tips for drawing bilateral clefts in though.
please keep in mind that this is an introductory drawing tutorial and has some generalizations in it, so not every “X is Z” statement will be true for Actual People : )
if you draw any characters using this feel free to tag me!!
Character Design tips when creating a Hijabi Muslim OC


Note: Sleeves or a head appearing is okay IN CERTAIN SITUATIONS. Like working in a garden and rolling up your sleeves OR going to the hair salon OR checking up in a hospital. In other Mazhab or fiqh, it's much more lenient and it's okay to show ankles or neck. (depends on country or Mazhab)

Note: Camel Hump hijab in certain tafsir could mean a haughty attitude rather than the camel hump shaped hijab, but there are also others that take it literally too, so it depends on the person.


So you might be saying: Lion why a guide on drawing black people? Well young blood it’s because a lot of people cant…seem…to draw…black people..Amazing I know.

Racist (caricatures) portrayals of black people have been around forever, and to this day people can’t seem to draw black people like they are human. If your artwork resembles any of the above even remotely your artwork is racist and offensive. If you try to excuse that as a stylistic choice you’re not only a terrible artist, but racist too!!! Congrats.

Whitewashing is also a problem. A lot of people refuse to draw black features on canonly black characters. While this example isn’t colored, lightening the skin-tone of a character is also considered whitewashing. So lets start with features!

Now all black people have different noses thats a no-brainer, but black noses tend to have flatter bridges, and wider nostrils. Please stay from triangular anime noses and small button noses. Your drawings should not depict black people with abnormally large noses. (Especially if you do not draw other characters this way)

If you feel like the way you draw lips on black characters is offensive or resembles a caricature,it probably does and you should change it. ABSOLUTELY AVOID PLACING LIPS AT THE BOTTOM OF THE FACE.

Hair is so diverse! Please get used to drawing braids, locs,kinks and coils! If you can learn to draw ringlets and long waves you can learn how to draw black hairstyles.

Add clips! Learn how to draw baby-hairs and never be afraid to add color Pinterest and Google are free my dudes! Also try using square brushes for blocking in coils.
OK THAT’S ALL YOU GUYS

Pwes gip me coloring advice o Master🙏
Color theory.
You want colors that look good with each other? Try complimentary colors, analogous colors, tri- something and all the other cool ones!


Of course, there's MANY different interpretations about how people see color, so the most important advice of all, DONT BE AFRAID TO EXPERIMENT!!! :D