☀️💧Ideas For Using Sun Water💧☀️
☀️💧Ideas for using sun water💧☀️
🌞 drink first thing in the morning, or whenever you’re low on spoons, for an energy boost
🌞consider charging locations, like: sun water charged by/in a courthouse for justice, a playground for energy, a beach for happiness. Etc.
🌞consider charging times, like: sun water charged by the summer solstice for abundance, happiness, and faery magic. Sun water charged by the autumnal equinox for warmth, clarity, prosperity, and peace etc.
🌞 drink when you’re feeling sad for a happiness boost
🌞wash your face with sun water for a confidence glamour, bravery/armor glamour, hapiness boost and to give your skin a glow
🌞drink it before a speech or presentation for confidence and leadership
🌞take your medicine, vitamins, etc, with it, or drink it when you feel sick for a health boost
🌞mix it with lemon juice for a potent cleansing spell
🌞drink before school or studying to help you remember what you learn, stay confident, and protect you
🌞use it as an offering to solar deities
🌞 put some sun water in a spray bottle with a little sunflower oil (or any carrier oil) and some sunny essential oils (citrus, cinnamon, frankincense, etc.) And use it as a room spray/perfume
🌞water your plants with it! Especially cacti/succulents!!
🌞bless your solar magic tools in it
🌞put a few drops in your eye or on your eyelid to enhance clairvoyance
🌞 rub some on your eyes/ears with intent to hear/see the truth
🌞use it for water scrying for a very clear and honest answer
🌞use it for baking or cooking to add a bit of sunshine, happiness, good fortune, and health to your food
Feel free to add more!
More Posts from Thesoftestwitch and Others
easy witchy tips i have learnt through my craft
writing a protective sigil inside your door to avoid bad energies to enter your room
making sigils by yourself works better because you pour your intention into it and can be a great way to manifest
white candles can replace any candle when doing candle magick
clear quartz can replace any crystal
when drinking your daily coffee/tea, stir clockwise to manifest something and anti-clockwise to let go of something. repeat your affirmations as you stir
salt baths absorb bad energies so having a salt bath once in a while helps with having your energies balanced
write an affirmation in a bay leaf and burn it to manifest it
always keep iron on you for protection
work with the moon phases and transits to make your spells more powerful
keep a sigil in your phone case for protection/manifestation
after giving an offering to a deity, return it to the earth
drink mugwort tea for lucid dreaming/astral projection (don’t drink it if you are pregnant!!)
before you put a crystal under water or in the sun, research about it
keep a dream journal. it helps for lucid dreaming.
put an amethyst under your pillow to sleep better and to recall your dreams
charge your tarot/oracle cards by putting a crystal on top of them while you are not usinf them
mix moon or sun water with your cosmetics for a quick beauty spell
try to do an activity to connect yourself with each element everyday. (ex: a bath for water, walking barefoot for earth, lighting a candle for fire, singing for air)
make an habit of meditating everyday
orriculum’s witchcraft masterpost ✨

✨ 101 - basics :
there are some accepted standard methods used widely in witchcraft,
unpacking witchcraft - spell types
some basic terms to know
methods for spells
grounding, a quick how-to
when to cast a spell - by weekdays
when to cast a spell - by time of day
how to cleanse
how to charge
nullifying spells
about jar spells
jars and mold
“beginner” spells
grounding masterpost
disposing of spell materials
✨ 202 - your own path
your own path is where you diverge from the standard things you learn at first, and may require you to write your own spells or adjust others to your needs.
how to write your own spells - resources
understanding herb associations with rosemary
how to substitute in a spell
how to write curses
how to write glamours
searching spells by ingredient
how to adjust a spell
✨ tools:
tools of witchcraft overview a witch’s wand
building a broom/besom
correspondence resource
on making moon water
herbs for spells : grocery store vs. home grown vs. edible wilds
a witch’s book
✨ you should know:
“to be a witch” falsehoods
other witches and you
witchcraft and the law
difference between a witch and a herbalist
self care for the witch
low effort witchcraft
when your spell fails
tarot and pendulums can get it wrong
♡ Witchcraft Masterlist ♡
Basic Witchcraft Sigils Spell Writing 101 Energy Work Masterpost Correspondences Candle Colour Meanings Crystal Correspondences Crystals Masterpost A Spell Masterpost
Energy Work Energy Work Masterpost Cleansing Correspondences and Masterpost Cleansing Methods Enchanting an Item How to Enchant an Object Simple Enchantment How to Enchant Enchanting Items How to Enchant Items Charge items
Correspondences Masterpost Another Masterpost Smells Love Candle Colours Herbs
Healing Crystals Uses Healing Crystal Masterpost Crystal Correspondences
Spell Masterposts Gentle Witchcraft Wake-Up Spell Self Care Masterpost Room Healing Household Healing Everyday School Spells Finals Week Spells Pen Enchantment
Tips and Ideas Witch’s Morning Routine College Witchcraft Ideas Tea Ideas
Divination through Casting of Stones

A while ago I devised a simple divination method of casting stones on a board and interpreting where they fell. I ended up writing an entire ritual around this concept and performed it as a public ritual after teaching a class on the magical properties of crystals and stones. If I’m going to be teaching class and running a ritual afterward I like to tie the ritual into the subject covered in the class, so people can apply what they learned.
I decided to divide a reading area into three sections, for the physical, mental, and spiritual aspects of the Element of Earth, which would be marked with the colours associated with those aspects - green for physical, brown for mental, and black for spiritual. To really drive the Earth symbolism home I put the alchemical symbol for Earth on the centre of the reading board, and decided that if a stone fell inside that triangle then it had a stronger influence in the reading.
The three areas would break down as follows: Physical (green): The body, the home, physical concerns, structure, ‘real life’, wealth and finance Mental (brown): Control of thoughts, memory, discipline, patterns of thought Spiritual (black): Religious community, buildings, heirarchies, grounding, obedience and duty, moral and ethical issues, foundations

In order to make the board I went to Michaels and got the biggest wooden disc I could find, then carefully determined the centre and divided it into thirds which I painted with acrylic paint. I wanted the brightest colours possible, as I’d be doing this by candlelight. Two coats did the trick. At some point I may varnish them.
I gathered some of my collection of stones and decided to go with tumbled ones to minimize any possible damage. I wanted a wide variety of possible meanings for each reading, so my choices on what stones to use was heavily reliant on the symbolism I attach to them. I went with the following:

First row: Clear quartz: Clarity, power, wisdom Carnelian: Fire, strength, physicality, the body Hematite: Grounding Second row: Lapis lazuli: Divinity, the Gods, the sky Moss agate: Friendship, growth, the Earth Fluorite: Peace, inner calm, structure, learning Third row: Abalone: Inner beauty, secrets, Water Tiger’s eye: The Sun, power, protection, strength Moonstone: The Goddess, motherhood, the Moon, the psyche, magic Fourth row: Malachite: The Earth, growth, love Rose quartz: Love, pace, acceptance Amethyst: Sleep, dreams, peace, magic, the psyche Fifth row: Labradorite: Dark Moon, hidden secrets, new perspectives Amber: The God, the Sun, strength, power, healing Jet: Earth, night, grounding, stopping negativity

A sample reading: Physical: We have lapis lazuli, malachite, and jet, although the jet is partly on the spiritual side as well. Note the carnelian rolled off the board and as such doesn’t matter for this reading. The lapis is far from the centre, so has a weak influence here - the Gods and Their worship are not primary concerns for you right now as there are more important things going on. The malachite right on the Earth triangle tells us that growth is on the way, probably financial - the querent would have what they need to be fulfilled. As for the jet, its placement here implies that Earthy concerns are currently important to the querent, and it’s possible that they are feeling ‘in the dark’.
Mental: Abalone, right on the Earth triangle. There’s a foundational part of your self and psyche that you’re not revealing to others because you’re afraid to do so.
Spiritual: Moss agate outside the triangle tells us that the querent is making spiritual connections, be that to Gods, Elementals, some form of spirit, or connections in a religious or spiritual community. These connections lead to growth, but not in a spectacular way. The borderline position of the jet between physical and spiritual shows that the querent is a little uncertain about the connections they may be forming.
Of course, the stones used could be different, or a different reader may have a different interpretation of each stone, but still, I found it to be a useful method of divination and others seemed to appreciate the readings.
I’ve picked up my Grimoire again and begun developing my Tarot section, (which is going to be huge and very time consuming but I am SO excited!)
Please feel free to use these pages as a guide in your own practices or as inspiration for your own BOS or Grimoire :) All I ask is that if you wish to recreate my design or wording, please credit in the description of your post!! Thank you 💕
✨Pages in my Grimoire on Tarot ✨
These pages begin my Tarot study on the symbols associated with the Major Arcana, the 4 Suites and associated zodiacs/meanings, the court cards and what they represent in meanings, numerology and their associated majors, and lastly color symbolism. this is basically all I need to do intuitive readings with the tarot!!
The next chunk of this will be meanings for each of the major arcana, based off of my own practices and what i’ve learned about their symbols.


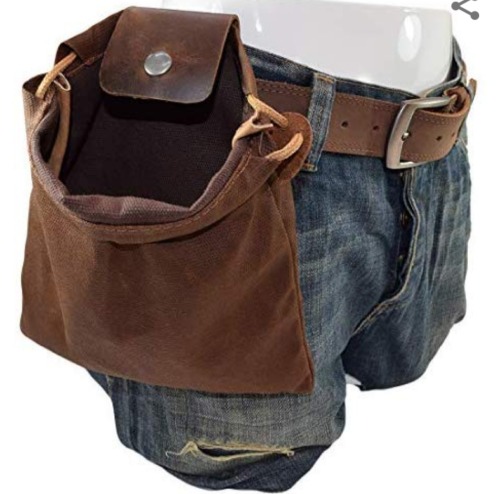
I’m not goblin myself but this feels like peak goblin to me…think of all the things you can fit in this baby…think of the ease of gathering…the power…
EDIT 1:
For everyone asking for a link!
Here is the original version I posted ($26.99): https://www.amazon.com/dp/B07B12MBDS/ref=cm_sw_r_cp_apa_i_VwtMDbZH81Z57
And here is a more affordable but less aesthetic option that I personally impulse bought ($7.89): https://www.amazon.com/dp/B007OZHIZO/ref=cm_sw_r_cp_apa_i_qttMDbJKTVBDB
If you look up foraging pouch on amazon or in general you should be able to look through all of the options. If you’re uncomfy going through amazon you can usually follow the listing to the external vendor that sells the item!!!
EDIT 2:
I did NOT expect this post to get so much love but since I have the goblins’ attention – you’re all funky and wonderful and you’re doing great!!!
Shadow Work
Origins, Meaning and Utility
The Structure of the Mind
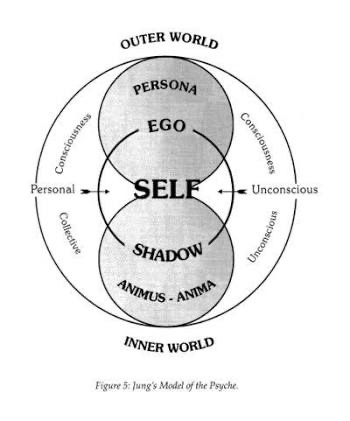
Carl Jung theorized the existence of three levels/spheres in the human psyche: the Ego, representing the conscious mind, the Personal Unconscious where memories are contained and the Collective Unconscious, where all knowledge and experiences of the species are shared.
Each Sphere has in it a certain number of Archetypes, used to better describe the components of those structures, and the Shadow is one of them.
What is the Shadow
The shadow can be seen as a instinctual or primitive part of ourselves, it exists as part of the unconscious mind and is composed of repressed ideas, weaknesses, desires, instincts, and shortcomings.
It is this archetype that contains all of the things that are unacceptable not only to society, but also to one's own personal morals and values, normally going against social norms and rules as well as what we personally consider right.
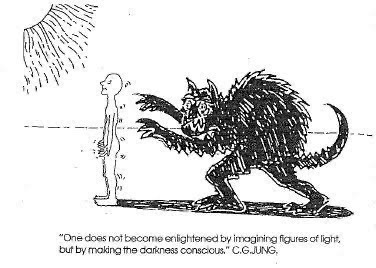
The Shadow is often described as the darker side of the psyche, representing wildness, chaos, and the unknown, and it is common for people to deny this element of their own psyche and instead project it on to others.
The Shadow in Witchcraft and Benefits of Shadow Work

Art: Unknown
The Shadow, in witchcraft, can represent The Unknown, hidden depth of ourselves. Speaking in terms of energy, this is an area that can be a deep source of energetic issues, because it’s locked up in the dark and always striving to reach the light.
To not work with one’s Shadow is to make it greedy and aggressive, as well as denying a big part of oneself, making everything a half of a whole.
Through that brief explanation, we can already establish the importance and role of the Shadow in witchcraft, and with that in mind, comes the concept of Shadow Work.
Shadow Work can be seen in a number of practices, meditation, trances, inner journey’s, lucid dreaming, astral travels, spells and divination.
The method can change, but the principle is simple: Centering your intent to self discovery, self knowledge and self acceptance.
Working with one’s Shadow is not only beneficial to one’s craft, as it allows one to get in touch with their intuition as well as allows for easier connection with one’s guide/guides, but it also allows for healing and acceptance of one’s feelings and needs.
Think of all aspects of life as a wheel. If there is one part bent, the wheel can turn, but with more effort. If the owner spends time fixing that bent part, the wheel will turn in a much more smooth manner.
That is what happens when you take the time to do Shadow Work, you have to put in effort, and most of the time it’s not easy, but once done, all other components on the wheel of your life will be relieved to move on without that obstacle that makes their job harder.
The Shadow is not evil, as evil is just a moral compass invented by humans. It is a part of one’s nature, and to deny it is to supress a connection with yourself.
Take the time to know and accept your shadow, and you’ll see that life will be a little easier.
References:
A Natureza da psique (Structure & Dynamics of the Psyche) by C.G. Jung
The Archetypes and the Collective Unconscious by C.G. Jung
Travel Altar/ Altar in a Box
I have a cat and my cat is an asshole. I’d love to have a big beautiful altar set up on my dresser, but Pip is the kind of cat that likes to knock things off of high places, take things that don’t belong to her and run, and hide things. To get around this, I decided to make an altar in a box. I used the small box that I already had, but you can use any size or shape box that you want!
I started with a box. Obviously. I got mine from Hobby Lobby ages ago and had stained it with a dark stain and put box corners on it so that it looked nice. I had been using it as a catch-all for oddities and found objects, but decided that I would have to use it for my altar, as it’s the only box that I have.
Step one was already done, as I had done it last year. Decorate the box. Like I said, I stained mine and added some dark box corners. I also used black ink to darken up the gold clasp so that it wasn’t so bright in comparison to the rest of the box. I wanted it to look a bit more vintage and worn.

Next, I cut a rectangular piece of fabric to line the box with. I forgot to take a picture of the fabric before gluing it in, so I quickly cut out this smaller piece to show you what I did. In order to make sure that the cloth lay flat around the edges and not bunch up, I cut off the corners. Like so.

And then I used hot glue to attach it to the box. I folded the raw edges of the fabric under so that they were hidden and the finished product looked a bit cleaner. This step was an absolute pain and I burned my fingers on the glue a few times.

After that, I cut a piece of thick board to fit inside the box. You could use cardboard or chipboard, too. I used what I had on hand. This piece of board will be used a shelf. You’ll see what I mean later. Here, I’m just making sure that the board fits. I actually ended up cutting it down a bit, because with the fabric lining in, and taking into account the fabric that will be covering the board itself, it was a bit too wide to fit inside the box.


Once I was confident that I’d cut it down to a size that would fit, I covered it with the same fabric I used to line the box. This picture shows the underside of the board where the fabric was glued down.

Next was probably the easiest step - gluing that board into the box to make our shelf. The board is glued onto the lid of the box so that when it’s closed, it sits flat against the back wall of the box, and when it’s open, it makes a little shelf! If you make this box, be sure to make the shelf narrow enough that you can still close your box. You don’t want it hitting the bottom and preventing the lid from closing all the way.

Next, we add the ribbon to the sides so that the lid stays upright when the box is open instead of falling back. Without the ribbon, your shelf is useless. I didn’t measure very well, just made sure that the ribbon wasn’t too short so that the box wouldn’t open all the way. If you’re using two ribbons like I did, it’s also important to make sure that both pieces of ribbon are the same length.
If you use something other than hot glue, you may want to do this step before you put your lining in. Because I used hot glue, I was able to peel back the front corners of the lining so that I could glue the ribbon down, and then replace the fabric over top so that the end of the ribbon was hidden underneath.

I ran out of hot glue for the second ribbon, so I was forced to switch to E600, which works very very well, but takes some time to dry. I glued down the ribbon and let it dry enough that it wouldn’t move around, then glued the lining back in place. I used binder clips to hold the fabric in place while it dried.

I left the project while it dried and went to eat dinner. When I came back, I was able to take the clips off, and the box was done!

At this point, you can decorate the inside of your box how you see fit! If you make one of these for yourself, be sure to tag me! I’d love to see what you come up with. Happy crafting and blessed be.
Some notes:
When gluing in the lining, put the glue on the box, not the fabric. This allows you to fold under the edge of the fabric and stick it down without burning yourself.
Before you cut your shelf, take into account that there is going to be fabric covering the board and the box, making the fit a bit snugger. Don’t do what I did and cut your board, then have to go back and shave some more material off so that it fits.
MAKE SURE YOU HAVE ENOUGH OF YOUR CHOSEN ADHESIVE TO FINISH THE PROJECT.
If you have fat hands like I do, you may want to use only one ribbon, on the opposite side of your dominant hand. I’m right-handed, so I may end up going back and cutting off the ribbon on the right side of the box.
-Vyrian
Rabbits Rabbits Rabbits
Reblog this on the first of the month for good luck all month long!
Bath magic
I bought bath crayons (the ones they sell to parents with toddlers to encourage fun bath time) a while ago, pro tip: you can use them to write sigils and stuff for a magical bath!
-
 houseaestra liked this · 4 months ago
 -
 honeywich reblogged this · 5 months ago
 -
 wonderfulcinderella reblogged this · 5 months ago
 -
 mageknight-anya reblogged this · 5 months ago
 -
mageknight-anya liked this · 5 months ago
-
 dumbass-fae reblogged this · 5 months ago
 -
dumbass-fae liked this · 5 months ago
-
 paldeian-wooper liked this · 7 months ago
 -
 the-hedgeflower-post reblogged this · 7 months ago
 -
 imcatsnyder liked this · 9 months ago
 -
 hearthhusband reblogged this · 10 months ago
 -
hearthhusband reblogged this · 11 months ago
-
 ravenpine reblogged this · 1 year ago
 -
ravenpine reblogged this · 1 year ago
-
 thoirnin reblogged this · 1 year ago
 -
 whateverz-2009 liked this · 1 year ago
 -
 superkomadreja liked this · 1 year ago
 -
 z3nko-kitsune liked this · 1 year ago
 -
 iloptagliheads liked this · 1 year ago
 -
 ravens-beak reblogged this · 1 year ago
 -
 apricotcutie liked this · 1 year ago
 -
 saturnluna liked this · 1 year ago
 -
 thewh0re0fbabyl0n reblogged this · 1 year ago
 -
 theoceanicangel liked this · 1 year ago
 -
 allegrainpajamas reblogged this · 2 years ago
 -
 beaniesweens liked this · 2 years ago
 -
 cyberneticdhampir liked this · 2 years ago
 -
 cremeux liked this · 2 years ago
 -
 drahcula reblogged this · 2 years ago
 -
drahcula liked this · 2 years ago
-
 19thcenturypagans liked this · 2 years ago
