Beating Brush Lag In Manga Studio
Beating Brush Lag in Manga Studio

Booooooooo… what is this, Photoshop?!
Lagging brushes are an occasional problem in any illustration software. Here’s a troubleshooting guide for Manga Studio if your tools are acting like molasses. (Some settings may be different on Windows or if you’re running the Clip Studio Paint branding of the software. For what it’s worth, I’m running Manga Studio 5.0.3 on Mac OS 10.7.5. Yup, I’m behind the times.)
There are a few options to beat the lag:
1. Quit Stuff Bye bye, YouTube. See ya, Skype. Later, Tumblr.
Save your computer’s processor by quitting RAM-hogging apps and tasks while painting. Streaming audio/video will drastically reduce performance, but even leaving browsers open can slow things down, so best to just close it up. Guess that rules out Spotify, but then there’s always ye olde Zune. Gotta love cringing through those high school playlists while working.
2. Change Preferences Easier than changing your mind, and quicker too.
Check under the hood of Manga Studio’s Preferences for a few speed boosts. Do the following in these sub menus:
Preferences/Tablet/Tablet Settings: Change from 1 to 6 (I believe this option is Mac only).

Preferences/Performance/Undo: Lower the Undo count. Try taking it down 10-15 notches from default. You could also turn up that long-titled setting (“Delay before recognizing new object…”) by 100 ms, but I haven’t figured out what that does exactly…
Preferences/Cursor/Display Position of Reversed Cursor: Make sure to check “No Delay”.
After changing preferences, it’s a good idea to close and reopen Manga Studio.
3. Modify Brush Tool Settings Your brushes may take it personally, but remember you’re in charge here.
The Tool Settings window is a wealth of options for customizing brushes. Some are more processor-intensive than others. Here are a few of the best ones to modify: (Note: the look and behavior of brushes may be affected. You may want to duplicate and/or export a brush before changing its settings.)
Tool Settings/Anti-Aliasing: Turn down to “Little” or “None”
Tool Settings/Brush Tip: Reduce the number of materials on your brush.
Tool Settings/Stroke/Space: Increase spacing, but not too much. Brushes are essentially a string of material stamps. A low space setting means a smoother brush, but more work for your computer. Picture it frantically scrubbing a rubber stamp across your canvas. On that note, also make sure Continuous Spraying is not on.

Tool Settings/Watercolor Border: If your brush uses this setting, turn on the “Process After Drag” option. This renders the effect after each brush stroke and saves computing power.
Tool Settings/Correction: Turn off (or decrease) Stabilization, Post Correction, and Brush Stroke.
Tool Settings/Starting and Ending: Turn off all this stuff. Pfffft, who needs it, right?
Here’s a speed test after fiddling with some settings:

Woooooooo! We’re getting faster! Still a bit laggy, which leads to one last tip:
4. Rework The Canvas Might as well rework my life goals too.
Okay, disclosure: The two gifs in this post were recorded on a 4500x3000 canvas at 300dpi with a size 500 brush to emphasize lag. This third one is recorded on a 1080x720 canvas at 72dpi with a size 100 brush:

Yes! We’re cruising now!
Canvas sizing and resolution has a big affect on brush performance. It’s a bit of a conundrum. Getting the best image quality means working at a minimum resolution of 300dpi, which can be taxing for brushes on large canvases. So what to do? Just like traditional paintings start with thumbnail sketches, digital work can start on a low-resolution canvas. Here’s the method:
Set up your canvas normally at the full target resolution. But before drawing anything on the canvas, use the handy tool under Edit/Change Image Resolution. Reduce Resolution to 72dpi. Use this smaller canvas for rough sketching, background filling, blocking in large areas of color, etc. Then increase resolution to 144dpi for building up the body of the painting, still keeping it loose. (I’d recommend switching Interpolate to Hard Outline when increasing resolution.) Finally, blow it up to full resolution and get into the nitty gritty of rendering. This is where you’ll do the crisp line work, highlights, details, etc.

The idea here is to work big to small. This will keep away brush lag by using large brushes on small canvases. As the canvas resolution increases, decrease brush size and work smaller, tightening things up in the process. NOTE: Increasing canvas resolution causes pixilation. Don’t worry about it. This can be cleaned up in the final stages of painting.
Hope this guide is helpful! If lagging persists, remember to check drivers and tablet settings as well. If all else fails, Google’s a good friend ;)
-Armin
More Posts from Zelo-ref and Others


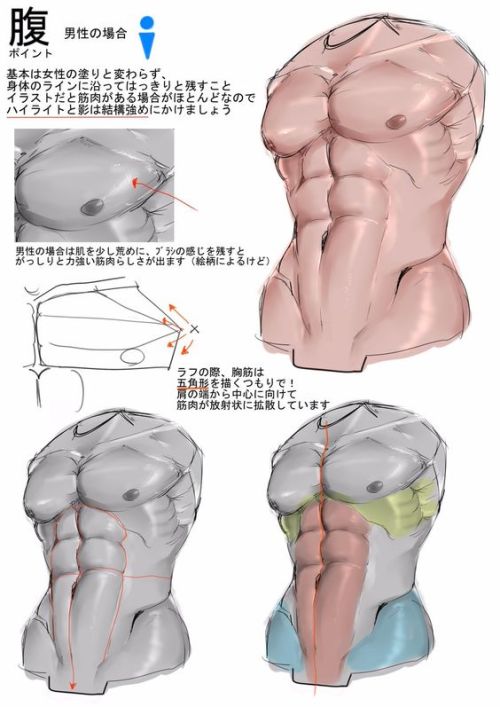
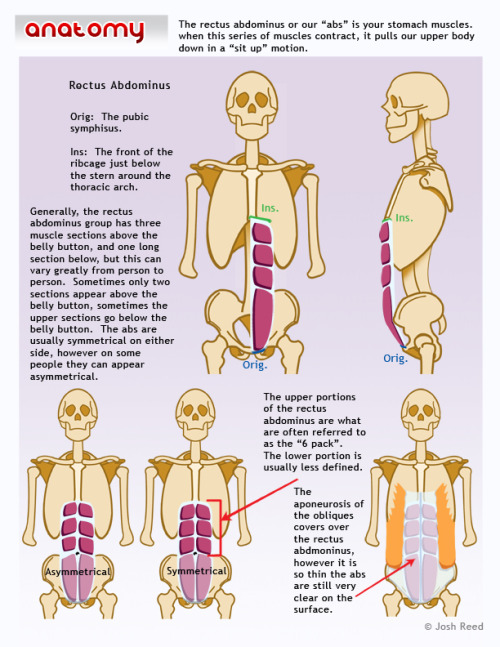
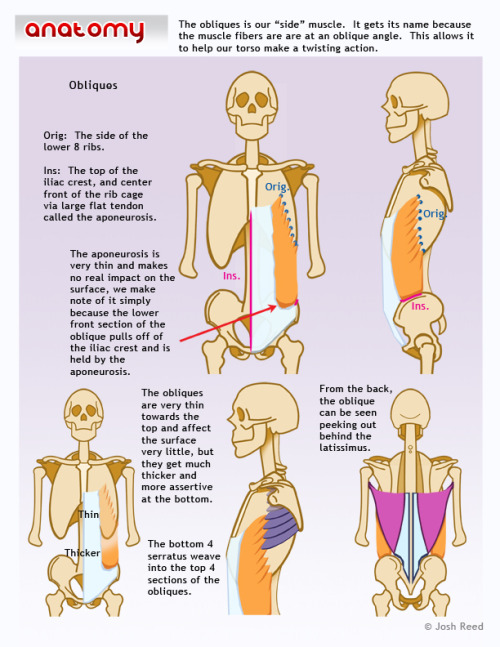
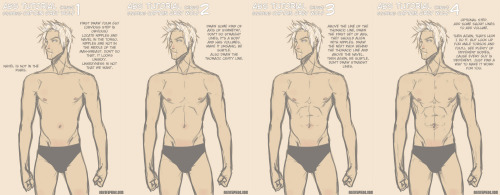
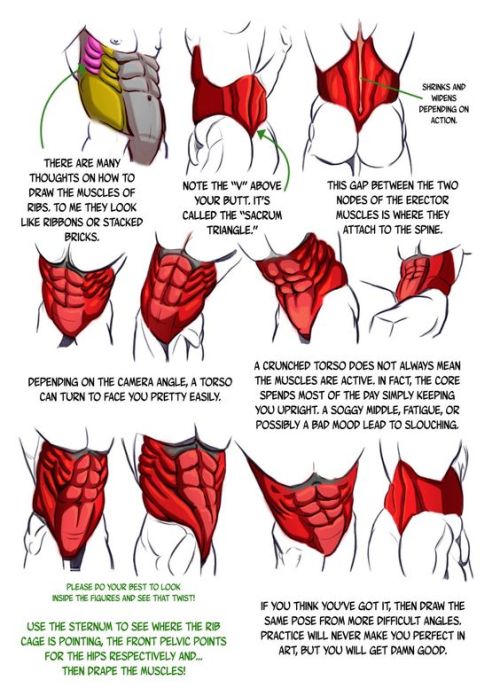
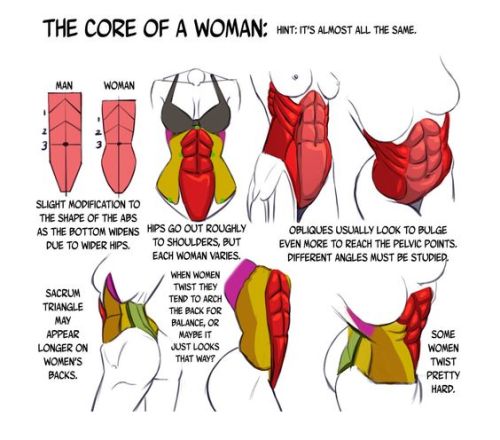
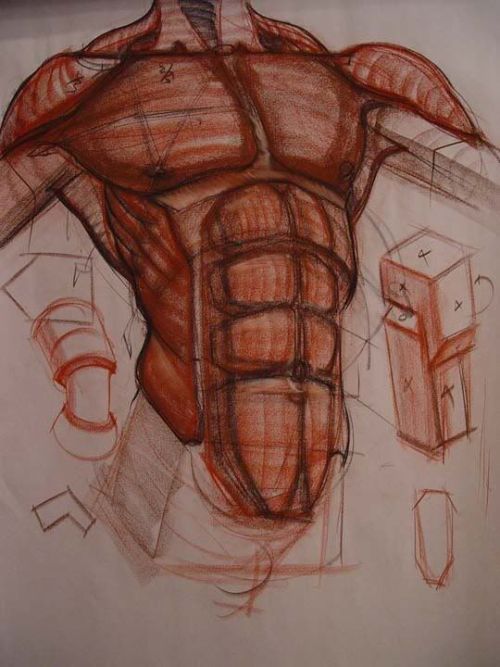

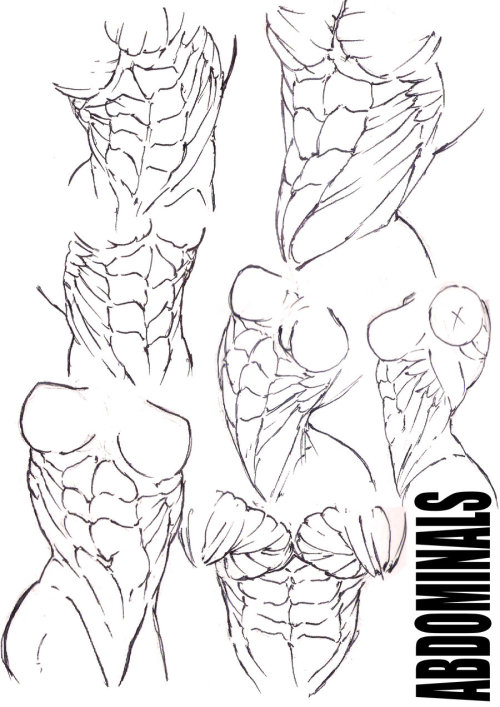

How to Draw Abdominals Top Image Row 2: by Josh Reed Row 3 Row 4: by NemanJa Filipovic Row 5: by Charles Hu Row 6 & 7


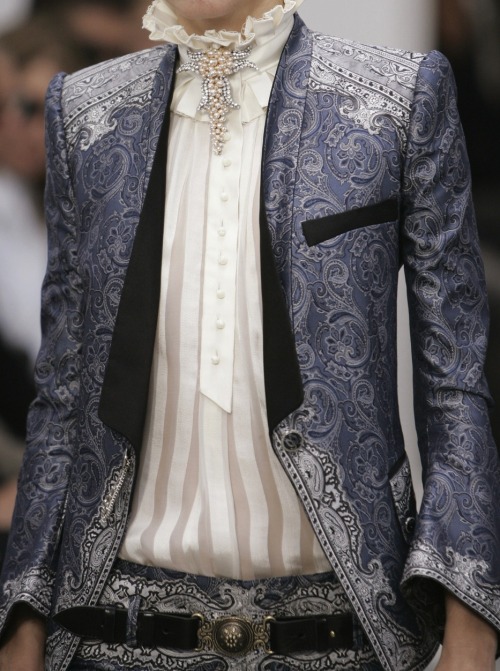
Balenciaga SS 06


Costume designed by Sandy Powell for Tom Cruise in Interview with a Vampire (1994)
From the collection of Larry McQueen on Pinterest


The World’s Most Beautiful Library Is In Prague, Czech Republic


8 Wedding Veil Styles
1. Angle
The Angle is a type of wedding veil that can be worn to the side of the head giving you a slight angle to the front (or to the back of the crown). This particular example features soft illusion netting and is finished with bobby pin loops for easy addition to a fascinator (fascinator example shown in photo below, right).

2. Bavolet
A Bavolet veil has a blusher veil on the front with a back snood style (snood refers to a type of garment worn at the back of a woman’s head). These two types of veils – the blusher and the snood – are sewn together to create one veil. In this particular example, the front veil can be flipped for the reception to provide another look.

3. Blusher
A blusher veil is very versatile and can be worn on the side of the head, back of the head, or flipped for a snooded look at the reception.

4. Elbow Length
This next style offers a dramatic look with fullness. An elbow length veil traditionally hits at your elbow and this particular example measures 32″ in length; it also features a corded edge. Elbow length wedding veils can be one-tiered (as shown) or two-tiered for additional fullness.

5. Fingertip Length
The fingertip length veil is a traditional choice and, as shown below, can be made in a two-tiered style for added volume. The second tier can be used as a blusher when you walk down the aisle, which can be then worn back during the reception. As the name suggests, this veil measures approximately to the length of your fingertips.

6. Cap
The cap refers to the portion of the veil that sits atop the head and frames the face. This particular example, for instance, uses ribbon to create a capped look that is simply timeless.

7. Mantilla
A mantilla veil is one that is lined with a wide edging of lace. This example below uses Alencon lace to frame your face beautifully.

8. Cathedral
The Cathedral veil makes a statement with its floor-length elegance. This veil can measure between lengths of 6 feet, 7 feet, 8 feet, or even 9 feet.

-
 misssickn liked this · 11 months ago
 -
 felidaefelicis liked this · 1 year ago
 -
 juliamccartney reblogged this · 1 year ago
 -
 fyn-rakkaus liked this · 1 year ago
 -
 fearowkenya liked this · 1 year ago
 -
 vidramon liked this · 1 year ago
 -
 citrus-cactus reblogged this · 1 year ago
 -
 galaxy-wing liked this · 1 year ago
 -
 frederickastrange reblogged this · 1 year ago
 -
 vensram liked this · 1 year ago
 -
 beetrans liked this · 1 year ago
 -
 ace-sailor-uranus reblogged this · 1 year ago
 -
 urdchama reblogged this · 1 year ago
 -
urdchama liked this · 1 year ago
-
 art-refs-galore reblogged this · 1 year ago
 -
 yrffobd liked this · 1 year ago
 -
 ceopacetu liked this · 1 year ago
 -
 mewmewti liked this · 1 year ago
 -
 wolfsrahne28 liked this · 1 year ago
 -
 chervia-art liked this · 1 year ago
 -
 madaei reblogged this · 2 years ago
 -
 megacomputer-art liked this · 2 years ago
 -
 ghostenjoyer liked this · 2 years ago
 -
 oniishi liked this · 2 years ago
 -
 vtori73-artblog reblogged this · 2 years ago
 -
 fluxchix reblogged this · 2 years ago
 -
 axybotyl liked this · 2 years ago
 -
 brunocardosoart liked this · 2 years ago
 -
 aquarianish liked this · 3 years ago
 -
 virgichuu liked this · 3 years ago
 -
 starsoftheuniverse liked this · 3 years ago
 -
 tutoriarts reblogged this · 3 years ago
 -
 mikkidarling liked this · 3 years ago
 -
 dragonbleps liked this · 3 years ago