Demashita! Powerpuff Girls Z Prototypes
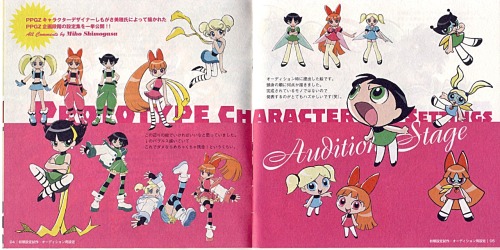
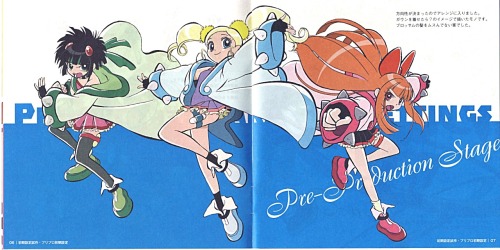
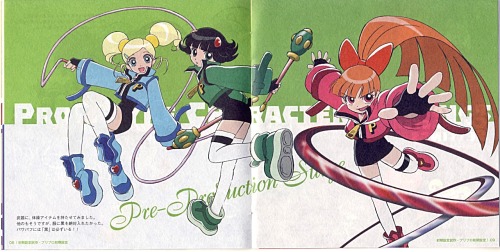

Demashita! Powerpuff Girls Z prototypes
More Posts from Zelo-ref and Others
The 44th Tokyo Motor Show 2015

Daihatsu D-Base

Daihatsu Hinata

Daihatsu Nori Ori

Daihatsu Tempo

Datsun GO-Cross

Lexus LF-FC

Mazda RX-Vision

Mercedes-Benz Vision Tokyo

Mitsubishi eX

Nissan 2020 Vision Gran Turismo

Nissan IDS

Nissan Teatro for Dayz

Subaru Impreza 5-door

Subaru VIZIV Future

Suzuki Air Triser

Suzuki Ignis-Trail

Suzuki Mighty Deck

Toyota FCV Plus

Toyota JPN Taxi

Toyota Kikai

Toyota S-FR

Yamaha Sports Ride

(If you haven't answered this before) how do you do shading?
i havent !! and. i cant say this is gonna be any help but heres some of the things i try to keep in mind when im shading stuff

so youve got your flats on your initial drawing, the thing thats getting the business

then youve got find out where the light is coming from ! your light source is gonna determine where all the highlights and shadows are cast, and while it doesnt have to be EXACT, its generally a good rule to keep it pretty consistent through the drawing - sometimes youll probably have to deal with multiple sources, and each ones gonna be casting its own light and shadow ( and color by extension )

the intensity and sharpness of your shadows generally also reflects the brightness or closeness of the light ! basically if you wanna make something look BRIGHT, you gotta make sure the shadows are dark enough to get the idea across

so the actual shading part - the way i shade is by getting a brush on a very low opacity, picking the color i want for shadows and then layering the strokes over and over until i get about the darkness i want ( because im LAZY and i dont actually work with complex backgrounds a bunch, i can usually get away with drawing the shadows directly on the locked flat colors layer so theres nothing to clean up after )

afterwards i clean it up a little if i need to, add highlights while keeping in mind where the light is coming from, and start on the Detail Work ( it also might be helpful to keep in mind that highlights dont always go on the EDGE of things, but rather where the curve of something is - where the light would catch. this can help add a little depth and make flat things look rounded out ! )

and THEN its basically me zooming into the drawing at least 200%, putting another layer over the top of everything, and going over the outlines with a tiny brush so the harsh black is mostly gone ! there shouldnt be anything along the edge thats darker than the darkest part of the shadow ( with exceptions like the eyes and nostrils )
and thats mostly it ! i picked red for the shadow color, but picking your shading ( and flats ! ) based on the colors in your background can go a LONG way into making it seem like your character is actually in the environment

reflective light is also an important thing to keep in mind when choosing shadows and highlights - light and color doesnt always just hit an object and stay there, and even in the shade there could be light bouncing back from stuff like water or grass creating smaller, subtle highlights along the edges of things close by
not everything reflects the same way either ! something like a piece of wood is going to react differently than say, a metal ball

so you get your light source, basic highlights and shadows, not bad ! but then theres ALSO the light reflecting from the rest of the environment along the edge of the ball, and then finally the color from both the dragon and the ball reflecting a bit on each other
honestly though these arent RULES of drawing and more just guidelines i work with sometimes, and maybe your style of shading and highlighting looks completely different than this and thats ok !! - im still figuring a bunch of stuff out about light and reflections myself, and the great thing about art is that you can do whatever the hell you want with it


Notes on Character Design
Character design and drawing are tome-sized topics and even if I had all the answers (I don’t - I have a lot to learn), I’m not sure I could communicate them effectively. I’ve gathered some thoughts and ideas here, though, in case they’re helpful.
First, some general things: - Relax and let some of that anxiety go. This isn’t a hard science. There’s no wrong way, no rigid process you must adhere to, no shoulds or shouldn’ts except those you designate for yourself. This is one of the fun parts of being an artist, really - have a heady good time with it.
- Be patient. A design is something gradually arrived at. It takes time and iteration and revision. You’ll throw a lot of stuff away, and you’ll inevitably get frustrated, but bear in mind the process is both inductive and deductive. Drawing the wrong things is part of the path toward drawing the right thing.

- Learn to draw. It might seem perfunctory to say, but I’m not sure everyone’s on the same page about what this means. Learning to draw isn’t a sort of rote memorization process in which, one by one, you learn a recipe for humans, horses, pokemon, cars, etc. It’s much more about learning to think like an artist, to develop the sort of spacial intelligence that lets you observe and effectively translate to paper, whatever the subject matter. When you’re really learning to draw, you’re learning to draw anything and everything. Observing and sketching trains you to understand dimension, form, gesture, mood, how anatomy works, economy of line; all of the foundational stuff you will also rely on to draw characters from your imagination. Spend some time honing your drawing ability. Hone it with observational sketching. Hone it good.
I don’t think I’ve ever seen anyone do this sort of thing better than Claire Wendling. In fact, character designs emerge almost seamlessly from her gestural sketches. It’d be worth looking her up.
- Gather Inspiration like a crazed magpie. What will ultimately be your trademark style and technique is a sort of snowball accumulation of the various things you expose yourself to, learn and draw influence from. To that effect, Google images, tumblr, pinterest and stock photo sites are your friends. When something tingles your artsy senses - a style, a shape, a texture, an appealing palette, a composition, a pose, a cool looking animal, a unique piece of apparel, whatever - grab it. Looking at a lot of material through a creative lens will make you a better artist the same way reading a lot of material makes a better writer. It’ll also devour your hard drive and you will try and fail many times to organize it, but more importantly, it’ll give you a lovely library of ideas and motivational shinies to peruse as you’re conjuring characters.
- Imitation is a powerful learning tool. Probably for many of us, drawing popular cartoon characters was the gateway habit that lured us into the depraved world of character design to begin with. I wouldn’t suggest limiting yourself to one style or neglecting your own inventions to do this, but it’s an effective way to limber up, to get comfortable drawing characters in general, and to glean something from the thought processes of other artists.

- Use references. Don’t leave it all up to guessing. Whether you’re trying to design something with realistic anatomy or something rather profoundly abstracted from reality, it’s helpful in a multitude of ways to look at pictures. When designing characters, you can infer a lot personality from photos, too.


And despite what you might have heard, having eyeballs and using them to look at things doesn’t constitute cheating. There’s no shame in reference material. There’s at least a little shame in unintentional abstractions, though.
Concepts and Approach:
- Break it down. Sometimes you have the look of a character fleshed out in your mind before putting it to paper, but usually not. That doesn’t mean you have to blow your cortical fuses trying conceive multiple diverse designs all at the same time, though. You don’t even have to design the body shape, poses, face, and expressions of a single character all at once. Tackle it a little at a time.

The cartoony, googly eyed style was pre-established for this simple mobile game character, but I still broke it into phases. Start with concepts, filter out what you like until you arrive at a look, experiment with colors, gestures and expressions.
- Start with the general and work toward the specific. Scribbling out scads of little thumbnails and silhouettes to capture an overall character shape is an effective way begin - it’s like jotting down visual notes. When you’re working at a small scale without agonizing over precision and details, there’s no risk of having to toss out a bunch of hard work, so go nuts with it. Give yourself a lot of options.

Here’s are some sample silhouettes from an old cancelled project in which I was tasked with designing some kind of cyber monkey death bot. I scratched out some solid black shapes then refined some of them a step or two further.
Here’s an instructional video by Feng Zhu about doing much the same thing (only way better).
- Shapes are language. They come preloaded with all sorts of biological, cultural and personal connotations. They evoke certain things from us too. If you’re ever stuck about where to go with your design, employ a sort of anthroposcopy along these lines - make a visual free association game out of it. It’ll not only tend to result in a distinguished design, but a design that communicates something about the nature of the character.

Think about what you infer from different shapes. What do they remind you of? What personalities or attitudes come to mind? How does the mood of a soft curve differ from that of a sharp angle? With those attributes attached, how could they be used or incorporated into a body or facial feature shape? What happens when you combine shapes in complementary or contrasting ways? How does changing the weight distribution among a set of shapes affect look and feel? Experiment until a concept starts to resonate with the character you have in mind or until you stumble on something you like.
If you don’t have intent, take the opposite approach - draw some shapes and see where they go. (It’s stupid fun.)

You might also find it helpful to watch Bobby Chiu’s process videos in which he feels out his character designs as he paints.
- Cohesion and Style. As you move from thumbnails to more refined drawings, you can start extrapolating details from the general form. Look for defining shapes, emergent themes or patterns and tease them out further, repeat them, mirror them, alternate them. Make the character entirely out of boxy shapes, incorporate multiple elements of an architectural style, use rhythmically varying line weights - there are a million ways to do this

Here’s some of the simple shape repetition I’ve used for Lackadaisy characters.
- Expressions - let them emerge from your design. If your various characters have distinguishing features, the expressions they make with those features will distinguish them further. Allow personality to influence expressions too, or vice versa. Often, a bit of both happens as you continue drawing - physiognomy and personality converge somewhere in the middle.

For instance, Viktor’s head is proportioned a little like a big cat. Befitting his personality, his design lets him make rather bestial expressions. Rocky, with his flair for drama, has a bit more cartoon about him. His expressions are more elastic, his cheeks squish and deform and his big eyebrows push the boundaries of his forehead. Mitzi is gentler all around with altogether fewer lines on her face. The combination of her large sleepy eyes and pencil line brow looked a little sad and a little condescending to me when I began working out her design - ultimately those aspects became incorporated into her personality.

I discuss expression drawing in more detail here (click the image for the link):
- Pose rendering is another one of those things for which observational/gesture drawing comes in handy. Even if you’re essentially scribbling stick figures, you can get a handle on natural looking, communicative poses this way. Stick figure poses make excellent guidelines for plotting out full fledged character drawings too.

Look for the line of action. It’ll be easiest to identify in poses with motions, gestures and moods that are immediately decipherable. When you’ve learned to spot it, you can start reverse engineering your own poses around it.
- Additional resources - here are some related things about drawing poses and constructing characters (click the images for the links).


Lastly…
- Tortured rumination about lack of ability/style/progress is a near universal state of creative affairs. Every artist I have known and worked with falls somewhere on a spectrum between frustration in perpetuity and a shade of fierce contrition Arthur Dimmesdale would be proud of. So, next time you find yourself constructing a scourge out of all those crusty acrylic brushes you failed to clean properly, you loathsome, deluded hack, you, at least remember you’re not alone in feeling that way. When it’s not crushing the will to live out of you, the device does have its uses - it keeps you self-critical and locked in working to improve mode. If we were all quite satisfied with our output, I suppose we’d be out of reasons to try harder next time.
When you need some reassurance, compare old work to new. Evolution is gradual and difficult to perceive if you’re narrowed in on the nearest data point, but if you’ve been steadily working on characters for a few months or a year, you’ll likely see a favorable difference between points A and B.
Most of all, don’t dwell on achieving some sort of endgame in which you’re finally there as a character artist. There’s no such place - wherever you are, there is somewhere else. It’s a moving goal post. Your energy will be better spent just enjoying the process…and that much will show in the results.

Evening dress, 1907-08
From the Muzej za umjetnost i obrt, Zagreb


Bummed that I didn’t manage to photograph (so sorry for the bad quality) this bugger of a blade properly but kind of happy (always hard to part from such time consuming projects) that got it sold so fast at Turku Medieval fair. Have to start crafting more blades as soon as possible.


DIY Shell Wrap Bracelet
Make this easy boho beachy wrap bracelet using just a few supplies.
Learn how to create summer charms for this bracelet, using copper headpins, shells, and wooden beads.
Find this DIY Shell Wrap Bracelet Tutorial from Happy Hour Projects here.
More Beachy Shell Summer DIYs
TIP: Shells can be bought at the Dollar Store and Craft Stores.
DIY Gold Ordon Inspired Shell Ankle Cuffs from Honestly WTF here.

DIY Shell Bracelet with Sliding Knot Closure from Happy Hour Projects here.

DIY Shell Candles from Burkatron here.

DIY Seashell Jewelry Tutorial from Polka Dot Chair for Everything Etsy here.

DIY Knockoff Fortalezza Shell Ring from you want me to buy that? here. Spend $225 for the “real deal”, o a few minutes and dollars to make your own.

DIY Kelly Wearstler Knockof Metallic Sea Shell Earrings from Honestly WTF here.

DIY Inspiration Shell Collage from A Mermaid’s Tale here. Match items from nature, like shells and rocks, with quotes or words that have meaning to you or loved ones.

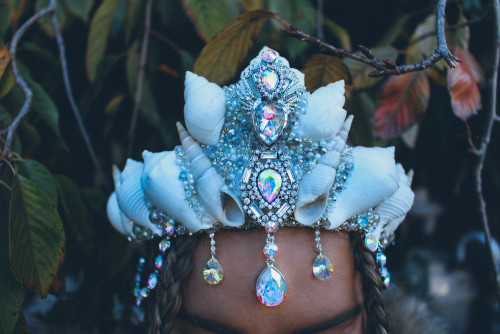
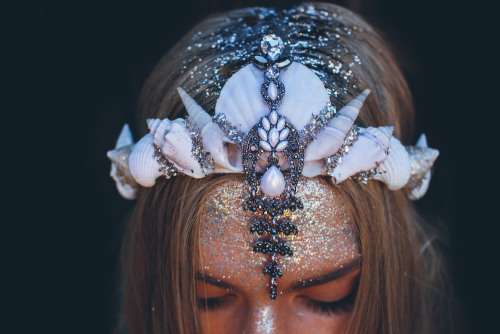
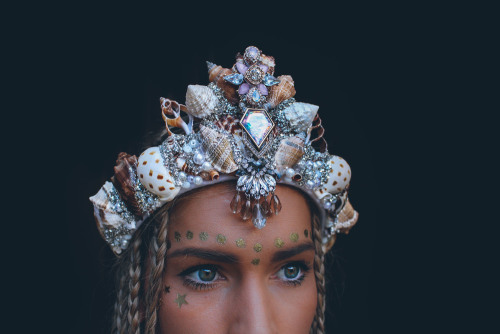
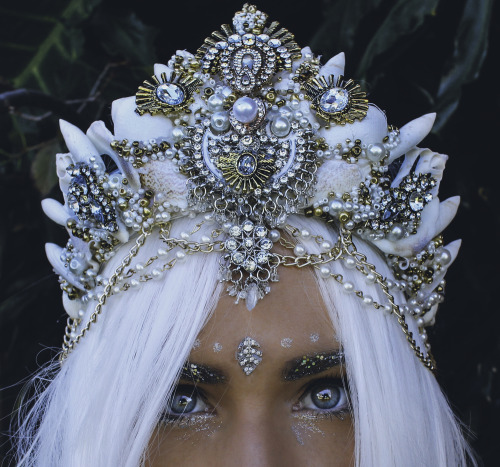
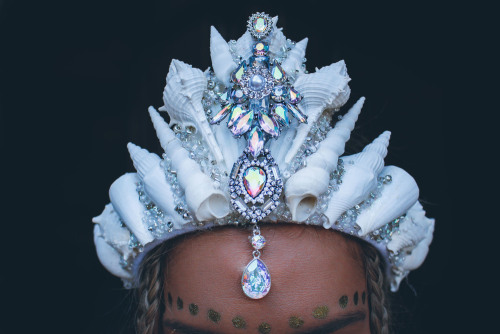

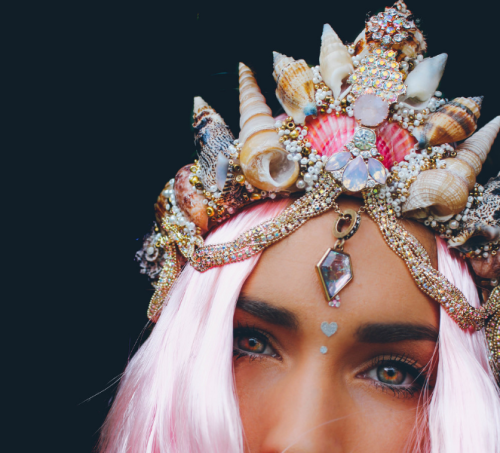
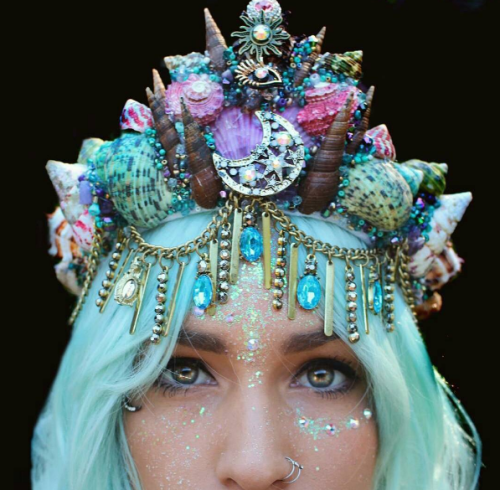
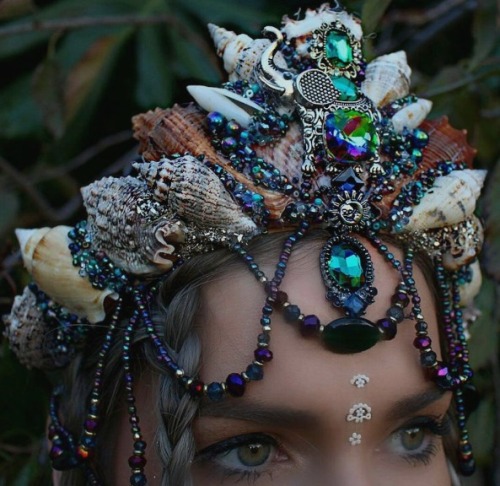
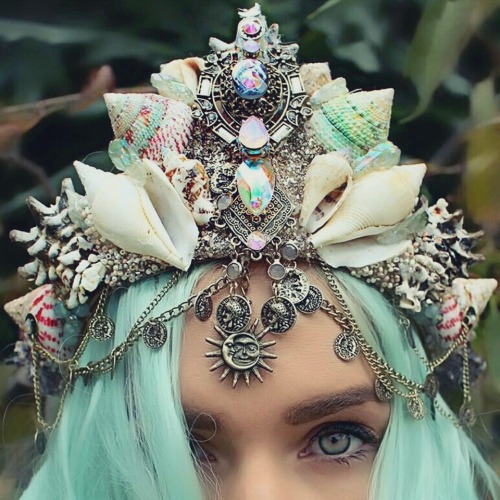
“Mermaid Crowns” by Chelseas Flowercrowns
Chelsea started as a florist in Melbourne, Australia when she was a teenager and has always been passionate about nature and floristry. She then began to create flowercrowns to cover her scar on her forehead, which was a result of an incident when she was just a baby. At the time flowercrowns were just beginning to be sold in shops, however majority of other crowns lacked detail and individuality. Chelsea saw this as an opportunity to not only create crowns for herself, but for others around her who wanted something different yet beautiful.
Over time, she expanded her range to Mermaid Crowns which have taken the world by storm. Her Mermaid Crowns allow girls alike to be the mermaid they always dreamed of since being a little girl.
Follow her journey via social media, and if you would like to access your inner Ariel, purchase a crown from her shop or etsy.


-
 blossomleo liked this · 1 month ago
 -
 ghost-zoast liked this · 1 month ago
 -
 twistys-magia liked this · 1 month ago
 -
 cosmixzpunk liked this · 1 month ago
 -
 nctyaoi liked this · 1 month ago
 -
 sittadehl reblogged this · 2 months ago
 -
 tsubasabasahazard liked this · 2 months ago
 -
 taye0925 liked this · 2 months ago
 -
 zansblue-mj liked this · 2 months ago
 -
 steadyconnoisseurnacho liked this · 2 months ago
 -
 pagonmoon reblogged this · 2 months ago
 -
 mkm4002 liked this · 3 months ago
 -
 ieryyfryctu liked this · 3 months ago
 -
 ardaozcan liked this · 3 months ago
 -
 niniiii2245666777 liked this · 4 months ago
 -
 km-navia liked this · 4 months ago
 -
 theapolloslyre liked this · 5 months ago
 -
 sleepydreameroncloud9 reblogged this · 5 months ago
 -
 shadyruinsllama liked this · 5 months ago
 -
 aztec-ahuizotil reblogged this · 5 months ago
 -
aztec-ahuizotil liked this · 5 months ago
-
 emil162 liked this · 6 months ago
 -
 lancefiore reblogged this · 6 months ago
 -
lancefiore liked this · 6 months ago
-
 tsmf829 liked this · 6 months ago
 -
 randoomantagonist reblogged this · 7 months ago
 -
 tessaigaa reblogged this · 7 months ago
 -
 tooncartoons reblogged this · 7 months ago
 -
 kurononuma reblogged this · 7 months ago
 -
 gamecents liked this · 7 months ago
 -
 syrenix12 liked this · 7 months ago
 -
 sluttyyeag reblogged this · 8 months ago
 -
sluttyyeag liked this · 8 months ago
-
 shinniekin reblogged this · 8 months ago
 -
shinniekin liked this · 8 months ago
-
 kai-kai50 liked this · 8 months ago
 -
 inanna-blabbers reblogged this · 8 months ago
 -
 deadst0ckroryy liked this · 8 months ago
 -
 pyreflydust liked this · 9 months ago
 -
 err0r404not reblogged this · 9 months ago
 -
err0r404not liked this · 9 months ago
-
 maxtheg-askthevoltroverse reblogged this · 9 months ago
 -
 korora12 liked this · 9 months ago
 -
 asexualatsushi liked this · 9 months ago
 -
 littleeyesofpallas reblogged this · 9 months ago
 -
 mollysunder reblogged this · 9 months ago
 -
 inanna-was-here liked this · 9 months ago