Shadow Work
Shadow work
Hello friends.
I’ve recently been delving into shadow work and OUCH.
It hurts but it is SO necessary. Processing trauma and learning and healing is WORTH IT. Get to know yourself and spend time with you.
I’ve found incredible meaning behind my “negative” thoughts, habits, responses, actions and behaviors.
Really be honest with yourself and reflect on who you are. Do not judge yourself.
Some prompts I’ve tried include:
What are you in search of?
What are you neglecting to heal?
Where are you directing your energy?
What is one thing that has happened in your life that made you feel weak or powerless?
What are your triggers?
In what ways are you being inauthentic with yourself and others?
If you want to start please proceed with caution. It’s heavy stuff. Take care of yourself before and after. Be kind to yourself. Notice and be aware of how this practice changes you.
If you need professional help please seek it. This is not meant to replace therapy or having a good support system.
Embrace your shadow self my lovelies ✨
More Posts from Thesoftestwitch and Others
Why Dream Dictionaries are Mostly Garbage: Raven’s Guide to Dream Interpretation.
{Note: the following post is heavy UPG based upon over a decade of personal experience, research and observation.}
The problems with dream dictionaries is they are based on the premise of “universal symbols”. The issue with this is while dreaming does operate in the language of symbolism it’s overlooks the personal elements. Dreams speak through the languages of symbols and emotions, and these symbols are highly personal. Picture that when you dream you are putting on a play but here’s the kicker, you are everything in the play, from the other actors (in includes family members and people you know), the backdrop, the props, scenery, the animals, monsters - it is all you. Everything is a message from your subconscious to you., and it your job as the dreamer to learn the language. So how do we go about interpreting the dream? Well I’ll get to that but first things first. Dream journal. Now I know you will see pretty much every dream relate thing telling you to keep a dream journal, and their absolutely right. A dream journal is vital for your dreamwork, it is the link between worlds. By keeping a record of your dreams you are creating an open dialogue with your deeper mind. And it’s oaky if you can’t remember your dreams, even if you wake up with just a vague impression or just an emotion, even the weird dreams that seem to make no sense at all, write it all down. You are learning a new language from first hand experience and creating your own translation guide. By journaling you are encouraging and strengthening your long-term memory, it just takes dedication.You will begin to notice the pattern and reoccurring themes in your dreams when you go back and review your entries. So how do we interpret our dreams? This my 4 step process:
First Step - How do you feel over all in the dream?
Second Step - What parts of the dream stood out to you the most?
Third Step - What do these things personally represent to me?
Fourth Step - How do these things make me feel?
Like I mentioned above everything in your dream is a representation of some part of you, and how you feel about it is a vital part of understanding what it means. Just remember nothing is what it seem, nothing is literal. It is important that you take your time when working with a dream, you can carefully and attentively peeling away the layers to expose the core, and thus the meaning of the dream and it’s message. And don’t feel discouraged if you don’t get it write away, some dreams takes days, weeks, months, even years to understand, which is another reason why keeping a dream journal is so important so that you can keep revisiting these dreams as you grow and changes as a person.
Four beginner witch tips that ~aren’t~ basic
If you can’t get a lot of candles to seal your spell jars, melt crayons and use them! They’re wax as well and believe you me, it works. (Lowkey this tip has been saving my life)
Warding doesn’t have to be complex- tape up sigils around your space, draw an evil eye talisman, sprinkle around some salt, whatever.
Your grimoire can be whatever you want it to be. I tried to have a journal grimoire, but now I’m switching to a typed grimoire and a separate BOS which i’ll transition into two binders. (This is going to cure my scatterbrain)
Sigils can be whatever you want them to be as well. Decorate them, make them gorgeous and intricate, make them look like doodles, whatever you want. Sigils are an expression of your personal intention
If this post does well I can do a part 2! Comment your beginner witch tips!
Blessed be!

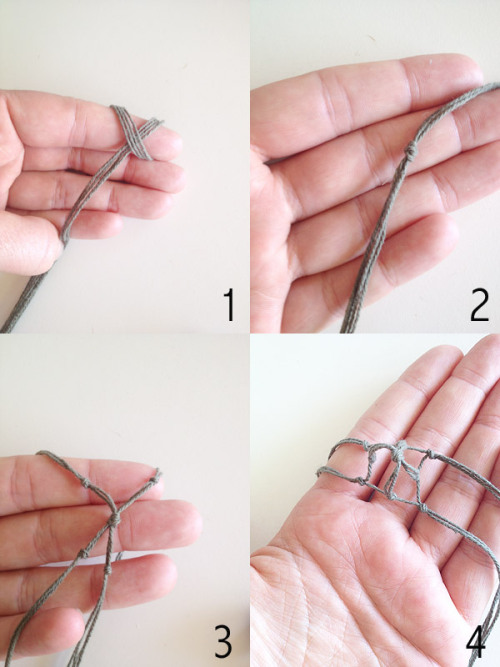
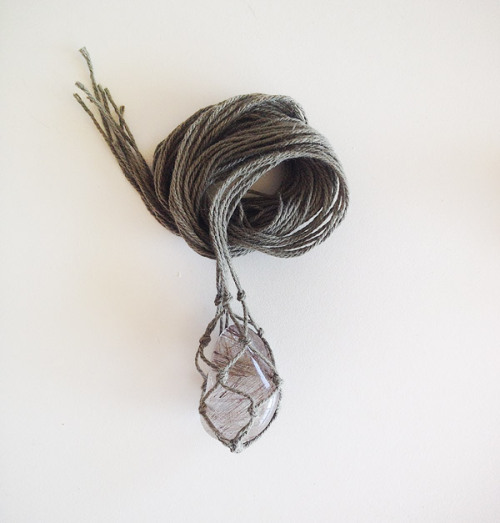
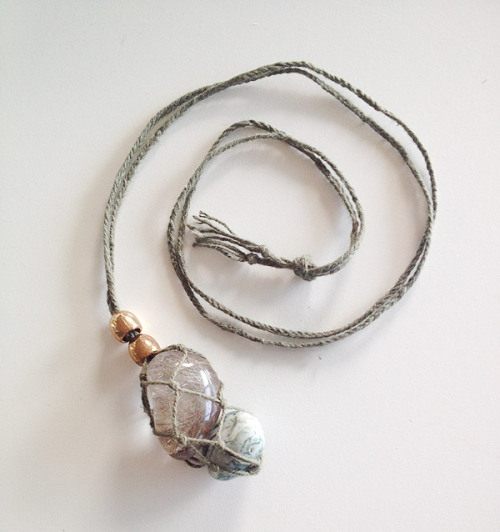
DIY Gemstone Necklace
✖✖✖✖✖✖✖✖
sew-much-to-do: a visual collection of sewing tutorials/patterns, knitting, diy, crafts, recipes, etc.
Simple Ways to Connect with Nature
Nature is my best friend, and often I feel disconnected from it. It’s important to ground yourself with nature, and feel one with it. Nature is the foundation of our lives, holding so much positive energy. You can easily harness this energy in many ways! So if you’re busy or just simply lazy, but would like to connect with nature, try some of these quick and helpful tips! Remember, always be aware of your surroundings and be careful!
Make contact with the earth. Take a walk in the grass barefoot, hug a tree, plant something with your bare hands, meditate on the dirt.
Have indoor plants. Not only do they freshen the air around you, but each plant brings it own unique benefits as well, such as mood boosters.
Open your window and blinds. Breathe in the fresh air and take in your outdoor surroundings.
If possible, do what you do indoors, outdoors! Even if you’re just sitting on a patio, you can still enjoy the benefits of the outdoors while doing what you need to do.
Collect outdoor elements. Often I see witches decorate their altar with outdoor elements. This is a simple and effective way to better your connection with nature.
I hope you find this useful! xx ~ @chlovoyant
Historical Witchcraft 101: The Compilation
My historical witchcraft series is (for now) finally over! Thanks everyone to all the support I got, I’m really glad you seemed to enjoy those posts as much as I enjoyed making them. Feel free to message me about things you’d like to see from me in the future!
For ease of reference, I thought I’d compile all the posts here:
Witch Bottles
Witch Ladders
The Toad Bone
Poppets
Hag Riding
Familiar Spirits
The Witches’ Sabbat
Flying Ointment
Shapeshifting
quick witch tip #2
quick witch tip: wear black pajamas to bed so you'll be protected during the night from any evil spirits or bad dreams!
black is a protective color!
The most important witch tip you will ever read
NEVER abandon professional medical advice and help in favour of witchcraft methods.
Travel Altar/ Altar in a Box
I have a cat and my cat is an asshole. I’d love to have a big beautiful altar set up on my dresser, but Pip is the kind of cat that likes to knock things off of high places, take things that don’t belong to her and run, and hide things. To get around this, I decided to make an altar in a box. I used the small box that I already had, but you can use any size or shape box that you want!
I started with a box. Obviously. I got mine from Hobby Lobby ages ago and had stained it with a dark stain and put box corners on it so that it looked nice. I had been using it as a catch-all for oddities and found objects, but decided that I would have to use it for my altar, as it’s the only box that I have.
Step one was already done, as I had done it last year. Decorate the box. Like I said, I stained mine and added some dark box corners. I also used black ink to darken up the gold clasp so that it wasn’t so bright in comparison to the rest of the box. I wanted it to look a bit more vintage and worn.

Next, I cut a rectangular piece of fabric to line the box with. I forgot to take a picture of the fabric before gluing it in, so I quickly cut out this smaller piece to show you what I did. In order to make sure that the cloth lay flat around the edges and not bunch up, I cut off the corners. Like so.

And then I used hot glue to attach it to the box. I folded the raw edges of the fabric under so that they were hidden and the finished product looked a bit cleaner. This step was an absolute pain and I burned my fingers on the glue a few times.

After that, I cut a piece of thick board to fit inside the box. You could use cardboard or chipboard, too. I used what I had on hand. This piece of board will be used a shelf. You’ll see what I mean later. Here, I’m just making sure that the board fits. I actually ended up cutting it down a bit, because with the fabric lining in, and taking into account the fabric that will be covering the board itself, it was a bit too wide to fit inside the box.


Once I was confident that I’d cut it down to a size that would fit, I covered it with the same fabric I used to line the box. This picture shows the underside of the board where the fabric was glued down.

Next was probably the easiest step - gluing that board into the box to make our shelf. The board is glued onto the lid of the box so that when it’s closed, it sits flat against the back wall of the box, and when it’s open, it makes a little shelf! If you make this box, be sure to make the shelf narrow enough that you can still close your box. You don’t want it hitting the bottom and preventing the lid from closing all the way.

Next, we add the ribbon to the sides so that the lid stays upright when the box is open instead of falling back. Without the ribbon, your shelf is useless. I didn’t measure very well, just made sure that the ribbon wasn’t too short so that the box wouldn’t open all the way. If you’re using two ribbons like I did, it’s also important to make sure that both pieces of ribbon are the same length.
If you use something other than hot glue, you may want to do this step before you put your lining in. Because I used hot glue, I was able to peel back the front corners of the lining so that I could glue the ribbon down, and then replace the fabric over top so that the end of the ribbon was hidden underneath.

I ran out of hot glue for the second ribbon, so I was forced to switch to E600, which works very very well, but takes some time to dry. I glued down the ribbon and let it dry enough that it wouldn’t move around, then glued the lining back in place. I used binder clips to hold the fabric in place while it dried.

I left the project while it dried and went to eat dinner. When I came back, I was able to take the clips off, and the box was done!

At this point, you can decorate the inside of your box how you see fit! If you make one of these for yourself, be sure to tag me! I’d love to see what you come up with. Happy crafting and blessed be.
Some notes:
When gluing in the lining, put the glue on the box, not the fabric. This allows you to fold under the edge of the fabric and stick it down without burning yourself.
Before you cut your shelf, take into account that there is going to be fabric covering the board and the box, making the fit a bit snugger. Don’t do what I did and cut your board, then have to go back and shave some more material off so that it fits.
MAKE SURE YOU HAVE ENOUGH OF YOUR CHOSEN ADHESIVE TO FINISH THE PROJECT.
If you have fat hands like I do, you may want to use only one ribbon, on the opposite side of your dominant hand. I’m right-handed, so I may end up going back and cutting off the ribbon on the right side of the box.
-Vyrian


SAY THEIR NAMES
source
-
 imcatsnyder liked this · 9 months ago
 -
 candiedgrapes222 liked this · 2 years ago
 -
 alley-pond-two reblogged this · 3 years ago
 -
 justinapatton-fitness liked this · 4 years ago
 -
 erica-talks-tarot liked this · 4 years ago
 -
 tristementhaineusement liked this · 4 years ago
 -
 bug-girl21 liked this · 4 years ago
 -
 steffis liked this · 4 years ago
 -
 sunshine-shawty liked this · 4 years ago
 -
 perpetuallyimmortal liked this · 4 years ago
 -
 bitchimrawlikethat liked this · 4 years ago
 -
 too-short-to-be-a-stormtrooper liked this · 4 years ago
 -
 lvluplyf liked this · 4 years ago
 -
 amoosemused liked this · 4 years ago
 -
 conettprojecttt liked this · 4 years ago
 -
 mooninthird reblogged this · 4 years ago
 -
 lonelysappho liked this · 4 years ago
 -
 annabooks17 liked this · 4 years ago
 -
 maymie692 reblogged this · 4 years ago
 -
maymie692 liked this · 4 years ago
-
 cosmicanimewitch liked this · 4 years ago
 -
 aughrasescape liked this · 4 years ago
 -
 defyinglogicofchaos liked this · 4 years ago
 -
 loudtyrantyouth liked this · 4 years ago
 -
 aduckislord liked this · 4 years ago
 -
 etherealdragonsrealm liked this · 4 years ago
 -
 magpie-art liked this · 4 years ago
 -
 halofcknbby liked this · 4 years ago
 -
 gxrewhxre666 liked this · 4 years ago
 -
 allthe-prettysongs liked this · 4 years ago
 -
 highhhminds liked this · 4 years ago
 -
 hoeonthelow liked this · 4 years ago
 -
 cherry-moonlight liked this · 4 years ago
 -
 swannbluana liked this · 4 years ago
 -
 a-lunar-scorpio liked this · 4 years ago
 -
 magickmeans reblogged this · 4 years ago
 -
 imforevertired liked this · 4 years ago
 -
 mugwortandpatchouli reblogged this · 4 years ago
 -
 whoiskay liked this · 5 years ago
 -
 forestg0ddess liked this · 5 years ago
 -
 robobard reblogged this · 5 years ago
 -
 angelipraesidium liked this · 5 years ago
 -
 thesoftestwitch reblogged this · 5 years ago
