Bestie Can We Get An Egg Tutorial Please? No One Is Doing It Like U…..
bestie can we get an egg tutorial please? no one is doing it like u…..


for sure!! here's a process video and some steps along the way!
first you wanna get yourself a little reference, but as you can see i mostly just use it for inspiration, shape, and base colors. i'm not looking to recreate it realistically. after i get the lines and base colors down i just start slapping MORE colors on that bad boy!! (no blending!!!!) i like to add bits of the background color and whatever color is going to be in the other egg im drawing (in this case it was green) which you can see in the circle around the yolk, which is just a stylistic choice.
umm what else... you gotta make sure to add that pepper... oh and i like to add a lighter version of the background around the white highlights (the highlights are the only place i use pure white and i only accent them with another color sparingly)
hope this helps!!!
More Posts from Nastysynth and Others
Hey how did you do that line effect on your models? asking for a friend.
So for a simple outline the easiest thing to do is open up your properties window (which should be displayed by default on the rightmost side of the screen. It’s got all of your render and output info displayed) and go to the section marked “Post Processing”


Open it and check the box called “Edge.” This’ll give your model a nice little outline when you render it (you can change the color by clicking on the rectangular box underneath the threshold slider)


and that’s just a simple way to get the basic result.
NOW if you’d like something a little more dynamic-looking, like this

Then you’ll want to go back to the properties window and instead of clicking on “Post Processing,” click on the box marked “Freestyle” (it should be at the very bottom)

Now, at the top of the properties window, click on the “Render Layers” tab. It’s gonna look like a stack of photos, right next to tab with the camera on it.

Once you’ve clicked on that, scroll down to the very bottom of the window, and click on “Freestyle Line Style”

Once you’ve opened that up, click on the “Geometry” tab. This’ll let you alter the style of the line.

and now you can add your modifiers! There are a lot of different styles to choose from, so don’t be afraid to experiment with them! “Sinus Displacement” makes a sort of zigzag pattern, “Blueprint” adds in some fancy circles, and “Spatial Noise” or “Polygonization” will typically get you that sort of loose, sketchy look if that’s what you’re going for.


blender is pretty neat, huh!


new video is up
Hey got any tips of drawing in the cr style?
Well first off, study the sprite sheets of the characters. They can all be found on the Cookie Run wiki.To draw in a style it helps to study the style too and figure out the elements of how the characters are put together. For Cookie Run it goes hand in hand with my style because a lot of it is very Geometric. Even with cookies who are oddly shaped.

I talked about this with my Discord once about how basic shapes can really go into making the character design solid and this seems to largely be the basis of how CR renders it’s characters.

Even characters build like Purple Yam and Milk Cookie use this more basic geometry when building the foundation of the character. It all comes down to a more simplistic style based on shapes.

That being said, When I build characters I use basic shapes to do it. That’s why a lot of my earlier drawings of the CR OCs look so different compared to now, because back then I was learning it. The easiest way to do it is to try drawing a CR character, build them as you see them, and then adapt that into how you draw.

And obviously cookies aren’t all the same shape! Shapes really can go into how people will interpret your character and their personality! So don’t be afraid to think outside of the box and look at different shapes for different characters!
That’s about as many tips as I have for now, but that’s the fundamentals over how I go about it.
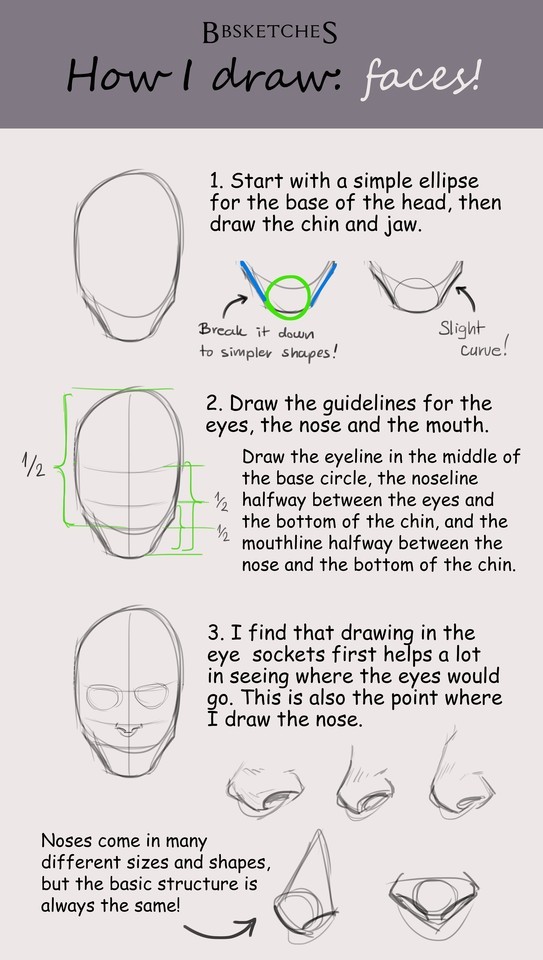

Face tutorial for Anon!
I wasn’t sure whether you meant heads or facial expressions, so here’s a very basic head tutorial! Of course not all faces are the same so proportions and the size of ears/eyes/noses etc. can vary! Feel free to explore and play with them to create unique and interesting characters! I hope this is somewhat helpful, and let me know if you’d like a tutorial on expressions as well!
Tusks!

no trouble at all! Here are some visual notes on how i approach orc teeth.
1: get familiar with the structure.

The better you can visualise the structure of teeth and where the tusks “plug in”, the easier step 2 will be.
2: simplify.
You only need to draw what will be visible. Don’t worry about drawing the anatomy right every time. If you get familiar with the structure underneath, it will be easier to spot when something’s off in your sketch.

Works for upper tusks and lower! Visualise –> Simplify


The Back and Spine
How do you draw noses?
I’m not sure what specific part you’re wondering about, so here’s a run-through of my process from sketching to painting!
1) The first thing I do is simplify the nose into a few basic shapes to get a prism-like block, like so:

2) I can now easily draw the prism shape in three-dimensional space depending on the angle and rotation of the head.

3) Using the guidelines/planes I can draw a proper nose in any angle! There aren’t many tricks or shortcuts for this step, unfortunately (other than practicing lots). I recommend using references, they’re always helpful :)
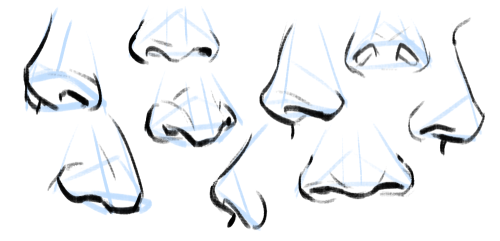
4) Really important to note: all noses vary greatly, especially from different ethnicities! A high-bridge “aristocratic” sort of nose or a ski-slope button nose might be accurate for some people, but definitely not everyone. Compare differences in size, width, a hooked or button nose tip, high or low nose bridge, and so on:

5) Then I paint! I have a skin tone tutorial here, if it helps. Take note of the lighting, skin tone, etc. Here are some things I keep in mind:
For pale skin tones, the nose sometimes has a redder colouration than the rest of the face because of increased blood flow.
The nose also usually has highlights (due to oil). These are located on the tip of the nose, the nostril groove, and where the base of the nose meets the flat area of skin around it!

Hope this helps! In the end, all stylistic choices are completely up to you. Art’s subjective, so feel free to draw any noses you want :)
do you have any tips for drawing a nose when the face is front facing?
This was really fast but I hope this helps:

Depending on the shape of the nose, the way you chose to render the contour lines will change. I used Rose, Quazky, and Glasner as examples in the lower right corner there. For TH, I generally don’t render the bottom of the nose with a line but with a shadow for simplicity’s sake. I hope that makes sense.
PS - I made a new brush for rendering technical drawings and I love it. *A*
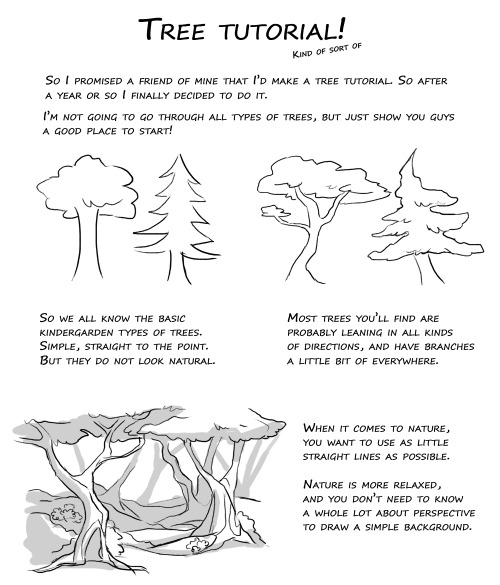
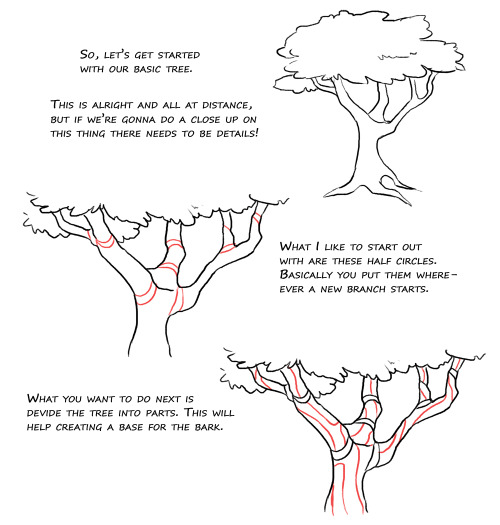

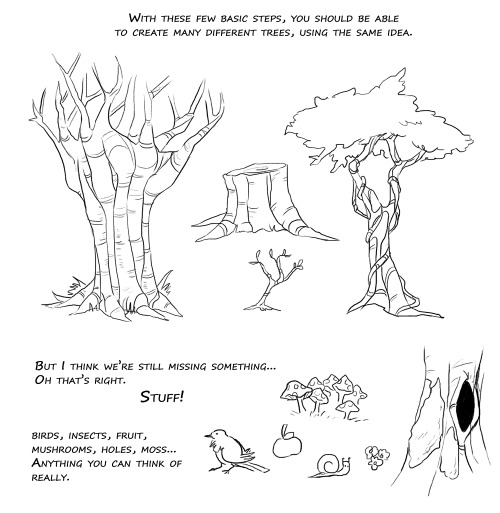

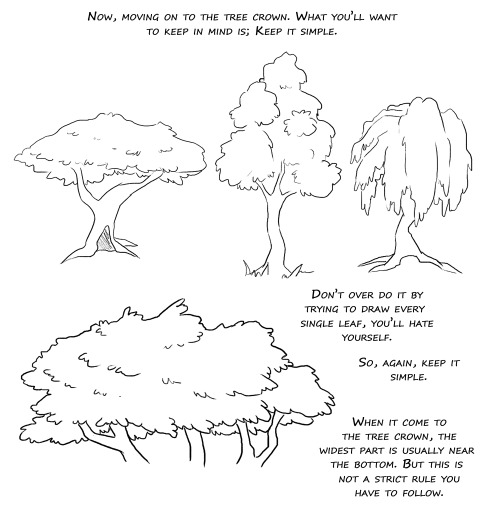


Aaahh so yeah. I’m nothing amazing at trees, but my friend Huispe has been asking for this for such a long time now, I decided to finally do it. Hopefully it can be useful for any of you out there <3 (there’s prolly plenty of typos in there too but I am just so tired right now aughhh)
any tips on how to start out drawing? I'd love to be able to just start being able to doodle characters and have them actually look like that character but I'm sh*t at anything arty lmao
Every time I get a message like this I wonder what’s the thing the person wants to hear. Everything needs time. It’s highly unlikely that a couple of tips will make you draw better right away. But here are some suggestions about what to do.

Keep reading
-
 dopefrickingjelysquid reblogged this · 2 months ago
 -
 notanrp-wow liked this · 9 months ago
 -
 cripp-tid reblogged this · 9 months ago
 -
cripp-tid liked this · 9 months ago
-
 shibee-inu liked this · 1 year ago
 -
 brokenroycrown liked this · 1 year ago
 -
 mstepenwolf liked this · 1 year ago
 -
 chifuwus liked this · 1 year ago
 -
 wiseandromeda reblogged this · 1 year ago
 -
wiseandromeda liked this · 1 year ago
-
 ambagelbraindump reblogged this · 1 year ago
 -
 jesterpanic liked this · 2 years ago
 -
 porch-gremlin reblogged this · 2 years ago
 -
porch-gremlin liked this · 2 years ago
-
 astarss liked this · 2 years ago
 -
 deivid198724 liked this · 2 years ago
 -
 bellz4brainz liked this · 2 years ago
 -
 heliopeia liked this · 2 years ago
 -
 strippedowntothebone liked this · 2 years ago
 -
 somethingdowitharthere reblogged this · 2 years ago
 -
 2001honda-civic liked this · 2 years ago
 -
 crittern liked this · 2 years ago
 -
 holyflippingfaerghus liked this · 2 years ago
 -
 sketchdeath liked this · 2 years ago
 -
 the-sweetest-antidote reblogged this · 2 years ago
 -
 tenderfixation liked this · 2 years ago
 -
 m4ggot-br4in liked this · 2 years ago
 -
 melonkollie liked this · 2 years ago
 -
 heart-horde reblogged this · 2 years ago
 -
 eaudecrow liked this · 2 years ago
 -
 star-spotted liked this · 3 years ago
 -
 birdforce liked this · 3 years ago
 -
 doviesoap liked this · 3 years ago
 -
 justanotherhimbo liked this · 3 years ago
 -
 bbq-grillmaster liked this · 3 years ago
 -
 eldritchgeminidiamond liked this · 3 years ago
 -
 sunreep liked this · 3 years ago
 -
 mwaml liked this · 3 years ago
 -
 voicecracks liked this · 3 years ago
 -
 orcaputt liked this · 3 years ago
 -
 alleeles liked this · 3 years ago
 -
 gurl-look-at-that-sketchbook reblogged this · 3 years ago
 -
 dutchesscoraline liked this · 3 years ago
 -
 daniavento liked this · 3 years ago

Sylwester | i will mostly post sketches, because i'm too lazy to end them
196 posts