Sorry, If You've Answered This Before, But Do You Have Any Tips On Drawing Mouths And Lips?
Sorry, if you've answered this before, but do you have any tips on drawing mouths and lips?
Hello anon! :D I’m not the best at making tutorials and giving tips but I’ll do my best to answer your question! ^^
I sure do love drawing lips! It might be in fact my favourite part of the face to draw.
Let’s see what makes them so irresistible ;)

tip 1: let them shine! that tiny shiny spot does wonders for the lips - it makes them fuller, softer and more three dimensional. It also makes the lips look slightly wet. Sexy!
tip 2: Build the depth with some darker spots. Quirking corners are great for that, and if you make the darkest spot in the middle of the mouth it seems like it’s about to part. And maybe whisper something seductive ;)
tip 3: The very middle of upper lip is my favourite area, it gives the mouth its distinct character. It’s also a great spot to play with shadows, one lighter stroke, one darker stroke and you have a very dramatic shading going on!
tip 4: When drawing lineart it’s good to keep the line varying in width and pressure. Equally thin, flat line might look good in anime, but even there it’s rarely the case. Making the line thicker in the shadowy part of the mouth adds depth to your drawing.
General remarks:
I almost never outline the upper lip, it tends to look weird. Just a thin “U” shape in the middle is usually enough.
Upper lip is usually in the shadow, at least half of it. Lower lip tends to catch the light, especially with pouty plump lips. The more shadow you add under it, the fuller the lips look.
When drawing male characters I usually play around with skin tones instead of pink and red (see the third row of examples). But it’s not a rule. Some boys rock them rosy lips. ;)
Never paint the teeth white, never. Gray, yellowish and pinkish tones are great.
And the final tip: use reference! Look for pictures of people with beautiful lips, with thin lips and full lips, try to see which line goes where and how it changes the shape and expression. I hardly ever draw without a reference.
Good luck! 👄
More Posts from Nastysynth and Others
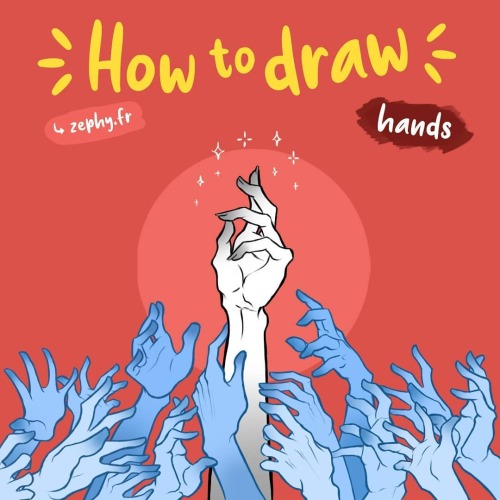
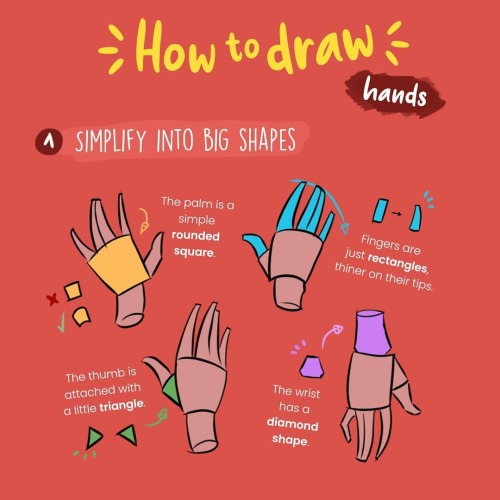
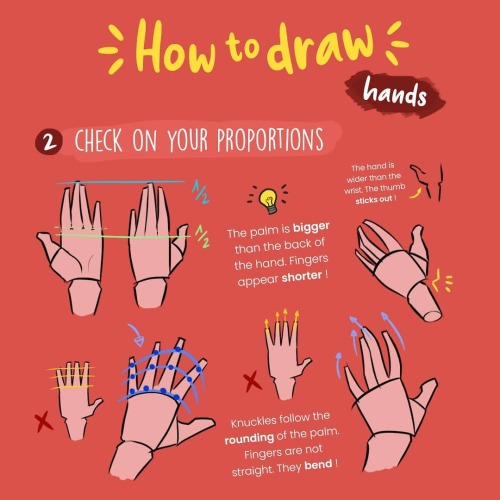
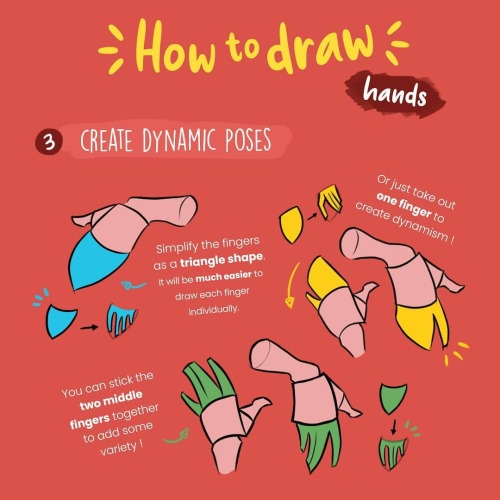

How to Draw Hands by zephy.fr
Support the artist and follow them on instagram!
I was wondering what's your process for creating plants? Specifically where you have to create leaves/flowers/branches out of a stem.
i really enjoy making flowers. basically, when i find one that looks fun to model, i’ll get a few photo references of real flowers, like this one from Home Depot’s website

so i can get a basic idea of their colors and shapes.
after that, i pretty much just make each component separately, one piece at a time. the stem, pistil, and stamen are essentially just long cylinders that widen and narrow at the ends, the leaves and petals start out as circles that i shape and alter over time, and then after coloring and detail work is done i move each separate model into place so that they start to resemble a complete flower


it’s kind of like putting a puzzle together, except you also make each of the pieces.

Goat daddy
actually please don’t call him daddy : (


a few ppl asked a while ago how to do the glitchy texture effect n i never rlly gave a good answer so heres a small tutorial:
1. add a wave modifier first, make the height really small (like 0.1-0.2), turn the speed to 1 and the width to less than 0.4
2. add a subsurf second (sometimes u dont need this one though, its mostly to stop the face/eyes collapsing on low poly models)
3. add a decimate modifier last
can you do a tutorial on how you color your artwork? it's so pretty!! 😍🤩
this is not the best and only way to color but personally i think it’s easy and quite effective for beginner artists who are practicing setting the mood for an artwork or laying out ground work for more detailed illustrations
I’m using Clip Studio Paint for this drawing.
Step 1: The base color

Use magic wand and bucket tool to lay out the base color, you can use different layers for each colors to be more precise, and it’s easier to change the colors later on. I use mainly warm tones for my base color because i prefer the look of it. Step 2: Coloring the lineart

Use a clipping layer above the lineart layer to do this step (there are other ways of course, you can search for them online) Color the lines that isn’t intersected with the background, the inner lines. Especially the skin part to reduce stiffness of the lineart, also help adding shadows.


I usually draw the darkest shadow areas with my lineart so i can color them at the same time.
Step 3: Adding shadow
Group the lineart + base color into 1 big group. Add a clipping layer above that group. Switch the layer mode to “Multiply”. Add the shadow area using a desaturated/grayish hue of your choice to set the mood for the drawing.
Example:
If the mood you want is more broody, use more cool tones (blue, purple,..)


If the mood is more festive or happy, use more warm tones


A drawing should consists both cool AND warm tones, other wise it would look dull. The second example has too much warm tones because the base color is already warm.
Step 4: Add filter layers/adjustment layers
This is where the magic happens. Enhance your art work by adding more Multiply and Overlay layers, set the mood as you like it to look, balancing the tones, play around. I wanted this particular drawing to have an overall cold feeling to it, so I added a blue multiply layer

Adding light with a beige overlay layer, using the airbrush with low opacity. This also help creating contrast between the shadow and light areas

But wait,,, it looks,,,,,, it looks too sad!! they are comforting each other after a terrible situation! Adam is not dead! I need another warm multiply layer!

There, it’s now finished. Quick tip: If your colors are looking off/doesn’t go well with each other, group everything and add a beige multiply layer on top! It would look better instantly! Learning color theory, color harmony also helps A LOT!! find tutorials and study from the masters! Good luck with your art, Anon!
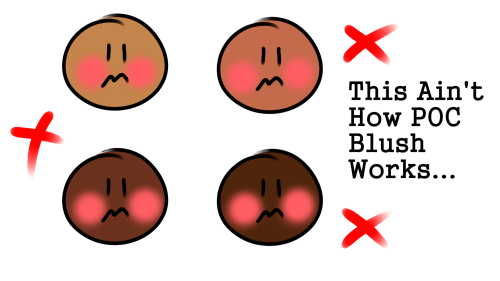
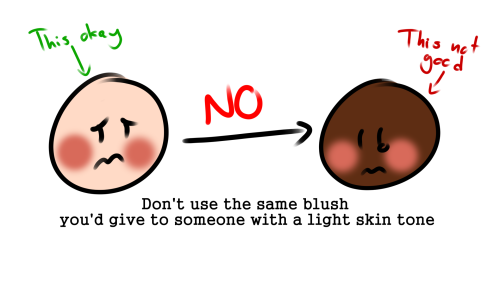
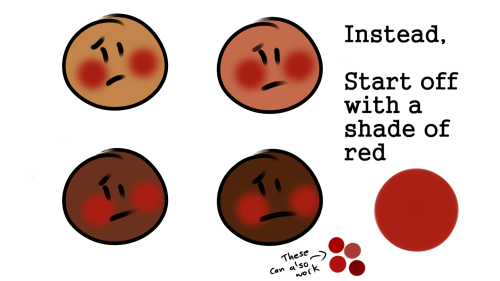

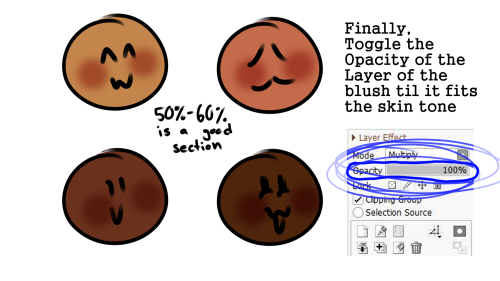
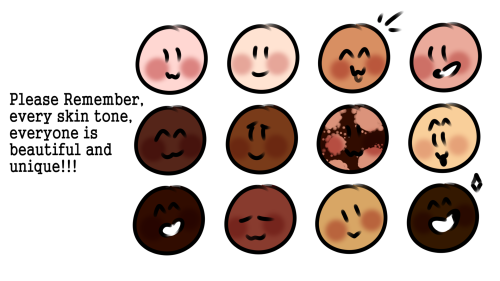
POC blush tutorial
Feel free to repost, but please credit me


By Lettiebobettie

how do you make ur art look like its glowing?? it's gorgeous!!
I’ll give you a weird secret. After you put the glowing object on a dark background, surround the white parts with a halo of highly saturated color. Observe:

It doesn’t have to be that blatant- smaller outlines of color, blended properly with the background, can make an equally effective glow-y look :)

i literally love how your color and shade if it’s ok do you have any tips on digital coloring? you don’t have to answer this if you don’t feel like it :) thanks!!
hello friend!! i have a tutorial i made on twitter a while ago which is more or less how i make my colours more interesting. i still use the technique and in general it’s just a lot of colour adjustment nothing too special LOL here!!


-
 mkhx liked this · 2 months ago
 -
 maryjanecrunch liked this · 2 months ago
 -
 digiweed liked this · 2 months ago
 -
 moonscryptids liked this · 3 months ago
 -
 solarblue liked this · 4 months ago
 -
 beetle-ze-bub liked this · 4 months ago
 -
 roseybloodlust reblogged this · 4 months ago
 -
 burnt-tomato-slush liked this · 6 months ago
 -
 annita89toyqw9ih liked this · 7 months ago
 -
 shalvis liked this · 7 months ago
 -
 mormms liked this · 9 months ago
 -
 multidimensionalfang1rl liked this · 9 months ago
 -
 sciencesartlab reblogged this · 10 months ago
 -
 mylittleomens liked this · 11 months ago
 -
 dotdotdotpng liked this · 1 year ago
 -
 war-crimes-rhymes liked this · 1 year ago
 -
 aranxtil liked this · 1 year ago
 -
 geraltslastcoin liked this · 1 year ago
 -
 lies418 liked this · 1 year ago
 -
 astrodork-geogeek-mythonerd liked this · 1 year ago
 -
 thepoetjean-makes-stuff reblogged this · 1 year ago
 -
thepoetjean-makes-stuff liked this · 1 year ago
-
 ana-isnt-dead liked this · 1 year ago
 -
 stinkysoks reblogged this · 1 year ago
 -
 ghost-zon3 reblogged this · 1 year ago
 -
ghost-zon3 liked this · 1 year ago
-
 sirgogetter liked this · 1 year ago
 -
 modarthelp reblogged this · 2 years ago
 -
modarthelp liked this · 2 years ago
-
 artistrianna reblogged this · 2 years ago
 -
 sh-ticantdraw reblogged this · 2 years ago
 -
 umi-bluesea liked this · 2 years ago
 -
 justexistinguntilgetoldoneback reblogged this · 2 years ago
 -
justexistinguntilgetoldoneback liked this · 2 years ago
-
 marianna-mikusha liked this · 2 years ago
 -
 sherimcc liked this · 2 years ago
 -
 bonitoflakes13 liked this · 2 years ago
 -
 sakuralady21 liked this · 2 years ago
 -
 spectreburbank liked this · 2 years ago

Sylwester | i will mostly post sketches, because i'm too lazy to end them
196 posts