MPHFPC: (Miss Peregrine's Children) Ages From Oldest To Youngest. Also Age Where They Appeared To Look
MPHFPC: (Miss Peregrine's Children) ages from oldest to youngest. Also age where they appeared to look like*Theory
Enoch O'Connor - 117-118 (13-15 N:he’s the oldest but he looks like a baby :3)
Emma Bloom - 87 (16)
Millard Nullings - 87 (16)
Fiona Fraunfeld - ((Considered to be in late teens, Possibly 87)) (16)
Hugh Apiston - ((Considered to be in late teens, Possibly 87)) (16)
Horace Somnusson - 83 (13)
Bronwyn Bruntley - ((Unknown, possibly 83(?) or older)) (13)
Olive Abroholos Elephanta - 75 (7-8)
Claire Densmore - ((Considered to be youngest of the children)) (5-6)
Others:
Victor Bruntley - ((Unkown)) (17 *based on picture)
Jacob Portman - 16
More Posts from Katchu-art and Others
Hey!! just wanted to say me and my girlfriend love your casino cups and all your artwork too!! I was wondering how you do shading (it’s the hardest part of drawing for me)?
Ayy, thank you! I don’t know how to make proper tutorials but basically-


Also use layer masks- I’m not sure how the setup would look on other programs but on krita (the program I use) it looks like this:

Also…

I have two new iswm drawings coming out soon!


My shading tutorial!!!!
Me: look at how intelligent he is.
Me: yeah, I guess.
Me: and so level headed. So kind. So brave.
Me: ...what are you...
Me: OH MY GOD HE JUST COMFORTED THAT GYPSY BOY OH MY GOD.
Me: Stop. Okay, just stop it. You're not allowed to fall in love with a fictional invisible boy.
Me:
Me:
Me: OH GOD HE WANTS TO BE A TEACHER YOU'RE SO PRECIOUS LET ME KISS YOUR INVISIBLE FACE.
Wilford Motherloving Warfstache!


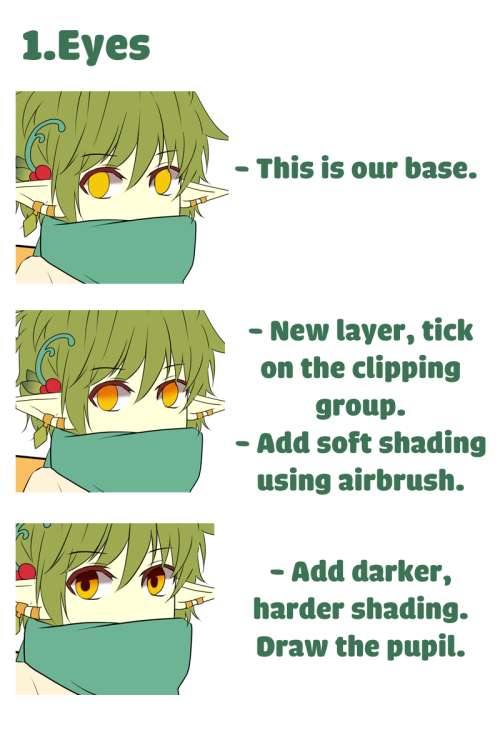


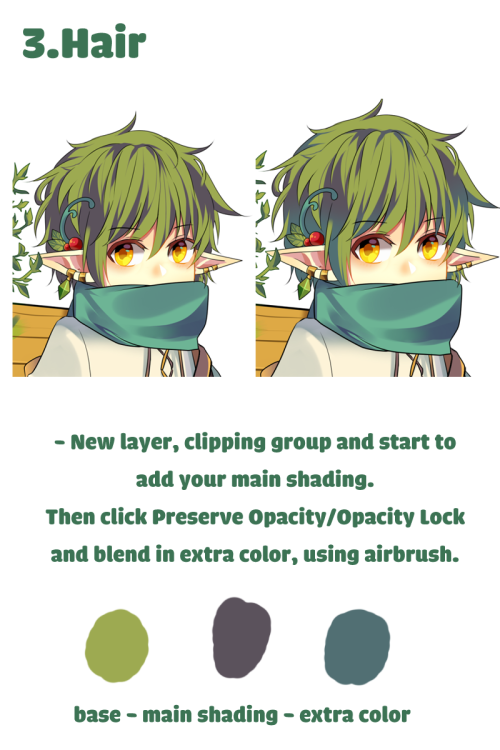
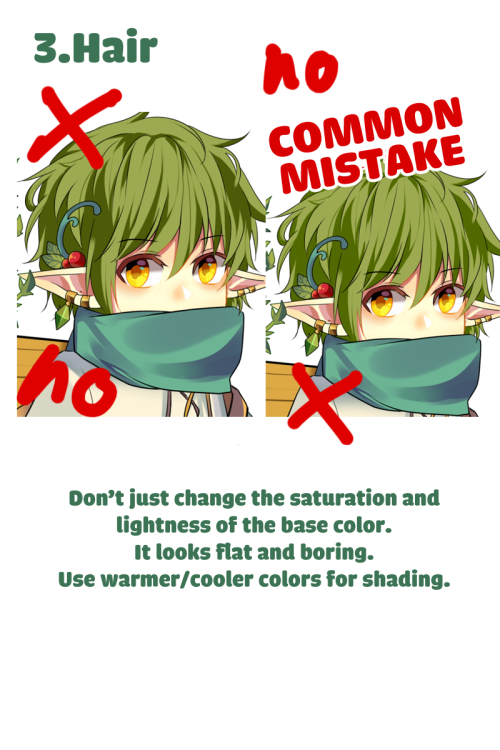


My friends asked me for an tutorial
For Paint Tool Sai users. There should be plenty of guides on how clipper group, preverse opacity/opacity lock works so I won’t be adding them here.
Excuse my lame English, I’m not a native speaker.
I can’t breathe
Here's yancy! I'm not fully happy with it so I'll probably will be drawing a new drawing for him.


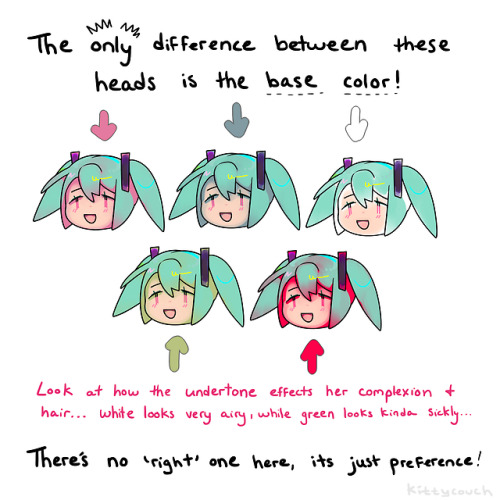

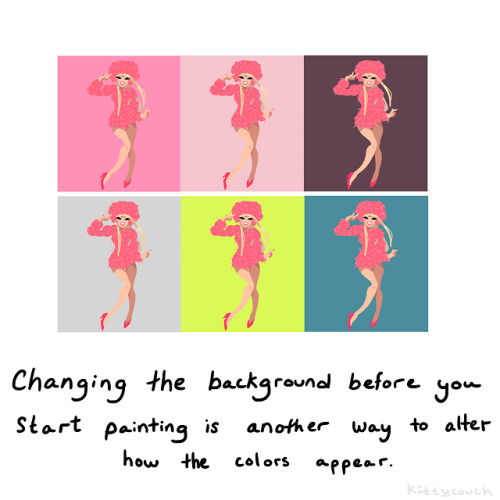
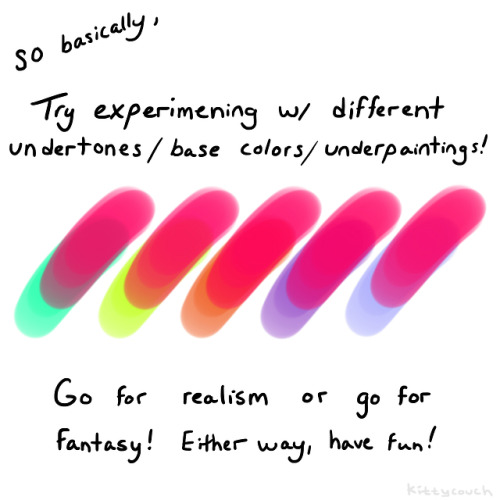
No one asked but here’s a brief tutorial on digital underpainting and how it can add some extra flavor to your art!
(I got asked this a couple times so just to clarify: I used “overlay” in the second slide… but the rest of these examples are JUST painted on, no effects! Try playing with the opacity on your pencil/water/brush tool to allow the base color to show through!)
Some Photoshop Tips
I’ve been getting quite a few asks about the process for the patterns in my stylized artworks, so I decided to put together a couple of tips regarding them.
Firstly, what you need are
— CUSTOM BRUSHES —
Most of the patterns I use are custom brushes I made, such as those:

For the longest time I was convinced making brushes must be super extra complicated. I was super extra wrong. All you need to start is a transparent canvas (2500px x 2500px max):

This will be your brush tip. When you’re satisfied how it looks, click Ctrl+A to select the whole canvas and go to ‘define brush preset’ under the edit menu

You will be asked to name your new glorious creation. Choose something that describes it well, so you can easily find it between all the ‘asfsfgdgd’ brushes you’ve created to be only used once

This is it. Look at it, you have just created a photoshop brush. First time i did I felt like I was cheated my whole life. IT’S SO EASY WHY HASN’T ANYONE TOLD ME

Time to edit the Good Boi to be more random, so it can be used as a Cool Fancy Pattern. Go into brush settings and change whatever you’d like. Here’s a list of what I do for patterns:
- under Shape Dynamics, I increase Size Jitter and Angle jitter by 5%-15%
- under Brush Tip Shape, I increase spacing by a shitload. Sometimes it’s like 150%, the point is to get the initial brush tip we painted to be visible.
- If I want it to look random and noisy, I enable the Dual Brush option, which acts like another brush was put on top of the one we’ve created. You can adjust all of the Dual Brush options (Size, Spacing, Scatter, Count) as you wish to get a very nice random brush to smear on your backgrounds

The result is as above. You can follow the same steps to create whatever brush you need: evenly spaced dots that look like you painted them by hand, geometric pattern to fill the background, a line of perfectly drawn XDs and so on.
BUT WAIT, THERE’S MORE
— PATHS —
But what if you want to get lots of circles made of tiny dots? Or you need rows of triangles for your cool background? Photoshop can do all of that for you, thanks to the magic of paths.
Typically, paths window can be found right next to Layers:


Draw whatever path you want, the Shape Tool has quite a bit of options. Remember, paths are completely different from brush strokes and they won’t show up in the navigator. To move a path around, click A to enable path selection tool. You can use Ctrl+T to transform it, and if you move a path while pressing Alt it will be duplicated.

Now, pick a brush you wish really was in place of that path you’ve drawn and go to layers, then choose the layer you want it to be drawn on. Then, click this tiny circle under the Paths window:

Then witness the magic of photoshop doing the drawing for you while you wonder how tf have you managed to forget about this option for the past 2 years

You can combine special brushes and paths for all sorts of cool effects. I mostly use them in backgrounds for my cards, but you can do whatever you want with them.

I hope that answers the questions for all of the people who were sending me inquires about the patterns. If you have any questions regarding this or any other Photoshop matter feel free to message me, I’m always up for complaining about how great and terrible Photoshop is C’:
-
 notsoshywarlock liked this · 1 month ago
 -
 spiraling-into-rainbows liked this · 3 months ago
 -
 yukierresstuff liked this · 5 months ago
 -
 hannahhook7744 liked this · 7 months ago
 -
 kixms4mx liked this · 1 year ago
 -
echos-of-laughter liked this · 2 years ago
-
 pain-in-the-ashe liked this · 2 years ago
 -
 cathyleighdoll liked this · 2 years ago
 -
 lizzygrantera liked this · 3 years ago
 -
 minmanmin liked this · 3 years ago
 -
 mycuretodespression liked this · 3 years ago
 -
 enochhhoconnner reblogged this · 4 years ago
 -
 cyberhon3y liked this · 4 years ago
 -
 kfczingermeal liked this · 4 years ago
 -
 0tr45hm0uth liked this · 4 years ago
 -
 homunculihoe liked this · 4 years ago
 -
 pan-didnt-die-forthis liked this · 4 years ago
 -
 birch234 liked this · 4 years ago
 -
 i-dont-know-make-it-cool liked this · 4 years ago
 -
 misty-cactus liked this · 4 years ago
 -
 curtispoets liked this · 4 years ago
 -
 indihome-suck liked this · 4 years ago
 -
 lympea liked this · 5 years ago
 -
 aerohmantics liked this · 5 years ago
 -
 katie-kat32 liked this · 5 years ago
 -
 bottles-with-caps liked this · 5 years ago
 -
 arrynnat liked this · 5 years ago
 -
 imightbesoju liked this · 6 years ago
 -
 soysaucedrunk liked this · 6 years ago
 -
 renjun-and-moomin liked this · 6 years ago
 -
 marrs-pop liked this · 6 years ago
 -
 redrosedemon liked this · 6 years ago
 -
 spikiests liked this · 6 years ago
 -
 a-curious-moment liked this · 6 years ago
 -
 yoyoyabusameold liked this · 6 years ago
 -
 wejustadaydream-blog liked this · 6 years ago
 -
 creatureofalatau reblogged this · 6 years ago
 -
 azuryn liked this · 6 years ago
 -
 cryptictrashtaker liked this · 6 years ago
 -
 liljim94 liked this · 6 years ago
 -
 akanewgirl liked this · 6 years ago
 -
 elinciaaaa-blog liked this · 6 years ago
 -
ankle-bite-r liked this · 7 years ago
-
 probably-ghostly reblogged this · 7 years ago

I don't know just random stuff and my drawings. kat / 22 /
43 posts