The Embroidery For The 1760s Waistcoat Is Officially Finished! This One Took Me A While To Complete,


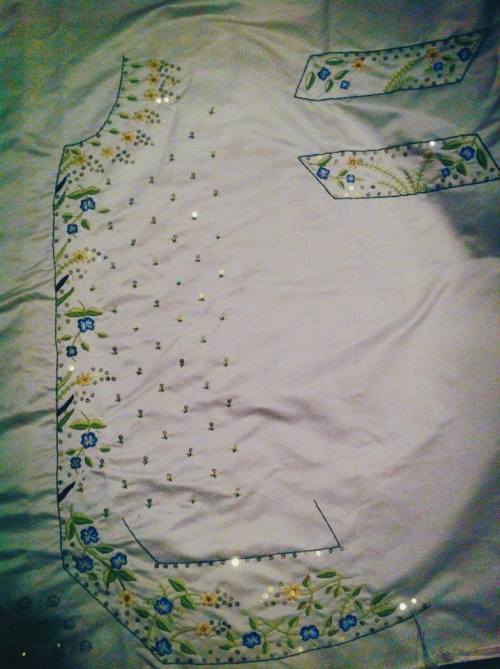
The embroidery for the 1760s waistcoat is officially finished! This one took me a while to complete, but looking back at my sewing diary I actually only spend a total of 16 days on the embroidery (though that was spread out over several months). As of now, I’ve put in around 150 hours, with more work to come.
The next thing to do is begin on construction. When it’s all finished, the waistcoat will be completely lined and have functional pockets. It will also be my first time making hand-sewn buttonholes, which is a little scary.
Now I need to figure out how to embroidery the coat that will go with this!
More Posts from Clusterfrock and Others
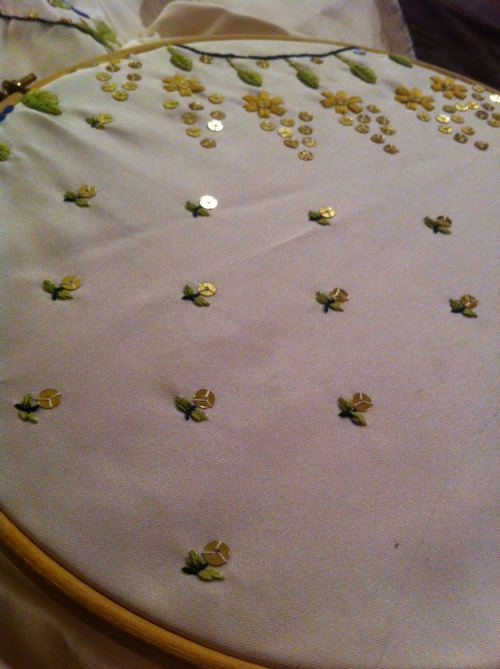
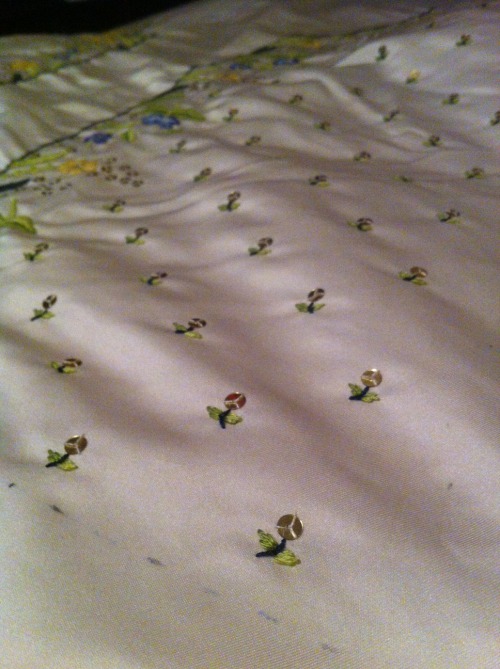
The fill pattern on one half of the waistcoat is finished! Tonight I’ll work on the other side and the remainder of the embroidery on the second pocket flap, and hopefully have all the embroidery wrapped up by tomorrow. Then it’s on to construction!


My latest finished project, based off a couple of extant bodices and a fashion plate which all had this snazzy cross-over front feature.
I actually made the skirt a long time ago as a historybounding, everyday thing to wear. It has alternating panels of striped and solid black cotton, and has a scalloped hem. I love it and wear it often, and decided that I was going to make a matching bodice so I could wear it to costume events, too.

I draped the pattern myself, based off of a couple of extants. Each seam is boned with artificial whalebone and the seam allowances were tacked down by hand with a herringbone stitch. The peplum is lined with black cotton, but the rest is just lined with cheap plain white muslin to save on cost. The bodice closes up the center front with hooks and eyes, and then the wrap panels are folded over and closed at the side seams.
Brain gremlins about my weight are under the cut for those that don't want to read it.
I finished this outfit a while back, but I've been struggling with whether or not I wanted to post it. It's not the outfit, I think that it turned out fabulously. But I've been really unhappy about my weight, and it's been a fight to remind myself that my weight is not my worth. I keep hearing the negative things my mother would say whenever I would gain a pound or two or the "positive" things she'd say when I lost them (things like "oh, you have a chin again!" or "I can actually see your waist now.")
So I'm trying to ignore all that and remind myself how awesome this dress turned out, how hard I worked on it, and how proud I am of the construction of it.


Embroidery on the 18th Century court suit is moving right along! This project started way back in February but had to be put aside because of how much schoolwork I was doing this semester. Now that school is out, I’m finally getting the chance to go back to it.
This suit is based on extant 18th Century court suits. The waistcoat is a cream duchess silk satin with cotton embroidery and metal spangles. So many spangles! I’m glad I have a fella that will let me make his clothes sparkly.
I’m hoping to finish up this week and finally begin the construction. I also need to make a new shirt for him before I can move on to the coat, so that’s in the queue, as well. Now to decide what embroidery pattern to use for the coat...


Whipped up a quick mantelet to keep me warm at yesterday’s Georgian Picnic. The outer fabric is a champagne colored taffeta, and it has a warm fleece lining. I edged the entire thing with marabou to simulate fur. It was nice and warm in our cool fall weather!
Early 17thC embroidered waistcoats are some of my favorite things. ❤️ Definitely one of my *someday* projects.

Woman's jacket, English. About 1610–15, with later alterations. Linen plain weave, embroidered with metallic threads and spangles; metallic bobbin lace. The Elizabeth Day McCormick Collection.
One of my favorites. Still planning to make my green version someday.


yellow silk evening dress with oak leaf design
c.1902
House of Worth
Fashion Museum of Bath
ⓘ A sewing machine is a device that provides a several-fold increase of the speed at which you can make mistakes


Back in 2015, I made this skirt for an 1860s ballgown. I wanted to make a daytime bodice to give the gown more wearability outside of formal events, but I had run out of fabric and since the fabric had lived in my stash for years, it had been discontinued long ago. I had a minor fabric miracle when I discovered some similar plaid taffeta on Etsy! I scooped it up and decided to make an 1850s bodice, since tiered flouced skirts like this were super popular then.
This bodice ate fabric, and I think I used three or four yards in total because the sleeves are massive and multi-layered. There is a black lace/fringe trim on the bodice, which you can’t see very well in pictures but is lovely in person.
The cap and bodice were made to accompany the new ensemble. The cap is made entirely from things found at Walmart, and the materials for the bonnet came from my fabric stash.
This hits so many of my niche interests, it's perfect. ♥
Bookbinding: A Stitch in Time
My mom has been hoping to get her hands on a hard copy of A Stitch in Time, which, as I'm sure most of you are aware, tends to be pricey if you can find it. (It's currently listed for ~$115 on eBay, and more expensive elsewhere.)
So, I decided to put my bookbinding skills to use and make her one for her birthday.


Notes on the design and construction:
The cover design was inspired by (or rather adapted from via considerable photoshopping) this book cover from 1901 that happened to cross my dashboard in a post with a bunch of other cool old book covers:

I created the Cardassian building silhouettes based on a screencap, and the DS9 silhouette is borrowed from the Niners logo. The orchid on the back cover emerging from the Obsidian Order logo is one I found in Cricut Design Space.


(Feel free to use these in your own projects, if you like.)
The bookcloth is by BOOKCRAFTSUPPLYCO on Etsy (dark green). The cover designs are HTV, Cricut Everyday Iron-On (black), Cricut Foil Iron-On (gold), and Vinyl Frog Metallic Foil (holographic silver). The Cardassian Union logos on the end pages were done using Cricut's foil transfer system (gold). The fonts on the cover are DS9 Title and DS9 Credits from st-minutiae.com.
Black & Gold 1870s Natural Form Dress

Quite possibly my most sparkly dress to date! I had plans to attend a Victorian weekend at the end of February, which included a Saturday night ball. Having precisely zero ballgowns, and wanting to go 1870s natural form for the event I started digging around for inspiration and fabrics.
I ended up staring at a gold and white dress from The Age of Innocence film, and in my head it slowly transformed into a gold and black gown. I purchased a length of African George fabric, which is similar to sari fabric and has an embroidered hem, and a silk chiffon shot with a metallic pinstripe, and used some black taffeta and plain black satin from the stash to help supplement.
I started with a fairly simple skirt pattern from Peterson’s Magazine. This skirt comes from the 1877 edition of Peterson’s Magazine.


The initial draft was fine, but it seemed a bit slim over my very voluminous petticoat, so I compared the two patterns and ended up adding a few more inches to the center front and center back in order to fluff up the body of the skirt.


Once I was happy with the pattern, I cut the fashion skirt out of black taffeta, and the lining out of silver taffeta. Since I was flatlining the skirt, they would be treated as one layer while I worked.
I wanted to work out how the fan pleats worked in the back of the skirt, so I assembled the back panels first and futzed around with the pleats until I was able to make them work.

Then I went back and worked on the front of the skirt. I assembled the two front skirt panels, but left the skirt back on its own for the time being since it would be easier to embellish the front and back separately before sewing them together.
Before I began embellishing the front of the skirt, I added a 6-inch wide hem facing, which I stiffened with a layer of tarlatan. I wanted this so the ruffles at the hem would get a bit of support.
Then I moved on to making the ruffles for the front of the skirt. The plan was for one ruffle in black taffeta, edged with gold ribbon, and a wider ruffle of the metallic chiffon, also edged with ribbon.
The taffeta ruffle was first. The strips were cut, assembled, and hemmed, and then a 1/4-inch wide gold ribbon was stitched down along one edge.

Once all the pleats were in place, the strip was sewn onto the front of the skirt, and I moved on to making the chiffon ruffle. Because the chiffon was so slippery, I decided to give the entire length of fabric a light starch bath before even cutting anything out. It gave the fabric a bit more of a crisp hand, and kept the chiffon from creeping all over the place while I tried to work with it.
From there, it was basically the same process as before, except with way more spraying and pressing and pinning. The chiffon was very springy and didn’t want to hold a crisp pleat, and the ruffle was several inches wider than my pleating board, which required more steps to get the top and bottom edges to press cleanly. Eventually, though, I was able to get some nice, crisp, flat pleats into the chiffon.


Finally, I could start on the apron front. I cut a wide piece of my George fabric and draped it over the front of the skirt. I played with the positioning of some pleats to just give it a little bit of volume toward the bottom, and stitched those in place by hand once I was happy with how they looked. Then I cut two panels of the embroidered selvedge and used them as hip pieces that would frame the front panel.

Then it was time to return to the back of the skirt. The back panel finally got its hem facing, and then I started on the ruffles. The plan here was for two of the ribbon-edge taffeta ruffles, with a pouf of the embroidered satin up top, opening up in a fan that would end at the top edge of the hem pleats. So, more taffeta ruffles were made. Since the train is quite long, this ate up quite a bit of fabric!

To make the embroidered section of the skirt fan, I used the Peterson’s skirt pattern again, but I flipped it so the straight edge was against the finished hem of the fabric, and the curved edge was at the top. I also folded the pattern so that it was a good foot shorter, so it would lay right at the top of the ruffles and not obscure them.

I was a little stumped on what to do for the top half of the skirt back for a while. I didn’t have a lot of my embroidered satin left, and what I did have was in long, narrow cuts. I decided to make use of the remaining scalloped edge, and cut two 35-inch long pieces, which I pinned to the side-back seams and then pleated into a rounded shape. I had one 28-inch length piece left, which had no embroidered edges, so I placed that panel in the middle to give some additional fullness to the bustle pouf. It all turned out to be just enough fabric to make the back pouf, and I was very pleased with how it ended up looking.

At this point everything was just pinned together, so the next step was actually to carefully stitch this entire concoction together, which I did mostly by hand. Last but not least was to install a placket and waistband. Instead of going into the center back like I usually do, I put the placket/skirt opening on one of the side seams so it wouldn’t interfere with the bustle pouf in the back. The top edge of the back pouf extends a couple of inches over the placket and attaches with a snap, completely hiding the skirt opening.


I had been working on the skirt every spare moment hoping to give myself plenty of time to work on the bodice, but I still ended up in a time crunch, with only two weeks before the event to put something together. I decided that I wasn’t going to drape my own pattern, since that would require multiple fittings to get it just right, and instead decided to use Truly Victorian’s TV416, and just make a plain black satin bodice straight from the package. I did one mockup to adjust for size, since I know from experience that their patterns are always very wide in the shoulders and long in the waist on me, and then I dove in and began cutting out my final bodice.
I didn’t have any of the embroidered satin left which I could have finagled to give me plain bodice pieces, but I did have a bolt of black satin in my stash, so that’s what I ended up using. The two black colors are not quite a match, but luckily they’re close enough that it’s not super noticeable.
Even though it was a quick and plain bodice, I still wanted to construct and finish it well. There’s boning on the front darts, and I finished the top and bottom edges with a piped facing. I didn’t want to spend time making separate piping, so I sewed one edge of the facing in, placed some yarn between the facing and the seam allowance, and then stitched in the ditch to create the piping. And it worked well! Then I turned under the raw edge of the facing and hand-stitched it to the lining.

I did the bulk of the work on the bodice in the week leading up to the event, but, as is tradition, I was working on it at the last minute in the hotel room. I had to attach all the hooks for the closure and make all the thread bars, and I was sewing right up until about 10 minutes before we had to get ready and go!

But the dress was a success! I wore it to dinner and to the ball, where it performed beautifully while dancing.


-
 sunrise-cerebellum liked this · 11 months ago
 -
 hummingwyrd reblogged this · 11 months ago
 -
 ask-schoolmaster-alfred liked this · 5 years ago
 -
 transmercutio liked this · 7 years ago
 -
 vinceaddams liked this · 8 years ago
 -
 vestireltiempo liked this · 8 years ago
 -
 clusterfrock reblogged this · 8 years ago